معلومات عنا
دعم العملاء
احصل على التطبيق

قم بتوجيه الكاميرا لتنزيل التطبيق
حقوق الطبع والنشر © 2024 Desertcart Holdings Limited


🎨 Transform your space effortlessly—paint smarter, live brighter!
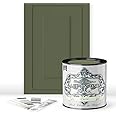
Heirloom Traditions ALL-IN-ONE Paint offers a premium, water-based matte finish with built-in primer and top coat, eliminating the need for sanding or priming. Featuring 30 curated colors, it covers 140 sq ft per 32 oz can, dries fast with low odor, and is waterproof for both interior and exterior use on diverse surfaces including wood, metal, glass, leather, and tile.


| Brand | Heirloom Traditions Paint |
| Color | Crete |
| Finish Type | Matte |
| Size | 32 Fl Oz (Pack of 1) |
| Item Volume | 32 Fluid Ounces |
| Special Feature | Low Oder, Fast-Drying |
| Unit Count | 32 Fl Oz |
| Paint Type | Oil, Watercolor, Acrylic |
| Specific Uses For Product | Cabinet,Cabinets,Doors,Floor,Furniture,Glass,Tile |
| Surface Recommendation | Ceramics,Glass,Leather,Metal,Vinyl |
| Item Form | Liquid |
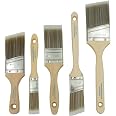
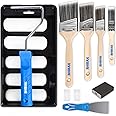
| Included Components | Roller, Paint Cup, Brush |
| Age Range (Description) | Adult |
| Is Waterproof | True |
| Model Name | DE-E1VY-3GNJ |
| Package Information | Can |
| Full Cure Time | 24 Hours |
| Coverage | 140 sq ft |
| Water Resistance Level | Waterproof |
| UPC | 682962386905 |
| Manufacturer | Heirloom Traditions Paint |
| Part Number | DE-E1VY-3GNJ |
| Item Weight | 2.31 pounds |
| Product Dimensions | 4.25 x 4.25 x 4.75 inches |
| Country of Origin | USA |
| Is Discontinued By Manufacturer | No |
| Finish | Matte |
| Material | water based |
| Item Package Quantity | 1 |
| Number Of Pieces | 1 |
| Special Features | Low Oder, Fast-Drying |
| Batteries Included? | No |
| Batteries Required? | No |
C**M
Great paint to work with !!
I bought this paint and I also bought the bundle with the bristle brush, sponge, applicator, and Sponge roll brush and deglosser wipes I definitely recommend these.I only needed two coats of paint. I was painting over a high gloss cherry finish furniture that I’ve had over 30 years.The first coast of pain I use the sponge applicator and then.” punched” down as the tutorials suggest to get a far more even and complete coverage for the first coat. You really need to use a liberal amount of paint. I suggest doing sessions at a time so you’re working with paint that is still wet.I waited three days and then applied the second coat with the brush. I personally didn’t have a ton of luck with a sponge roll brush to eliminate brushstrokes, but it didn’t affect the quality of the outcome. Again, I suggest using a very liberal amount of paint so it goes on thick and brush this coat unlikely. If you apply too much pressure, you run the risk of pulling your first coat off.I let this coat dry another 36 hours before returning the drawers and then putting the hardware back on.It is very true in terms of it’s going to take a full 30 days to truly set and “cure” so I won’t be putting anything on top of the dresser until then so I don’t risk any paint scraping off and needing to touch up.I looked at the tutorials on their YouTube channel.
H**H
Loved using this product, testimonial from a not-craft first timer
Yup, I’m hooked. I am the worst painter and with a sponge brush, there were no lines. My husband is a builder and hates when I paint because he feels it is a reflection on him when people come in the house. BUT if I waited for him to paint, forget it. So I paint sometimes. I’ve gotten better but still not up to his standards. Also, he has been opposed to all this chalk paint DIY that’s been the new rage, he was so opposed to anything that would chip off or need yearly waxing. He’s just all about his Ben Moore. Anyway, I had an awful vanity that needs to be replaced. It’s the type that is surfaced in that wood look shiny paper. We aren’t replacing until next year and I hate looking at the eyesore when the rest of the bathroom is so nice and done. I said, screw it, I can’t make it worse, so I informed him I was going to try chalk paint. His response was fine, at least we can wash it off before it cures when you realize how bad it will look. So I set out, fully prepared that he would be disappointed, lol but what the heck, try new things. First off, my vanity was NOT the ideal surface for painting and even less ideal probably for chalk paint. Completely non porous. I degreased as recommended. So it took me at least 4 coats to cover because of the surface material (slick, paint doesn’t absorb). For reference, I painted a small wood item, too - a tissue box - and it looked great from coat one and the second coat was perfection. So it’s all about the surface when it comes to coats. Anyway, when I was done, my husband came in and said - wow - that’s the best paint job you’ve ever done. LoL. Funny, because I literally was SO messy doing this. It was Friday, working from my home office on quarantine, and there was a bottle of wine involved (it was a stressful work from home day full of COVID related complications at work, we are in an epi-center and that day really sucked for someone to working in HR in an essential industry). I was basically hitting it every 2 hours (the wine and the painting), breaking all the rules of painting, just to get away from my desk. But it was my best work ever, according to him, haha. And it really DOES look good - it almost looks sprayed on. I cannot take the credit for that, at all - this was not skill, this was entirely product!! So smooth. And the color is GREAT! Highly pigmented, Abbey is a perfect dark greige (is it brown, is it charcoal - who knows?! It works great with our weather barnwood and transitional/loft style master bath decor). Very easy clean up, too - again, I was drinking wine and by coat 3, I was really not caring about coloring inside the lines. Cleaned right up from the white tile and white painted walls, no staining. I mean, I don’t recommend being as careless as I was, I’m just saying that a wayward drop of paint didn’t destroy what it landed on, and I didn’t have to prep for protection anywhere near what I do with latex. And it dries super fast (yet didn’t dry out in the paint tin I was using for application).The only downside - and it’s probably mostly to do with the surface material, 100% - easy to chip in spots. Again, considering the surface material will not grip it like a wood, that’s not the paints fault. What I did was to hit it that weekend with 3 coats of General Finishes flat top coat (that’s the good stuff and highly recommended by woodworkers as a top coat and reviewed as best overall top coat for chalk paint - speciality item, won’t find it at Home Depot). I spent the extra $ on it because I was so happy with my cheap little chalk paint job that I wanted to give it respect! Haha, true though - I want to keep it looking as good as it does. So while you are supposed to not need a wax or a top coat, I did use one - but you may not need one on a better surface. I am using the rest of my paint to do a porous wood hamper - I may not need a top coat with the wax built into this product and a surface that will accept paint.Anyway back to my builder husband. Mind you, when I say builder, he builds million dollar homes and multi-million dollar remodels in the Boston area. Best quality of everything for these people, we’re talking $1000 shower heads. Ya, I know, you’d think I wouldn’t be refinishing a crappy $200 vanity in my own home, but that’s how it goes with someone who doesn’t want to work when they get home from work and I have to force to be house-proud. He can build amazing things but he could care less about whether his home decor is outdated from 30 years ago. Anyway, he has decided that he is going to chalk paint our sleigh bed and bureaus now. He’s going to do it because even though my work was “great”, imagine how great it will be if he does it (he’s not wrong, just a little full of himself lol). I wanted to buy a new set and I still do, but at least now our old one will match the master remodel we are finishing up until I can get one. It won’t be an eyesore to me every time I walk in the finished room and think about how I have to wait to replace it. We’re going to try antiquing this time for a weather look. I’m sure it will be lovely.Anyway, if you’re thinking about diving into chalk paint, I recommend this brand very much. I’m not sure I would have had the same experience with other brands that seem to have a lot more of a learning curve and a lot more steps involved. Plus Heritage has a ton of examples on their website to give you inspiration. I may even try their gel stain next (just wish they still offered it in Carbon, what’s up with only the one color, Heritage?). I may even join their monthly club for the new colors. Lots of fun, I’m seeing a lot of projects with this product!!
N**P
What a transformation!
We bought this paint originally thinking our kitchen cabinets were chipboard, but after using the same prep products, wipes and rough sanding, we quickly realized they were actually solid wood. If they had been chipboard, I think one coat would’ve done the trick. But because the wood really soaked up the paint, it ended up taking about four to five coats to get full coverage. Just a heads-up if you’re working with real wood: it really drinks the paint. But a little paint goes a long way with this product.The degreasing wipes that you can buy from the same product line were just okay. Honestly, they ran out pretty fast, so I’d recommend skipping those and grabbing a heavy-duty degreaser from somewhere like Home Depot instead.I also bought the recommended paintbrush for this paint and I have to say, it was fantastic. It made painting the cabinet doors much easier and gave a really nice finish. The paint dries quickly (which is great), but that also means it can run if you’re not careful. I had to keep going back over it to smooth things out as I went. It’s definitely a process and not a quick job, but absolutely worth it in the end.Our cabinets are probably 50 years old, and now they look totally modern. I’ve attached pictures so you can see for yourself. I’d definitely recommend this paint, but I also suggest doing a little research first. Make sure all the grease is off, rough sand well, and be ready to move fast when painting. Brush worked best on the doors, but for the actual cabinet frames, foam rollers gave a smoother finish. I bought Heathered Grey which is a light grey. The last picture is the before photo. This was my first time painting cabinets and overall, I am very happy with the results!
ترست بايلوت
منذ 3 أيام
منذ شهرين