معلومات عنا
دعم العملاء
احصل على التطبيق

قم بتوجيه الكاميرا لتنزيل التطبيق
حقوق الطبع والنشر © 2024 Desertcart Holdings Limited


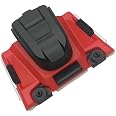
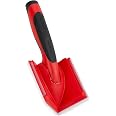
🎨 Edge Your Way to Perfection!
The SHUR-LINE Paint Edger Pro model is designed for professional results, featuring a 180-degree swivel handle, retractable guides, and a woven pad for smooth, straight lines. This lightweight tool allows for quick and clean trimming around windows, doors, and moldings, making it an essential for any painting project.
| Brand | SHUR-LINE |
| Size | Professional Paint Edger |
| Color | Red |
| Model Name | 1000C |
| Sport | Paintball |
| Material | Plastic |
| Style | Classic |
| Item Weight | 0.01 Ounces |
| Shape | Round |
| Product Dimensions | 6.75"W x 3.13"H |
| Cross section shape | Round |
| Air Gun Power Type | CO2 (carbon dioxide) |
| UPC | 022384010000 |
| Global Trade Identification Number | 00022384010000 |
| Manufacturer | SHUR-LINE |
| Part Number | 2006562 |
| Item Weight | 0.01 ounces |
| Country of Origin | China |
| Item model number | 2006562 |
| Is Discontinued By Manufacturer | No |
| Pattern | Solid |
| Thickness | 1 Inches |
| Item Package Quantity | 1 |
| Included Components | Unit^Instruction Guide |
| Batteries Included? | No |
| Batteries Required? | No |
W**Y
Unreal!!!
This inexpensive tool has been amazing. I can edge a room (crown molding, doorways, windows, and baseboard molding inside 30 minutes). I load the product with my paint brush...I do not dip it as instructed. I saw this trick on YouTube and am I glad I did my research. Be mindful not to put too much paint on the pad each time you load it or you could have a "bleeding" problem where the paint will possibly run a little and ruin your crisp trim line. Pressure is a key as well. Watch a few YouTube videos from professional painters who use this tool; you'll get the hang of it in no time. The inside corners are the ONLY places you need a paint brush. I actually go around my room first with the paint brush and get the inside corners and then edge with this tool, then roll and done. Clean up is a breeze too. Even if you used oil based paint, the pads are not that expensive if you used once and tossed. I never used it on a pole, but used it to trim the walls and even a fair amount of ceilings in my 4,000 sf home...so you can do the math on how many 100's of feet I have trimmed...lots of work, but this product does a really nice job.You won't be disappointed; I highly recommend this product.
G**L
confortable
Easy to use and comfortable to hold while using
F**N
Must have time saver!
Like the headline says this is a must if you want to save some time painting. I think where others have problems is in thinking this is a magic device. It's not magic, it is a tool and it requires skill and technique to use. You will not have perfect results the first time you use it, but you can develop a technique quickly.1. Don't overload the pad. The applying paint to the pad with a brush works, but so does using a roller tray and dragging paint onto the slope and loading there.2. Do not start dragging directly up against the trim or wall. Start 2-3" inches away and drag backwards and forwards once or twice before heading towards the trim in the intended direction. This allows the paint to spread out evenly across the face of the pad,3. Pay attention to how hard you are pressing the pad into the wall. Using too much pressure will squeeze paint out past the wheels and into the edge you are forming. This will take some experience, but it can be mastered on the first wall you try.4. After dragging a 3-4 foot section of wall make one final swipe in the opposite direction over the line where the painted area meets the unpainted wall. This will smooth out any raised paint line created by the edge of the pad and allow the pad painted area to blend in with the area you will be rolling later.
M**A
Nice idea, but terrible in practice
I've read a lot of the reviews that tell you to use a brush to apply paint to the pad, and followed their instructions. I was as careful as I could be, didn't get paint on the wheels, and still, this thing just made a mess of the line between my wall and the ceiling. I will have to clean it up and cut it in by hand.This tool is a nice idea, but working with it in practice is not at all like the promotional videos make it out to be.
L**.
Not the best
Was really hopeful that this would help save me some time and headache. While it’s not horrible, it definitely doesn’t give you a perfect edge. If you apply too much paint, it will get on your baseboards, trim, or other wall if you’re doing another color. I’m definitely going to have to touch up a lot of things now after using this. You will still have to go in with a brush to bring your paint line closer. Luckily I’m changing out my baseboards and the other wall will be a different color so I can paint over the mistakes.
A**R
It’ll pay for itself easily in saved tape!
We couldn’t be happier with this little tool. We painted our whole house ourselves and hardly had to use tape because of this. Get close along baseboards, ceilings, window details, you name it! It does take a slight learning curve, but if you angle the wheels upward, you’ll get it right up flush to the edge. We were also able to paint our high ceiling edges above our stairwell by attaching this to a pole…saved us hundreds because we didn’t have to hire a painter to do the job. And it saves so much time because you don’t have to apply or remove tape. We’re snobs when it comes to good-looking painted edges but with this we had no drips. I’d recommend it to anyone!
M**G
Not for perfectionists
I'm not a professional painter but I'm pretty handy in general and have probably painted 50-75 rooms in my life. Never have I wanted more for a product to work well, because I really hate painting ceiling edges. I read all the tips from other reviewers and followed them. I practiced on door and window frames. I still couldn't get the ceiling edges right.Everything has to be perfect with this product. You must load the paint with a brush, get the right amount of paint on it, not get too much paint close to the wheeled edges (it will leak onto the ceiling), use just the right amount of pressure (how do you define and explain that?), and hope the contractor who built the home achieved consistently straight and sharp wall-to-ceiling edges (which my home doesn't have.)The skill development curve is unreasonably long. I'm going to have to resort to masking tape to fix the situation.
A**D
I recommend this to others
Affordable and easy to use. If you set it into paint make sure you use side of paint tray to get extra paint off before use or use a paint brush to apply paint evenly. Easy to clean but make sure you keep a cloth near so you can wipe off the black guard located with the wheels so you don’t get paint where you don’t want it. I check and wipe the guards after applying paint each time before using. In my photos edges weren’t straight with original paint before I painted so ceiling edges need to be done also. So In my photos the edges may not appear to be straight but they definitely are straight. I haven’t used this edger with a pole/extension attached, only used by hand.I do recommend this to other!!
ترست بايلوت
منذ 5 أيام
منذ أسبوع