معلومات عنا
دعم العملاء
احصل على التطبيق

قم بتوجيه الكاميرا لتنزيل التطبيق
حقوق الطبع والنشر © 2024 Desertcart Holdings Limited


🚗 Repair with Confidence - Your Ride Deserves the Best!
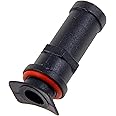
The Dorman 10691 Radiator Overflow Tube Repair Kit is a universal solution designed for a wide range of applications. It features a durable plastic construction, a leak-resistant O-ring for a tight fit, and is easy to install. Backed by Dorman's ASE Blue Seal Certified technical support, this kit ensures long-lasting service and reliability.
| Brand | Dorman |
| Material | Plastic |
| Color | Blue |
| Item Weight | 0.02 Pounds |
| UPC | 037495106917 |
| Manufacturer | Dorman Products |
| Global Trade Identification Number | 00037495106917 |
| Item Weight | 0.32 ounces |
| Product Dimensions | 5.5 x 2 x 1 inches |
| Country of Origin | USA |
| Item model number | 10691 |
| Is Discontinued By Manufacturer | No |
| Exterior | Ready To Paint If Needed |
| Manufacturer Part Number | 10691 |
| OEM Part Number | 10691 |
R**Y
Works on Nissan Titan - make sure to file the surface flat
TLDR. I installed this into my Nissan Titan 2004 and it leaked. Then I removed it and made sure to file down the outer surface of the radiator neck so the o-ring could be seated properly. Seems to be working fine now.The kit comes with 3 pieces : inner nozzle (OD=5/16"; threads 23/64"); outer nozzle (OD=3/8"), and o-ring (5/16"). The inner nozzle fits inside the radiator neck, then place the O-ring, and screw down the outer nozzle. If the inner nozzle is too long for your radiator neck, you may have to shorten it by cutting it with a dremel or hacksaw. It fits fine in the Titan.Installation. Place a shop rag in the radiator neck to prevent pieces from dropping into the radiator. File down the broken nipple. Enlarge the old hole. When drilling on the Titan remove the plastic engine cover to get a better angle. Carefully enlarge the hole with a 5/16" bit, and then a 3/8" bit (or 23/64"). On the Titan, ideally, you should enlarge the hole by making it straight and centered slightly above the old hole center. However, I ended up just drilling into the old hole and angling the new hole up slightly toward the radiator cap. This unfortunately put a gap in the bottom of the new hole, so the first time I installed it, it leaked at this gap. Then I used a flat file to more aggressively file the outside of the new hole so it was completely flat so that the O-ring would seat flush on it. I checked it by placing the file flat on the hole and used a bright flashlight to check that light did not leak through the bottom gap. Someone mentioned using two o-rings, inside and outside, but I tried that with another similar o-ring I had but the extra thickness made it difficult to tighten. Someone else mentioned using a larger O-ring and I happened to have a pack of thicker 9/16" OD x 5/16" x 1/8" o-rings from home depot. These o-rings were thicker than what came with the kit. I'm not sure if the smaller o-ring that came with the kit was sufficient, but I ended up using just one of the thicker o-rings. The instructions say to screw down the outer nozzle finger tight. Then use a wrench to turn it 1/2 turn. If it leaks, turn it 1/4 turn more, but don't crush the o-ring.In my install on the Titan, the new nozzle points at a downward angle. The inner nozzle "wings" are kind of bent at an angle. On the Titan, the radiator cap is just flat and doesn't have an external spring, so I did not have to worry about any clearances or blocking of the cap spring like on some other vehicles.The OEM Titan overflow hose is 5/16" ID, approximately 33". I tried to re-use the OEM 5/16" hose, but it fit very tight and was a pain to take it off again. I replaced it with 32" of 3/8" ID heater hose ($6 Gates Safety Stripe 28409 / 3270) cut from local auto parts store. I re-used the old 5/16" spring clamp on the coolant overflow tank, but used a new hose clamp at this new connection because the old spring clamp seemed a little tight on the new 3/8" nipple.Started the Titan again and no leak. Refilled some of the coolant lost from the first time it leaked. Then re-started and got it up to temperature. So far it's holding fine.FYI: I broke the original overflow nipple while leaning over the engine to change the spark plugs. Just goes to show you, mess with one thing, but break another.... I could just install a new radiator which I think would take me about 2 or 3 hours (since I already changed the condenser and it's messy but not too difficult) and I've thought about putting in a better radiator anyway. But this fix was just easier and cheaper for now. And since I already bypassed the fluid-fluid cooler (transmission oil to radiator), I'm not too worried about ruining my transmission if the radiator cracks (strawberry milkshake of death). If this fix starts to leak, I might try patching it with jb weld, but I'll probably just get a new radiator. But I feel like this is a mechanically solid repair.
M**U
was surprised of this product
i did not know these were available. this one worked great.
J**H
'11 Corolla Bypass Hose at filler neck
Successfully (so far) used it to repair the connection at the filler neck for the upper bypass hose on an '11 Corolla. The part is otherwise not repairable on the all-plastic radiator, and this seemed worth a shot to avoid the lengthy job of replacing the radiator. The original hose nipple is not centered on the filler neck, which presented a challenge- mainly with wall thickness, and the fact that the little wings on this are meant to contact the inside center of the filler tube. I was able to use a Dremel with several sanding disks to sand it. down evenly. This took quite a long time as the plastic would just melt at all but the slowest rpm of the Dremel. Also, I needed to get the wall thin enough to get enough threads on the threaded tube to ensure it compresses the o-ring. Then I still had to use a sanding drum on the inside of the tube to get the wings to sit flush. In order to ensure the inside section stays put, I opted to epoxy it in with loctite high temp 2 part putty. I simply rolled and wrapped a bead around the inside part before inserting it. This has the added benefit of compressing into the hole I drilled in the filler neck sealing it fully. I let it sit over night before stress testing it. No leaks! As long as the outer section stays threaded on, it should all hold. If not, I suppose I'll just use some more hi temp epoxy.
S**R
Saved my Accord!
This tiny repair kit saved my Accord! The man we bought it from did "repairs" on it prior to giving it to us and I didn't realize until it was too late to take back that he had "repaired" a broken radiator by duck taping the overflow tube to the radiator because it had sheared off completely! Luckily all it took was a little drilling, this kit, and some stopleak, and she doesn't leak coolant anymore! Yay!
D**B
Flawed product.
Great concept, but this is not a quality product, it never did seal right. Every time I tried to tighten it, it just ran out of thread and popped loose again. This product waisted my time and money with the false hope of a quick and easy fix.
A**S
Does the job
It worked perfectly with epoxy glue
C**R
O ring very small.
I had to add a thicker o ring to seal off the leak. The hole you have to drill is 3/8" for the unit to fit. The o ring is also 3/8". The o ring will not stop the leak. The larger o ring is working for now. I check it often.
R**H
Does not reliably seal.
Thin plastic, tiny o ring, doesn't seal well. If you need a very temporary 'fix' to drive a few miles, then this might help. I put this on my 2012 Armada radiator. Drilled a hole, filed o ring surface flat, and installed. The tiny plastic threads and the skimpy o ring will not allow you to reliably tighten this on, certainly not enough to trust it. Normal driving will have it leaking in no time. I finally threw the o ring away and JB Welded it in.
ترست بايلوت
منذ 3 أسابيع
منذ 3 أيام