🚙 Build the Past, Drive the Future!
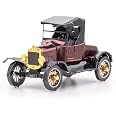
The Fascinations Metal Earth 1908 Ford Model T 3D Metal Model Kit is a meticulously designed hobby model that allows you to assemble a detailed replica of the classic vehicle. With 51 precision-cut metal pieces, this kit requires no glue or solder, making it accessible for hobbyists aged 14 and up. The compact size of 3.5 x 1.95 x 1.8 inches makes it perfect for display, while the illustrated instructions ensure a smooth assembly process. Ideal for collectors and vintage car lovers, this model is a timeless addition to any collection.
| Material Type | Metal |
| Size | Small |
| Number of Pieces | 51 |
| Item Weight | 50 Grams |
| Item Dimensions | 4.88 x 0.08 x 6.77 inches |
| Additional Features | Hobby model kit, easy assembly without glue or solder, superior detail |
| Style | Vintage |
| Seasons | All Seasons |
| Theme | Vehicle |
| Color | Multicolor |
A**R
... put together more than 50 metal earth models and love every one of them
I've put together more than 50 metal earth models and love every one of them. Many times you can find a set of multiple models for a much lower individual price. Some are just harder than others. A few considered "easy" on metal earths web site have been harder than ones considered "challenging" or "expert". I like the harder ones. Spending $7 to $10 on a model that I put together in less than 20 minutes sucks. Having the proper tools is a must. A pair of small wire cutters (I purchased the Hakko CHP-170 for less than $5), a small pair of pliers or two (I purchased at Hobby Lobby in the jewelry section), a set of small electronic/watch repair screwdrivers (to bend the tabs or to take apart when I mess up), and since my eyes are not what they used to be, a head magnifier or cheap reading glasses you can get at any dollar store. I search around the house for things that may help. Round pencils, small wood dowel, markers of different sizes, anything that fits the shape I need.Many of the pieces in the models are very small, and the tabs to be bent or twisted are hard to get to or manipulate. But isn't that the idea of a model? With all Metal Earth models, take your time and if something doesn't seem to fit then stop, backtrack, and look and see if you missed something or have a wrong piece in the wrong place. The instructions are easy to read, but on the more than 50 models I have put together only 2 or 3 have had an error in the instructions. I have learned that if you come to a spot in the instructions that is hard to understand then slightly twist the tabs. This allows for a much easier time taking apart. You can then bend or twist the tabs when you know it is correct. The tabs can be bent several times before they break (I can't seem to put together any of them without messing up and having to take a piece or two off to correct).
P**R
My first and I enjoyed it
This was my first metal model and I really enjoyed putting it together. I found it to be the right level of challenge for me -- not too easy and not too hard. Others might find it more challenging than they expect/want.Some cautions/caveats:* Some of the pieces are extremely tiny. It's very easy to drop a small piece and then spend the next 15 minutes trying to find it under the couch. It's a good idea to work on a piece of black fabric, so pieces are easy to find if you drop one.* Don't even think about trying to put this together without at least a pair of needle-nose pliers. Tweezers, wire-cutters, and a tool that lets you bend the metal into curves are also very helpful.* Follow the instructions closely and don't rush. Trust me, once you attach a piece, you don't want to have to detach it.* There are a few points in where the instructions aren't as detailed as they could be. Notably, assembling the wheels and attaching them to the chassis has to be done in a set order that the instructions don't sufficient emphasize -- you may want to attach the inside wheel-rim to the tire/outside wheel-rim before attaching the entire wheel to the chassis, but it's important to attach the inside wheel-rim to the chassis before attaching the rest of the wheel to the inside rim. The instructions should make that clear, but they don't.* This took me about three hours of work to assemble and the result looks very nice!
J**.
Just say NO!
OMG. I NEVER leave a review for anything but this is SO insane that I just have to! This thing is SO minuscule and flimsy that you can't even put it together! it's literally smaller than the palm of my small female hand and is breaking as we are using the recommended "tweezers" (I kid you NOT) to put this together. DO NOT BUY THIS UNLESS YOU ARE A FAIRY!!!
M**N
Look
Beautiful look. The detail is great and some parts even functioned unless I have the wrong car. My son had great fun building it
T**N
TOUGH little model but will look very cool when completed.
Just began on the model a couple nights ago. Had to stop because I realized I needed much better flush cutters. After buying a couple of MUCH needed tools (magnifying light stand, FLUSH side cutters) I restarted building. The small round pieces are not impossible to do correctly BUT be warned, you should have a set of metal dowels or drill blanks or gage pins to help roll/form the circular parts.This will take me at LEAST 10 hours to complete (my best estimate). I am a skilled tool and die maker and I am used to working under a microscope. I have nearly every tool imaginable at my disposal, but I needed that magnifying stand, these are VERY small parts indeed and my 49 yr old eyes wouldn't do it without help!!I think a dentist or surgeon would enjoy this model, needs a lot of care and precision to make. This model is NOTHING like a plastic model. Soem basic knowledge of steel is helpful. The stainless steel parts are very ductile (soft). The sheet is annealed, so it bend very easily. this is good AND bad sometimes. It is a bit tricky to bend one thing and NOT make bends where you don't want them, you need some long nose small pliers with NO serrations in the jaws. GET A REALLY BRIGHT LIGHT!!I include a few pictures of how far I've gotten. The little radiator cap was not too bad, but the headlights were difficult to do nicely. Like I said get some metal pins/dowels to wrap around to pre-form and it makes it easier. Use a small abrasive stone or a Dremel and diamond point to remove any flash that can interfere with fitting to other pieces.
ترست بايلوت
منذ 3 أسابيع
منذ 4 أيام