🎨 Elevate Your Airbrushing Game!
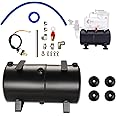
The OPHIR 3L Air Tank Kit is a versatile and durable solution for DIY airbrush compressors, featuring a large capacity, auto start/stop functionality, and lightweight design. Ideal for hobbyists and professionals alike, this kit includes all necessary components for easy installation and optimal performance.


| Brand | OPHIR |
| Voltage | 1.1E+2 Volts |
| Recommended Uses For Product | Spraying |
| Power Source | Corded Electric |
| Noise Level | 30 dB |
| Special Feature | Customizable |
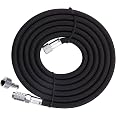
| Included Components | Filters, Air Hose |
| Item Weight | 3.96 Pounds |
| Maximum Power | 0.2 Horsepower |
| Capacity | 3 Liters |
| Color | Silver Or Metallic Gray |
| Material | Metal |
| Product Dimensions | 9.6"L x 5.1"W x 5.7"H |
| Style | Fashion |
| Motor Horsepower | 0.2 horsepower |
| Model Name | OPHIR DIY 3L Air Tank Kit |
| Manufacturer | OPHIR |
| UPC | 769638637087 |
| Part Number | AC132B |
| Item Weight | 3.96 pounds |
| Item model number | AC132C |
| Item Package Quantity | 1 |
| Special Features | Customizable |
| Batteries Included? | No |
| Batteries Required? | No |
M**R
It goes between the compressor and the regulator, and it works.
A week or so ago I picked up the better airbrush kit at Harbor Freight. While I eventually got it dialed in to a fairly steady pressure, I realized I needed a set up with a tank. Very seriously considered taking it back, paying the restock fee, and getting something else. Did a quick search and found this. It works a treat! I get consistent pressure at the brush even with long sprays.It's true, there are no instructions, but there is a video out there of someone assembling part of it. I'll give a few pointers here, but these will be specific to the Avanti compressor from Harbor Freight.1.) Pick up some new O rings, 1/4 in ID 3/8 in OD. The rings that come with the kit aren't great and I over tightened the first time I tried and destroyed two of them.2.) Pick up a 1/4in by 1.5 in Nipple, I'm adding a link here, but I got mine cheaper at the local hardware store. There are other options, but this is what they had and it works. https://www.amazon.com/EDGE-INDUSTRIAL-Brass-Nipple-Length/dp/B07DCF9J2J/ref=sr_1_4?crid=346J2P7P6OVIU&keywords=1%2F4%2Bby%2B1.5%2Bnipple&qid=1652562653&sprefix=1%2F4%2Bby%2B1.5%2Bnipple%2Caps%2C93&sr=8-4&th=13.) The cutoff sensor on the Avanti is the same as the one that comes in the kit (3kg on, 4kg off), so no need to mess with it.4.) You'll need either thin open end wrenches of appropriate sizes (12 mm and 14 mm) and an adjustable (crescent) wrench, or you can get away with the crescent by itself.To assemble,0.) Attach the feet to the tank.1.) Unscrew the regulator from the compressor. This can be tricky, but I found that using an adjustable wrench if I went lefty loosey on the bolt where the airbrush hose connects, the regulator unscrewed from the compressor. OR use a THIN* 14MM open end wrench and unscrew the connector between the compressor and the regulator directly. (THIN means 5MM or less)2.) Remove the feet from the compressor3.) Attach one end of the pipe to the square 90 by fitting it inside the opening and pushing two o-rings to the fitting. Loosely screw the connector on. Do not tighten as you'll need to adjust it later.4.) Attach the other side of the square 90 to the opening where the regulator came out. Snug it down but don't tighten yet, you will need to ensure the flat side of the pipe attachment is on the front and back. The pipe will need to be vertical5.) On the tank there is a smaller opening and a larger (1/4 in) opening, put the appropriate fitting into the smaller opening where the larger part is facing out6.) Set the compressor on the tank fitting the pipe into the opening of the fitting you just placed, you may need to adjust the positioning of the pipe vertically to ensure it seats in both the upper and lower openings. Once that is done, pull the compressor off the top of the tank7.) With the compressor off the tank, loosen the square 90 to a position where it is possible to tighten the compression fitting on the pipe, and ensure it is snug. Make sure the font and back have flat sides on the bolt. Tighten the Square 90 into the compressor completely ensuring the pipe is vertical. You'll see the compression fitting is nearly flush with the compressor, thus the need to have a flat side there and not a corner. Set compressor aside8.) put the nipple into the other opening on the top of the tank, and put the rounded 90 on the other end of the nipple9.) If you have not already done so, remove the connector from the regulator that was used to connect to the compressor, and screw the regulator in to the rounded 90 and tighten ensuring the moisture trap is down.10.) Add the Red fitting to the of centered hole toward the top11.) Add the drain fitting in the bottom12.) Set the compressor back on the tank13.) Use the included screws and nuts to attach the feet of the compressor to the tank (it will be a tight fit due to the nipple being vertical. It is possible to change this arrangement, but I didn't want my regulator sticking out from the compressor and tank.)14.) Snug the bottom of the pipe to the fitting15.) Plug the compressor in and fire it up. If you got really lucky you'll have no air leaks. I didn't get lucky and had to do a little rework on a couple places, but it was pretty painless. Soapy water makes it easy to see where the leak is.Note: it's going to take a some time for the compressor to kick off. Just about the time you think you messed up is when it will shut off.
J**H
Save your money and look elsewhere
Terrible design, the one pipe connecting the tank and compressor isn’t flared it’s just 2 o rings holding it tight so if you tighten it even a bit the o rings sure, nothing lines up properly even though I have the single most common air brush compressor on the market, save your money and just buy a combo air compressor with a tank. This is just a box of random parts they threw together
J**L
Good little air tank
All in all it's a good air tank for the cost. Mine did arrive with rust in the threads, and missing hardware. However it mounted my badger TC909 like it was made for it. As others have said no instructions are provided but realistically its soo simple to assemble they are not needed. I had to assemble and then disassemble a few times for correct assembly order. I used the kit supplied tube and fittings to connect the compressor to the tank, although the o-rings seem cheap it sealed first try. Overall it's a great addition to an airbrush compressor if you want to hear the compressor kick on less frequently.
M**N
dont fit
Doesn’t fit a Harbor Freight compressor
N**E
Ophir Air Tank Kit is Amazingly Helpful
This kit makes my small airbrush compressor perform so much better. There are no install instructions but it’s pretty much common sense so if you don’t have common sense stop reading right now. Everything will to be secured with need the Teflon tape to prevent air leaks, and trust me it’s not worth the time it takes to skip this step just to have to go back and re do all connections. I skipped and ended up hating my life while I went back to do things correct. All in all this unit is great and now my compressor doesn’t have to run non stop while I airbrush which is going to allow it to last so much longer and not have to strain when I work on larger projects while also allowing my airflow to be consistent and constant. This is a absolute must have if you have a small airbrush compressor without a tank!
R**B
Works after much fiddling and additional components
This tank appears to just about only choice for one wanting to add a small tank to their airbrush compressor. As noted by others, no instructions provided, nor any parts identification list. Had to purchase better hardware early into assembly with my Paasche compressor. After initial assembly, "everything" leaked, had to disassemble reseal and reassemble - FOUR TIMES! Fittings did not fit the ports correctly and leaked with teflon tape, them pipe sealant, then BOTH! Finally, disassembled again (fifth time) and replaced virtually all the Ophir-provided fittings, chased all the threads with a tap, cleaned and taped all fittings and reassembled carefully. It still required some tweaking, but now holds pressure and is what I needed to compliment my airbrush.For an item costing this much, it should be easier to get to a useable state! This item seems unsuitable for the average hobbyist who lacks experience in mechanical assembly and pneumatic systems and fittings, not to mention the variety of tools and required additional fittings required to complete the project (including the thin wrench required to properly tighten the pressure relief valve, taps to clean up threaded fittings, brass elbows and nipples). I consider myself a reasonably experienced DIY'erbut this took three afternoons in addition to trips to Home Depot, Lowes, Ace and ordering components from Amazon to be able to put this tank into service with my airbrush setup. This was way too much additional work for a simple tank to put together with a small compressor.
ترست بايلوت
منذ أسبوعين
منذ 3 أسابيع