Desertcart purchases this item on your behalf and handles shipping, customs, and support to EGYPT.
🛡️ Ride Bold, Crash Smart: Protect Your Rebel Like a Pro
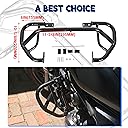
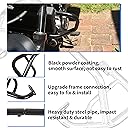
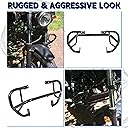
The ECOTRIC Engine Guard Highway Crash Bar Protector is a heavy-duty, powder-coated alloy steel crash cage designed exclusively for 2017-2024 Honda Rebel 300 CMX300 motorcycles. It bolts directly onto the frame without modifications, providing robust impact protection that safeguards both bike and rider. This easy-to-install pair of engine guards enhances your Rebel’s durability and road confidence, making it an essential upgrade for safety-conscious riders.


| ASIN | B088JV1484 |
| Auto Part Position | Rear |
| Automotive Fit Type | Vehicle Specific Fit |
| Best Sellers Rank | #369,795 in Automotive ( See Top 100 in Automotive ) #148 in Powersports Engine Guards |
| Brand | ECOTRIC |
| Brand Name | ECOTRIC |
| Color | Black |
| Compatible with Vehicle Type | Motorcycle |
| Customer Reviews | 3.9 out of 5 stars 205 Reviews |
| Finish Type | Powder Coated |
| Fit Type | Vehicle Specific Fit |
| Included Components | 1x Pair of Engine Guards. |
| Installation Type | Bolt-On |
| Item Type Name | Engine Guard Highway Crash Bar Protector |
| Manufacturer | ECOTRIC |
| Manufacturer Part Number | ET-480-Z1 |
| Material | Alloy Steel |
| Material Type | Alloy Steel |
| Model Number | ET-480-Z1 |
| Number of Items | 1 |
| Number of Packs | 1 |
| Vehicle Service Type | Motorcycle |
M**O
30 minute install on 2024 Rebel 300
The bars are solid and straightforward to install. I used four basic tools and some lubricant to help with the joint connection. They offer good protection for the engine, gear shifter, and parts of the rear brake. The black coating looks sharp, though it would be even better if the hardware (nuts and bolts) matched in black. Installation Steps: 1. Support the engine (I used an auto jack placed underneath). 2. Loosen the main engine bolt. 3. Carefully tap out the original bolt while feeding in the new one. 4. Install the left bar onto the new bolt and upper clamp brackets, but don’t fully tighten yet. 5. Lubricate the joint connections. 6. Install the right bar the same way; use a rubber mallet if needed to align the joint. 7. Cross-tighten the bolts for a balanced fit. 8. Check for even alignment across both sides. 9. Tighten the joint nut using an Allen wrench.
T**Y
Tight fit on a Honda Rebel 500
Overall it looks good and seems sturdy enough. the fitment is a little and on my Rebel 500 you have to put the bars on with the lower hole otherwise the top mounting clamp make contact with the engine. and the included bar for the bottom is useless, as it is barely long enough to make it all the way through and the nuts and bolt that it is replacing also act as the mount point for the horn. The lack of instructions is annoying but the installation is easy enough to figure out.
T**M
Saved My Bike
I have gone down low speed into a car at 3omph, saved my engine and frame! The bars bent but it saved most of the stuff so thats what mattered. It was easy to install, some parts didn't line up as easily but it was manageable. The long rod that goes through the engine was machined a little off and a little long, but a few washers fixed that. It looks great and works fine for what it is.
C**S
Not safe minimal engine protection
Only good thing about it is the bars were fully painted everything else is an engineering abortion. It sits WAYYY to high on the bike all the nuts and bolts provided will rust easily. Nothing lined up accurately. The bars were bent wrong so they can't even fully seat into each other. There's no place for the horn to get reattached and absolutely no instructions. The top screws are too long and even so I could not get them tight enough for it to not move on the bar so say bye bye to it in a crash. If anything it adds an extra hazard and damage to everything. If I haven't mentioned it yet there are absolutely no instructions so maybe I'm supposed to bend bars and make other modifications for this to work properly but I'm not convinced it would even be worth it to make it actually work and be safe. Even for looks this is garbage. Nobody needs this much nonsense in their life.
J**E
Good
Fit good but didn’t have directions so I had to figure it out.
G**D
Take your time and figure out where everything goes before you get started.
This crash bar fit perfect on my daughters 350 Honda rebel. Start to finish maybe 30 minutes very simple if you pay attention to where everything goes. Even though there are no instructions it’s not hard to figure out if you’re a little bit handy with tools. Everything went on nice and smooth and so far I’m very happy with it. It looks good on the bike.
P**N
Dropped my bike and didn't get crushed
I dropped my bike shortly after getting this installed. I had stopped with the handles turned and didnt have the strength to keep the bike upright, and in slow motion I dropped and bike and it took me with it. Wish I had caught it on video because my husband said it took like 10 seconds for me to actually fall over because I was trying to save it. Aside from my bike suplexing me into the ground and twisting my ankle on landing, I was unhurt and am glad to have this installed on my bike. To drop bike is to human. (not if, but when and how).
L**R
Great look and price.
This didn’t come with instructions but it was easy to find YouTube videos and get it placed correctly. We had to do a little bit of adapting for the horn placement but it looks good when on my 2024 Honda Rebel 500. Be mindful when bolting up, the engine gets in the way but it can be done. Can’t beat the price.
S**E
Great kit! 100% Recommend!
I purchased this for my 2018 Rebel 300 ABS. Flawless install, and took me probably 15min max. I have seen negative reviews due to no instructions so I’ll add some. Will try to edit the review with some pics later. 1. Remove stock bottom bolt with 14mm wrench/socket. Take nut off and remove bolt entirely. (Nothing should move/fall out at all when this is removed.) 2. Insert supplied rod threaded on both ends through the hole. 3. Slide crash bars over new threaded rod (I used the top hole on the crash bar bracket) and at the same time line up the bar in front of rad and guide together. 4. Install supplied locknut on either end of threaded rod and leave loose for fitment to allow everything else to line up easily. 5. Install 2 of supplied half blocks around the frame tube and secure crash bar to frame at crash bar upper bracket location using the supplied allen head bolts (Note one block half is threaded and one is not, one of each is needed per side) and tighten down. Repeat on opposite side. 6. Now go back to the threaded rod at the bottom and tighten down evenly with a 15mm wrench/socket. (A wrench on both ends works best here because clearance is tight for a ratchet and socket.) 7. Lastly install the supplied small set screw in the bar in front of the rad and snug it up with allen key. Hope this helps.
D**S
No sirve para rebel 500
No es posible embonar correctamente en la rebel 500. No trae algunos orificios y llega a chocar con el motor. Me rayo el motor con la tornillería, no lo recomiendo
I**Y
Instructions
It's a good way to protect your bike, only problem is that the is no instructions. We had to Google it, cause there was something we couldn't figure out.
Trustpilot
1 week ago
1 month ago