معلومات عنا
دعم العملاء
احصل على التطبيق

قم بتوجيه الكاميرا لتنزيل التطبيق
حقوق الطبع والنشر © 2024 Desertcart Holdings Limited


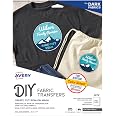
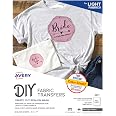
🎨 Craft Your Style: Where Imagination Meets Fabric!
Avery Printable T-Shirt Transfers are designed for dark fabrics, allowing you to create custom designs on 100% cotton materials. Each pack includes five 8.5" x 11" transfer sheets that are compatible with inkjet printers. The uniquely formulated heat transfer paper ensures a soft, stretchable, and machine-washable finish, making it ideal for personalizing a variety of items from t-shirts to bags.
| Fabric Type | 100 Cotton |
| Material | Paper |
| Item Dimensions L x W | 27.9L x 21.6W centimeters |
| Size | 8.5"x11" |
| Color | White |
M**M
Worth the money
The quality is so good and the peeling is so easy i liked it
M**2
Perfect for small projects and reducing waste
I've used a number of printable fabric transfer products but they have always been full sheet. I really like that these are small 2x3 rectangles. I wanted to print an image to add to a mask and this size was perfect. One issue I encountered was that the Avery templates website did not have a template for this product number. However, I found that the template for Presta 94237 worked perfectly.I printed my image in the top left square. I was able to peel off the rectangle without damaging the rest of the sheet so I can use the rest of it at a later time. I also did not want a big white rectangle on my mask. I had no problem hand cutting out the image AFTER it was peeled from the backing. It was sturdy enough to hold and cut by hand without tearing or smearing the color. Application onto my fabric was also easy with a regular home irron. It recommends not using an ironing board but rather a towel. I used my wool ironing mat and it worked well.I think this is a great product especially if you are like me and don't want to waste paper when you only want to print and transfer a small image.
C**!
great for dark fabrics
I love. these transfers for dark fabricsThey iron on easily and function in their full described capacity...what I really have a bit of an issue with is getting what I want in design elements into a 7.5 inch circle...it's pretty small. Thankfully Avery has templates online to help guide me in the process.I honestly would much rather have a full size sheet of transfer paper to design what I wanted, and if that means using a circle shaped design, I can cut out the circular shape on my own.
H**U
DIY Customized Pieces
I can’t wait to use these! I got these for our fun school days so I can customize special designs during Wacky Week, and other fun occasions. I remember doing Letter People shirts with printed iron-on designs when I was in elementary school, so I’m excited to have these to carry-on the tradition of making wearable school-related items for my kiddo. I expect these to be the same great quality as the Avery labels I use, and I love the convenience that these are 100% DIY with an ink jet printer and an iron. The size of the printing area is perfect for noticeable designs without being too big! I will definitely update this review when I make my first piece.Side note, I’ve used the Avery online design platform more times than I can count, and I highly recommend it for any of their products. I will definitely be designing these iron-ons at the Avery site.
J**A
Súper eficiente servicio
Increíble servicioMuchas gracias. Felicidades
S**Y
Wash the shirts, do not print in reverse, peel the back first !!! (and more)
These work really well, fourth time we are using this! A few tips for you, especially since the instructions leave a bit to be desired.1) WASH THE SHIRT FIRSTI forgot about the washing of the shirts ahead of time. The first time we used these the shirts are still hanging in there after about two years and multiple washes. The next two times we forgot to wash the shirts, the iron ons looked great but are peeling a bit already.2) DO NOT PRINT IN REVERSE, THIS IS NOT AN IRON ON TRANSFER! THINK OF IT MORE LIKE AN IRON ON PATCH!Meaning: What you print out is what you will see EXACTLY on your shirt. The ink does not transfer to your shirt. if you're not sure what that means, do you know those little kid toy tattoos that you peel, apply to skin, and then put a wet sponge on the back of the tattoo to get the ink to "transfer" to the skin (and it does it in reverse of what you see). That is a transfer. This is more like an iron on patch, but instead of a patch, it is what you print out on the printer sheet.3) PEEL THE BACKING FIRST!Because the "iron on patch" will be stuck to the surface it is on. If you do not peel the backing, then your print will be forever sealed to the backing. You want it sealed onto the shirt. Fortunately, the back of the sheet has numerous pieces on it, not just one big piece, so I was able to cut the shape of the heart on my transfer and still was able to peel it quite easily.4) Use the white sheet included in between the iron and the printable.I think otherwise you may discolor your shirt with all the heat from the iron5) 3 minutes, not a lot of pressure, repeatedly going over the entire printable esp the edgesI did not use anything close to a lot of pressure, I think that also may discolor your fabric. Just fairly light even pressure over the course of 3 minutes, not staying in any one place too long, over and over and over6) Let the surface cool down a bit after each ironMostly because otherwise the next shirt will get hot when you put it down and it's waiting and you don't want to accidentally have your iron on printable get heat sealed any little bit before you apply the iron. Just to be on the safe sideGreat product!!!
ترست بايلوت
منذ شهر
منذ أسبوعين