معلومات عنا
دعم العملاء
احصل على التطبيق

قم بتوجيه الكاميرا لتنزيل التطبيق
حقوق الطبع والنشر © 2024 Desertcart Holdings Limited


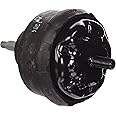
General Motors Genuine GM 15062381 Engine Mount
| Manufacturer | GM |
| Brand | General Motors |
| Item Weight | 3.1 pounds |
| Product Dimensions | 11 x 5 x 8 inches |
| Item model number | 15062381 |
| Is Discontinued By Manufacturer | No |
| Manufacturer Part Number | 15062381 |
| OEM Part Number | 15062381 |
C**R
Fixed my rattle and hard tranny shift on 2005 Trailblazer
As I spent the last year replacing parts that I thought was causing a rattle noise to occur under the hood of my 2005 Trailblazer I was beginning to think I was never going to figure it out. I don't pay others to "troubleshoot" as it can incur a hefty bill. So I replaced things such as the water pump, vasco electric fan clutch, belt, belt tensioner, alternator, shocks, struts, sway bar links, power steering pump, and the worst (was told it can't be done but I did it anyway without issues afterward) AC compressor clutch.After all this money and time fixing these things (which isn't bad cause I have replaced almost everything, can you say new car?) I decided that I need to fix these mounts which I felt was causing a transmission hard shift.BINGO! All the noises I was trying to fix stopped. No more hard shifts and no more rattle. These were identical to the factory mounts I removed. Great product!A word of advice to those installing these yourself and have read all the reviews about cutting the top of the new mount shaft to get it installed. I did NOT have to do this. It WAS very difficult to install (but this is ok because of what it is). After you have the old mounts unbolted and the engine jacked up all the way( I removed as much as the throttle body to be sure everything was safe) make sure the sensor that is just right of the throttle body that is inserted into the top of the intake plenum, I believe it was the MAP sensor, is removed. I will be crushed by the frame right above it when the engine is jacked up high enough to install these mounts.After you are all the way up you will need an extra person there with you because they will need to pull the engine in the opposite direction of the side you are installing. I used a tie down strap wrapped around the arms attached to the engine lift hole on the top front of the engine. Install the passenger side mount first. This is because of the position of the engine mount hole you'll use to pull the engine. The passenger side will be easy (I say easy but it has specific turns it has to make to fit down into the area to be installed) and be sure to transfer over the heat shield on that side. The drivers side will be very difficult because the new mounts are taller giving you even less room than you had to remove the old mount. This is where the extra body comes in the pull the engine the other way, and with a lot of force (and very little tool leverage) it popped into place. This was probably the hardest install I have personally done. But the reward of all the issues that are now gone makes it worth doing all over again.Thanks for reading and good luck!
B**N
Perfect mount
This was a perfect motor mount for my 2004 trailblazer LS 4.2L i6. Even though my mounts appeared ok. I had a weird vibration all the time. In gear or in park. I also had a hard shift from 1st to 2nd. Makes you think it is your tranny messing up. These solved all the problems. DO NOT USE other mounts on the trailblazer. GM mount is the only one that works right. Remove your MAP sensor before you do this job!!! I removed the brackets that hold down the top of the mount. That way I didn't have to jack the engine up much. Maybe an inch or so. I was able to unbolt the mounts and the mount brackets easiest from under the car. BE SAFE AND USE AS MANY JACK STANDS AND BACKUP JACKS AS POSSIBLE. From under the car, it is easy to get to all the bolts to take out. There are 4 bolts on each bracket. One bolt on the top of mount and one bolt on the bottom. The bracket bolts are 15mm and the top and bottom mount bolts are 19mm. When you get the 4 -15mm bolts out and the top 19mm bolt, you can lift the bracket off the mount and then remove the bottom 19mm bolt and pull the mount up and out.When installing, the mounts are the same on both sides, so this mount will work on both sides of the car. And you will need 2 of them. One for each side. There is a small pin that comes off the bottom of the mount and you need to get that into the same little hole the old one came out of along with the mounts lower bolt into its hole. Easy once you see it. With new mount installed, Tighten the lower nut back onto the bottom mount bolt. Then slide the bracket onto the top mount bolt, and put back all 4 bolts that you took out to take the bracket off. Put the top mount nut onto the top mount bolt, just a little. Not all the way down. You have to remember, your engine is jacked up a little. Now do the same thing to the other side. After your done, lower the engine all the way and tighten down the top nuts on the mounts. Reinstall your MAP sensor and your done.I don't disconnect my battery. I pull the 2 PCM fuses.
N**E
THESE MOUNTS ARE WONDERFUL. TO ALL THAT PLAN ON CHANGING THERE MOUNTS ...
THESE MOUNTS ARE WONDERFUL. TO ALL THAT PLAN ON CHANGING THERE MOUNTS AND USING AFTERMARKET MOUNTS THAT ARE CHEAP---- YOU WILL GET WHAT YOU PAY FOR. I FIRST REPLACED MY ENGINE MOUNTS WITH A AFTERMARKET BRAND ON MY 03 GMC ENVOY AND STARTED MY VEHICLE AND HAD A TERRIBLE VIBRATION ON START AND BRAKE AND IDLE, I REPLACED THEM THINKING IT WAS A DEFECTIVE MOUNT AND STILL IT VIBRATED HORRIBLY. I WENT TO MY LOCAL REPAIR SHOP AND TOLD THEM WHAT WAS HAPPENING WITH MY VEHICLE AND THEY LAUGHED AND SAID TO REPLACE THEM WITH GM MOUNTS SO I DID. WHAT A DIFFERENCE, NO MORE VIBRATIONS AND WHEN STARTING THE VEHICLE IT FEELS LIKE IT ISNT ON, AS SMOOTH AS THE FIRST DAY I GOT IT AND MIND YOU I HAVE 175,600 MILES ON HER. SO SPEND YOURSELF LESS GRIEF AND TIME AND GET THE ORIGINAL MOUNTS. ALL IN ALL A LITTLE MORE SPENT ON THE ENGINE MOUNTS GAVE ME A PIECE OF MIND AND MY TRUCK A NEW BEGINNING.
D**D
Great replacements, but hell of a job!
Same as the ones that came out, but beware, changing them on a 4x4 is a bear. Front axles hit the frame preventing the engine from being jacked high enough for the mounts to be removed/installed. Had to remove the lower mount brackets, held on by 3 bolts accessible from the wheel well, but the struts make access to 2 of the 3 bolts difficult. It can be done, but took me 7 hours to do both sides. All-day project, and I am pretty handy with such things. Also had to remove the fan and cross-beam to give room to lift engine, remove computer and drill a 1" hole in metal bracket below computer to allow access to top mount nut on driver side. The new mounts are perfect though, and I fully expect to never have to do this again.
P**T
Fixed my issue
I was having a horrible vibration in my 2005 Chevy Trailblazer while stopped. After replacing the engine mounts, the vibration is completely gone, mt vehicle sounds and drives like new.These are genuine GM parts, not the cheap knockoffs that go bad in a year.
ترست بايلوت
منذ 3 أسابيع
منذ 4 أيام