معلومات عنا
دعم العملاء
احصل على التطبيق

قم بتوجيه الكاميرا لتنزيل التطبيق
حقوق الطبع والنشر © 2024 Desertcart Holdings Limited


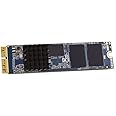
🚀 Elevate Your Mac Experience with Aura Pro X2!
The OWC480GB Aura Pro X2 SSD is a high-performance NVMe flash upgrade designed for select MacBook Air and MacBook Pro models from 2013 to 2017. With read speeds up to 3200MB/s and write speeds up to 2400MB/s, this SSD not only enhances your device's speed but also consumes less power and runs cooler than previous models. Backed by a 5-year warranty, it's the perfect solution for extending the life of your Mac while keeping it up-to-date with the latest technology.
| Brand | OWC |
| Series | Aura Pro X2 |
| Item model number | OWCS3DAPT4MB05 |
| Hardware Platform | Mac |
| Item Weight | 1.41 ounces |
| Product Dimensions | 0.59 x 7.09 x 5.12 inches |
| Item Dimensions LxWxH | 0.59 x 7.09 x 5.12 inches |
| Color | ABAA1560 |
| Flash Memory Size | 480 GB |
| Hard Drive Interface | NVMe |
| Manufacturer | Other World Computing |
| ASIN | B07QBR2NBX |
| Is Discontinued By Manufacturer | No |
| Date First Available | April 8, 2019 |
A**E
Value Add Product
Its work perfect and good performance.The only thing it's Unformatted, just needs to format otherwise, the OS will not identify the SSD.I used it in my Macbook Air late 2013.Performance-wise better than the original which was Samsung.Great Value Add Product
S**I
Disappointed
Disappointed. It is not working with macbook pro 11.1 , even though it says that it is compatible with it.
J**N
Perfect !!!
Excellent fit & guideline with complete peace of mind works perfect as tested for a 13” MacBook Air 2017. Upgrade from 128 GB to 1TB.
L**Z
Upgrade your MacBook Air
An amazing product to increase memory space. Easy to install!
S**L
Excellent and easy upgrade.
Superb speed and a huge performance boost. Super easy installation. All included with online support video. The old SDD becoming a super fast HDD is a life saver too.
W**S
Terrible experience
Rip off! Incomplete product delivered and by the time I opened the package it was past the return deadline!
A**K
after installing the SSD the battery started draining fast
I am using this ssd for a month and I am observing that the battery started draining fast
A**N
Working fine as expected
Only battery consumption become high since i installed it. But overall its performing well.
A**E
Installation mit Hürden
Also das SSD Laufwerk funktioniert in meinem Macbook Pro 15" Retina 4K 2015 Mitte.Verpackung ist super. Das Alu-Case ist auch sehr schön, schlicht und passt sich ganz gut in das Gerätedesign ein.Im Upgrade-Kit sind Schraubenzieher dabei mit denen man die Festplatte tauschen kann.Leider wird die Festplatte bei vielen nicht erkannt und kann im Festplattendienstprogramm nicht erkannt.Ich selbst musste den OWC Support anrufen um den Datenträger auch ans Laufen zu bekommen.Der Datenträger ist auf jedem Fall kompatibel mit dem Macbook Pro 2015 13" Mitte 2015.Wichtig ist, die OWC SSD darf NICHT in dem Alucase benutzt werden, da sie dadurch beschädigt wird. Dieses Case ist AUSSCHLIESSLICH für die aus dem Macbook ausgebaute Original-SSD.Vor dem Einbau sollte unbedingt mal ein PR-Ram Reset durchgeführt werden. Dazu geht man wie folgt vor: 1. Macbook komplett ausschalten. 2. Macbook wieder einschalten undsofort gleichzeitig die vier Tasten cmd – alt – P – R. Halten Sie die Tasten gedrückt und warten, bis der Startton 4x zu hören ist. (ca. 20 sec) 3. Stromversorgung trennen und den Rückdeckel vom Mac abschrauben. Bitte Schraubenlänge beachten. 4. Stecker des Akkus durch vorsichtiges anheben lösen und alte Festplatte des Macs abschrauben. 5. OWC SSD in den mac schrauben, Stecker des Akkus wieder auf das Mainboard drücken und Deckel verschrauben. 6. Den Macbook in den Recoverymodus starten. Dazu UNBEDINGT direkt nach dem Einschalten des Macs die Tasten CMD-ALT-R gedrückt halten um in einen besonderen Recoverymode zu starten, da sonst die OWC SSD NICHT ERKANNT wird. 7. Sprache auswählen udn bestätigen. 8. Im Recoverymenü das Festplattendienstprogramm starten und dort die OWC SSD löschen udn als APFS datenträger formatieren. 9. Das Festplattendienstprogramm beenden und eine externe Festplatte über USB/Thunderbolt anschliessen, auf der sich das Timemachine-Backup befindet. 10. Backup von der externen Festplatte auf das OWC Aura Pro2 aufspielen. Das kann je nach Datenmenge 1,5 bis zu 6 Stunden dauern.Der komplizierte Installationsvorgang führt dazu, dass ich dem Datenträger einen Punkt abziehe.Der Hersteller würde sich viele Reklamationen und den Kunden viele Fragezeichen ersparen, wenn er den Datenträger vorformatieren würde.
N**P
Powermanagement-Einstellungen für Mac OS X 10.15
Die SSD ist prinzipiell super, schnell, groß und der Einbau mit dem mitgelieferten Werkzeug nach der ifixit-Anleitung total einfach. Aber im Gegensatz zur Original-Apple-SSD geht sie im MacOS-Ruhezustand nicht in den benötigten stromsparenden Standby-Modus. Daher zieht sie Strom (ca. 50% pro Nacht), das MBP erwärmt sich und man erkennt eine dauerhaft leuchtende rote LED durch die Lüftungsschlitze an der Rückseite. Bei mir (MBP 12.1, Late 2015, 13 Zoll Retina, Mac OS X 10.15) funktioniert dieser Workaround (Hibernate-Mode richtig einstellen, Übergang von Standby in Hibernate-to-Disk-Mode nach 60s statt erst nach einem Tag) - diese Befehle im Terminal eingeben:sudo pmset -a hibernatemode 25sudo pmset -a standby 1sudo pmset -a standbydelaylow 60sudo pmset -a standbydelayhigh 60Danach erwärmt sich nichts mehr, die LED geht aus und der Akku wird über Nacht nicht belastet.
J**R
Saved me £££
Life saver! I have an older 2013 model MacBook Pro that was now considered "obsolete" by apple. Unfortunately I had a hard drive fault which rendered the MacBook completely unusable. After contacting Apple care, taking it to an apple store and speaking to other people in the repairs field I was told it could be repaired but would cost me close to £600+, which just wasn't worth it for an old model. I couldn't afford a new MacBook so searched the internet and found this to be the hard drive that I would need to replace my old one.After a bit of you-tubing it because clear that MacBooks are modular and you can install the product yourself with the correct screwdriver. A few screws later and this SSD was in place and just needed to install the software.No problems with any of the installation and it was very quick and easy.Cost was great. I managed to double the size and speed of my old hard drive for less than a third of the price Apple quoted for the smaller like 4 like hard drive.Overall absolutely thrilled! managed to keep my MacBook for a while longer, saved myself hundreds and did an upgrade all at the same time with this piece of kit. 10/10Also their aftercare service is fab! I had an issue with sleep wake failure and was put through to a specialist from their team via a phone call and walked through how to fix the issue very quickly!
M**C
Quoted £600 to replace a 512gb from Apple
My SSD from Apple went kaput after 6 years of use, they wanted nearly £600 to replace like for like and a week to do it in. Found out that OWC SSDs are simple and fit perfectly without the need for any adaptors. The install was easy and plenty of videos exist online to do it.One thing I did find an utter pain was my 2015 Pro Retina would only install Yosemite which wouldn't recognise the new SSD, I couldn't create a bootable USB or reinstall as effectively there was no SSD found. This is how I got around it, it's a long process but easy enough:1) Installed Yosemite on an old SD card, booted from that2) Downloaded the oldest OS that would recognise the new SSD off the OS installed in part 13) once I had downloaded and installed the first OS to recognise the SSD, in this case, High Sierra, I installed that to an external HDD and ran that4) The OS then found the new SSD instantly where I downloaded Big Sur and it is now up and runningThere's probably a billion better ways of doing it but very pleased with the new SSD, I have noticed the sleep function is a bit lacking but certainly have noticed the fans run less and the mac runs cooler.
W**L
Amazing.
Upgraded my Mid 2015 15inch MBP from 512 GB to 2TB quick and easily. I found some useful installation instructions on iFixit (there are none included) and these clearly explained how to install the drive.Initially I was at a loss as to how I was going to transfer my system across because rather strangely the included enclosure allows you to house the original SSD but doesn't support the new 2TB drive. However the solution is to back everything up first, take full anti-static precautions (regularly discharge yourself somewhere like a radiator and also don't touch the components directly) then extract the original SSD into the included enclosure, install the new SSD and then hald down 'ALT' on boot to boot from your original SSD now housed externally to the MBP.Once you've done the hardware bit the real work begins getting everything to perform as before. I went through a number of hurdles to get to a fully working system but the below steps worked best for me; this is edited from all the dead ends I went up.1. format your new SSD now inside the MBP.2. Use Carbon Copy Cloner to transfer your drive across (I tried Super Duper! but that failed with the new MacOS file OS).3. Clear your P-RAM (press the Command, Option, P, and R keys at the same time) when you reboot - if you don't I found the machine sort sits there and thinks for quite a while whilst it works out where the system disc is.4. Once you can successfully boot into Mac OS from your new SSD, remove the old one and keep it safe for the time being.5. Reboot and hold down shift to get to the recovery mode.6. Reinstall MacOs from the recovery mode - this shouldn't erase any settings or applications you have installed but seems to iron out any niggles or problems with either booting or running the system.7. Install OS updates and check all your apps are running correctly.The new SSD in my MBP now runs super smoothly. I had some problems with time machine that are probably out of scope for this review that I also needed to resolve but the laptop now boots quicker than before and is no longer creaking through lack of HDD space. It also feels genuinely quicker than before.I do seem to have a corrupted file somewhere within my Applications folder - if I open the applications folder Finder crashes. If I press F4 I can see there is a strangely named application that I can't access or delete. I suspect I had this problem before and cloning the drive carried it over, but it's something to flag.In terms of compatibility and ease of installation I can't fault this upgrade. The hard work really centres around transferring the system across and ironing out all the niggles with MacOs after you've done that. It's an expensive upgrade but will add years of life to your existing laptop.
ترست بايلوت
منذ يوم واحد
منذ 3 أسابيع