
Desertcart purchases this item on your behalf and handles shipping, customs, and support to EGYPT.
⚡ Upgrade your Galaxy Tab A touch experience—don’t let a cracked screen hold you back!
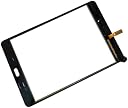
TheCoolCube Touch Screen Digitizer Replacement is a precision-engineered front glass panel designed exclusively for the Samsung Galaxy Tab A 8.0 SM-T350. This professional-grade part restores touch functionality and visual clarity, offering a durable and responsive solution for cracked or damaged screens. Installation requires technical expertise to ensure flawless performance and avoid damage. Highly rated by users, it’s the go-to fix for maintaining your tablet’s premium feel.
| Asin | B01JMY4QW2 |
| Best Sellers Rank | #146,145 in Electronics (See Top 100 in Electronics) #56 in Tablet Digitizers |
| Customer Reviews | 4.4 4.4 out of 5 stars (719) 4.4 out of 5 stars |
| Date First Available | August 3, 2016 |
| Item Model Number | 8541524447 |
| Item Weight | 5.9 ounces |
| Manufacturer | TheCoolCube |
| Other Display Features | Wireless |
| Package Dimensions | 9.88 x 7.99 x 0.94 inches |
User
Fit perfect. Works just fine.
I have replaced digitizer screens on at least 5 tablets for my kids. I have done iPads' and Samsungs' alike. This one is good quality and I could not tell any difference from the OEM one I removed. This comes with all the tools and 3M tape needed to install so NOTHING more is needed. These are fragile glass just like the OEM version so handle it gently! They are easy to break if you "man handle" them like a guerilla when they are out of the packaging. The item arrived in a well packaged box with foam surround. Take your time, clean off all the old adhesive, and take your time installing the new 3M adhesive. A heat gun or hair dryer is a huge help with removing the old screen. The new screen was a snap to install and it worked on the first try. I would buy again.
User
Dont believe all the neg reviews, this was not difficult and did include adhesive and (too many)tools.
So,..I dropped the Samsung Tab A from about 5 feet and shattered the whole screen.I had never even attempted a screen repair of any kind,...was maybe 50/50 on if i could pull it off,...esp. considering all the reviews were very mixed but all said there were no included directions. Some said no adhesive strips were included.The bottom line is there are youtube vids out there that are WAY too complicated. I found one where it was much easier by using a hair dryer. in this method I only had to remove the main screen connection internally. then pry and heat and pry to get glass away. the kit included the 2 needed pry tools and 2 guitar-pick like pry tools. there were 4 small screwdriver type tools included but not needed with the easier technique.Now its like new,..saved 100 bucks or so over getting a replacement tablet at least. took about 45 mins including finding the right video. hope that helps.Follow -up: 9 days later (with at least 5 hours of use each of those days) and its still perfect. Not loose at all (as some of the neg reviews said) and touch screen works perfectly. I forgot to say that there were not any instructions included,...but just look up the popular Youtube vid with the hair drier installation-method and you'll do fine...i hope that helps everyone. BTW, I do point out to people i did it myself,..lol. I really had never tried anything like this b4.
User
Perfect fit
It's a perfect fit and exact replacement for Samsung tab A 8.0 SM-T250 model. My 8 year old thought it was a good idea to hit his tablet's screen with hammer. Please don't ask me why. This is not the first time he has managed to crack the screen, so I have bought from the same supplier previously and I can't be happy enough with this purchase. YouTube video is a good guide if you want to do it yourself like I did. This comes with tools to take the old one off. It also comes with adhesive pre-installed, so just peel the plastic off and you are good to go. No issues with any functionality. Even has "Samsung" logo. Definitely recommended.
User
All things considered, a great purchase.
This was very easy to install. That being said, I have replaced a few screens on various devices before. Use a hairdryer on the heat setting to warm up the broken screen. The goal is to warm the adhesion enough to remove the old digitizer. If you look up some YouTube videos you will get an understanding of the process. Make sure you clean any areas with the old adhesion. Make sure not to touch the screen or the back of the digitizer as it will leave fingerprints, I used gloves. The adhesion on this screen is suspect. It is not as sticky as other brands I have used, only time will tell. I will update the review accordingly.I saw reviews for broken screens and no adhesion. Peel off the film on the back of the digitizer to reveal the adhesion tape. The screen itself feels very thin. It is still acceptable since I am only using the device to cast to my Chromecast and not for everyday use.Regardless, of the tools and the price, I would recommend and purchase this again.+ Responsive touch screen+ Easy to install+ Adhesion tape already included+ Well packaged+ Included tools+ Price- Adhesion not very sticky- Digitizer felt more fragile than other brands I have usedFor the price and circumstances of what I intend to use the device, I do not regret this purchase. Hope you find this helpful, thanks.
User
Easy to replace with supplied tools and tape
The screen/digitizer fits and works great. The glass is not as tough as the original screen. I would recommend installing a screen protector and a protective case if it is for a child. My 5 year old granddaughter cracked hers 2 days after I replaced it.If the old screen has many small cracks it helps to place some clear shipping tape on the cracked screen first. It requires heat to remove the old screen. I use a hot air gun, but a hair dryer will do. The back must be pried off first. Just under the top the back presses on to the chassis and you use the supplied pry tool to pry the case back away from the top. The back just presses back on when assembling. Then remove the digitizer connector cable on the back. Next heat around the top of the screen in order to loosen up the adhesive. Heat enough to get the screen pried up. Pry at one corner and place the included wedges under the screen to hold it off the adhesive. Be careful around the home button as there are some small wires that can be damaged. Heat and pry a bit at a time until the screen is completely free from the adhesive. Then remove the screen pulling the connector cable up through the opening in the chassis. Next remove all the adhesive and glass fragments. Failure to remove fragments will make it likely the screen will crack when pressed on. Next remove the supplied adhesive strips from their backing and carefully place them where the old adhesive was. Be careful not to cover the camera lens or other openings with adhesive. Next route the new digitizer connector cable through the chassis. Remove the protective film from the bottom of the screen and then carefully place the screen on the adhesive tape keeping it aligned. Press down to seat the glass on the adhesive. Next connect the digitizer cable to the connector on the main circuit board and make sure it is firmly in place. Turn on the tablet and test the new digitizer for proper function. If it works properly press the back on the chassis. You are done. It helps to place some weight like a book on the digitizer for an hour or more to help seat it on the adhesive. It took me a half hour to do my granddaughter's, with 15 minutes of that taken to remove the glue and adhesive. I cleaned the LCD and used canned air to blow any debris off the LCD and chassis before I placed the new digitizer on it. You can see the whole procedure done on YouTube and this is the best way to familiarize yourself before digging in.
User
Fits, No Calibration Problems, Sticky Tapes In Place
I saw a lot of reviews about this screen saying "it was broken after a few days or weeks" or "screen didn't fit or glue down" or "there screen no longer works right saying when they click it clicks somewhere else" well I would like to tell you. You are wrong ;) simply because mine is perfect you guys must have installed your wrong. Because mine fit right in place and stayed in place and looks crystal clear, I've only replaced an iPhone screen and that was it. This is now my second screen repair. Worked amazingly and I would buy again if I break another screen. Came with all the tools I need and comes with screen saver on back and front, the back contains sticky glue tape so as long as you get the old tape off you will have no problem with the new one sticking.
User
Five Stars
Edit: My other son broke his screen and after ordering from this seller prior and having no issues I ordered again.The replacement was DOA and the resolution at the time was to ship it back at my cost (more than I paid for the product).Sure you see others rate this product 5 stars and blame the 1 star reviewer on improper installation, but that's not the case. I have replaced well over 50 screens and LCD s over the years and this is truly a quality control issue.Recommend look for another seller.
User
It's not rocket science.
Touch screens and tablets batteries are not hard to replace. This was my third battery and first touch screen. The first step is to get inside. Take your tablet and find your micro memory card gently push the card in and it will pop out then remove it from the tablet. Next take a small flat edge screwdriver, stick the screwdriver blade in the memory card slot about of an 1/8 of an inch, twist the screw driver clockwise until the edges separates the top from the bottom, move the screwdriver blade around the table repeating the insert and twist process. Until you have completely separated the top from the bottom. This will open up the battery compartment. There are two electrical connections. One to the battery and one to the screen. If the battery is dead remove lift up the connector with the screw drive blade. Lift up the paper on the back of the battery and pull it out. Then put the new battery and reconnect by pushing the connector together.. yon now test the tablet by pushing the on off button to see if the tablet boots up. If it does let it run until the home screen comes up. Then go thru the shut down process. Remember be careful the back is still not connected. Finally carefully line up the top to the bottom and snap then together with your thumb and forefinger. On the edges not the touchscreen working your way around the tablet until your back to your starting point.If your touch screen is cracked you undo the upper connection above the battery connector. Take clear shipping tape and put on top of the damaged screen to protect youself from the broken glass. Then find a hair dryer. Heat the edges until the adhesive softens. Gently pry the glass off of the upper portion of the tablet. Reheat edges so often as necessary. Once you have worked your way around the glass remove it and carefully discard it.Then take that small screwdriver and remove all the ground glass chips, dirt and adhesives you can findI used an exact knife and scotch tape.When it's all clean put your adhesive on the area you just cleaned. My kit supplied me with 30 2MMS wide 3 inch long strips of double sided tape. I put the tape on all the flat spots that would touch the back edges of the new touch screen. Then I threaded the electrical connector to the battery side of the top of the tablet. Before I proceeded to seat the touch screen I tested the tablet to see if it still worked. Then I took some microfiber eye glass cloth, lined up the touch screen, and gently pushed it into place. Pushing the cloth along the edges with my forefinger. Finally I pinched the top and bottom together the same way I completed the battery change. The final step is to set the tablet on it's back, placing a clean cloth on top of it and then a book or something else heavy on top to push the screen onto the adhesive.The replacement kits are easy to find on Amazon.com but the instructions are almost impossible to find. Everything I found on the subject stated the kits were for trained professionals. It took me longer to write these notes than to figure out and complete the process.The vendors should supply instructions!
User
digital screen
non oem ,logo Samsung.
User
Three Stars
Worked great! Hardest part was getting the old, broken screen off. Works just like new.Revised: First time I replaced screen it worked great. However, second time I replaced the screen all the touch sensitivity was off. Had to touch below and to the left of icon on screen for it to work. Typing was impossible.
User
Improper Business Practices
Did not work, you had to pay for shipping back and refund received
User
Cheap product, screen broke
Screen broke when finishing installation.
Trustpilot
1 month ago
3 weeks ago