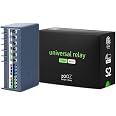
🔧 Automate Your World with ZOOZZ-Wave!
The ZOOZZ-Wave Long Range Relay ZEN17 800LR is a versatile smart device designed to control and automate various electrical devices, featuring two independent relays (10A and 20A), advanced Z-Wave connectivity, and compatibility with popular smart home hubs. With quick installation options and enhanced signal coverage, it’s perfect for managing everything from garage doors to sprinklers.
A**L
Flexible to use for many different devices
This is for more advanced users but works great. Lot’s of flexibility to use for different devices.
P**P
Works well with Home Assistant
I picked up two of these for operating 3 garage doors (each will handle up to 2) and also to extend my Z-Wave network range. Out of the box this was very easy to set up in Home Assistant. I did have to check the included documentation to get it into Z-Wave pairing mode, but after that it paired right away with Home Assistant through the closest Z-Wave Repeater and populated device information and configuration. The configuration has a lot of options but it's pretty clear and simple if you are familiar with switching and basic residential and low voltage electric. If you are not, get some help before you mess with anything like this and of course unplug/de-energize electric things before you mess with them.I have S1 set up as momentary, meaning it looks for a single button press or switch closure, which is what you get when you click the button on the garage wall. The R1 NO Output was linked to S1 by default, meaning when you click the garage button, it closes S1 momentarily, telling the relay to close R1 momentarily, actuating the garage door. This meets my "keep wife happy" standard where things need to work when you push the button even if something quit working with the automation. I could completely shut down all other devices and home assistant and this would still let the garage door work like normal. Parameter 10 lets you decouple this. Say, for example, if you wanted to set up security conditions, like keep the door from opening unless certain people are home, or time of day or something. There are a lot of other options as well, I added snips in the photos.With HA and Ecolink Tilt Sensors (B00HGVJRX2) on the garage doors it was very easy to set up door status monitoring, notification, and buttons in the HA front end. I was able to set up notifications based on people presence, duration left open, and time of day that prompt a button press to close the door. For example, the last person to leave a home zone with a garage door left open gets notified. If the door is not closed within x time, everyone gets notified.
J**H
Solidly built device with tricky setup, but A+ support! Make sure you configure properly!
My plan to use this device was by replacing an older wifi Garage door opener with something that I could control locally and would be more secure than wifi.I had seen several reviewers who had used this device and it's older brother the Zen16 as garage door relays, and figured I'd try it out. I had previously installed the Zen16 to provide smart control of my gas fireplace. I'm using HomeAssistant with ZWaveJS UI integration and a HomeSeer SmartStick+ G3 Z-Wave Plus (V2) USB Stick as the coordinator.I was replacing an Meross Wifi Garage Door opener, which was very easy to setup, but when I had some issues with my wifi (AP failure), it began to flake out along with many of my other wifi smart devices. I began a mission to replace what I could easily with locally controlled devices (zigbee, zwave and matter/thread). To start, I reused most of the wiring left behind by the Meross unit, which included clipping the harness to connect the magnetic reed switch used to sense door open/close. After stripping those wires, I connected them to the S1 and C terminals. It's doesn't matter which wire is connected to which terminal.IMPORTANT NOTE: BEFORE WIRING AND MOUNTING THIS THING, MAKE SURE YOU TAKE A PICTURE OF THE QR CODE ON THE "BOTTOM" OF THE UNIT. YOU WILL LIKELY NEED THIS OR THE CODE ON IT LATER.On the relay side, as with most garage door openers, my Chamberlain Liftmaster Pro is a Normally Open (NO) circuit connected to a momentary switch wall button. As with my prior smart opener, you can add leads onto the existing button contacts on the garage door opener terminals. These leads connect to the NO and C terminals on the Relay. It shouldn't matter which order the wires are connected, but typically it's run with Red/White bell wire (in the US). Pay attention to which terminal is which and make sure the common wire is connected to the C terminal on the relay and the hot is connected to the NO terminal.If you have dual doors with separate openers, you would wire in the other "door sensor" and "door opener wires" the same way on S2 and R2 blocks.The relay runs off a standard 5v/1a charge and comes with a USB-A to USB-C cable. It's too bad a USB power adapter isn't included in the box, but in the interest of minimizing e-waste, it makes sense. I can't think of a situation where someone who is willing to use a device like this wouldn't have a dozen extra 1a chargers in a drawer somewhere. It can also be powered by a 12/24v source on the terminal leads, but it's unlikely that would be anywhere near a garage door, so for this application...USB it is.Once the relay has power, it's easy enough to add to the coordinator of choice. You enable INCLUSION MODE on your coordinator software and then tap the single button on the relay 3 times. At first, I didn't like the pairing mode button trigger, rather than the more normal "hold it down for 3-5 seconds). But when I had issues trying to configure the relay properly, I started to see the wisdom of it. You don't have to worry about guessing how much is 3 seconds vs 5 vs 10 seconds. You tap the button 3x and it's instantly recognized, every time. Same way for EXCLUDING the device, which we'll get to in a minute.Once you have the device recognize, you need to select the correct values for each parameter, depending on the application. For a garage door opener, you will change Parameter 2 ("S1 Terminal: Input Type") to Value 11 ("Garage Door Mode...:"). For dual door applications select the same for Parameter 3.VERY IMPORTANT NOTE: AFTER CHANGING P2 AND/OR P3 TO ANY SETTING 4-11, YOU HAVE TO REMOVE/EXCLUDE THE RELAY AND INCLUDE IT AGAIN. This will enable binary sensors for the switch terminals to provide the "open/close" status that will be needed for proper integration.Finally, Parameter 10/11 will need to be set to DISABLED (or OFF) if using a wired (reed) switch as an open/close sensor. If not, once contact is made with door sensor, it will activate the relay. ***This is what screwed me up resulting in my contacting support. I misread the wording on this Parameter and didn't disable it***I've included pictures of my config from the ZWaveJS UI integration in HomeAssistant. You can also view the settings in ZWaveJS directly under the "Configuration V4 section). A different integration or smart hub may look slightly different, but the parameters/values should still report the same.I contacted support when I couldn't figure it out. That was Sunday afternoon. By Sunday evening I had a reply. After requesting/sharing that information, I had 3 more exchanges with the support team, including twice in one day. They pointed out my configuration error and I had it fixed that night.When setting up a user-friendly "button" in HomeAssistant, you'll want to use a "Cover Template" which will act as a button to trigger the relay, but also change the icon to reflect the status of the door (open/close). I've attached my yaml code here. This will need to be entered into the configuration.yaml file in HomeAssistant. If you don't know how to do that, there are many videos out there to show you the ropes.Now the TL;DR Pro's Cons:PRO's:* Well Built, no lose parts inside, terminals blocks are solid, won't strip* A+ support, rapid reply 24/7* S2 Security supported, great for secure applications (like entry control)* Great signal strength* Fast switching on the relay.Cons:* Doesn't come with a USB power adapter* Instructions are "adequate" but a little messy to read. Have to go online to get proper instructions on setting up as garage door opener.In summary, very happy with my purchase and next-level support from the mfg. I will buy from them again!
B**.
Works with homeseer to trigger multiple home theater AMPs
I have 9 separate amplifiers for my home theater setup. My processor has 3 12v outputs and is separated from the rear amplifiers by almost 20 feet.I have 5 20 amp circuits for all of the amps. I have to be careful or I get ground loops between the equipment.This relay let me trigger all 9 amps via my existing smart home software and a combination of Emotiva ET-3 trigger expanders (hooked up to smart switches). The ET-3s are not directly hooked to the processor - instead, they are hooked to smart switches that are turned on/off based on the relay state.I use HomeSeer as my home automation software. I had to change the following on the ZEN17 for this to work -Parameter 2 - set to 7Parameter 10 - set to 0I then used (unable to re-name) window/door contact open/closed as my on/off trigger. I'm able to turn on all 9 amps (with a delay set in Homeseer, because my lights dim otherwise) when the processor is turned on.I've been using this setup for a few days and 0 issues so far.
J**R
Nice piece of Z-Wave Hardware
Have three of these and never had an issue with connectivity or configuring.2x ZEN17 and 1x ZEN16 used mine to control 2 garage doors in two locations, and the other to manage high/low on a 220v variable speed pool pump motor.
ترست بايلوت
منذ يوم واحد
منذ شهر