We remain fully operational. Our teams are working around the clock to ensure your deliveries continue safely.

قم بتنزيل التطبيق


معلومات عنا
حقوق الطبع والنشر © 2024 Desertcart Holdings Limited
قم بتنزيل التطبيق


🖨️ Don’t let clogged nozzles kill your workflow – clean smarter, print sharper!
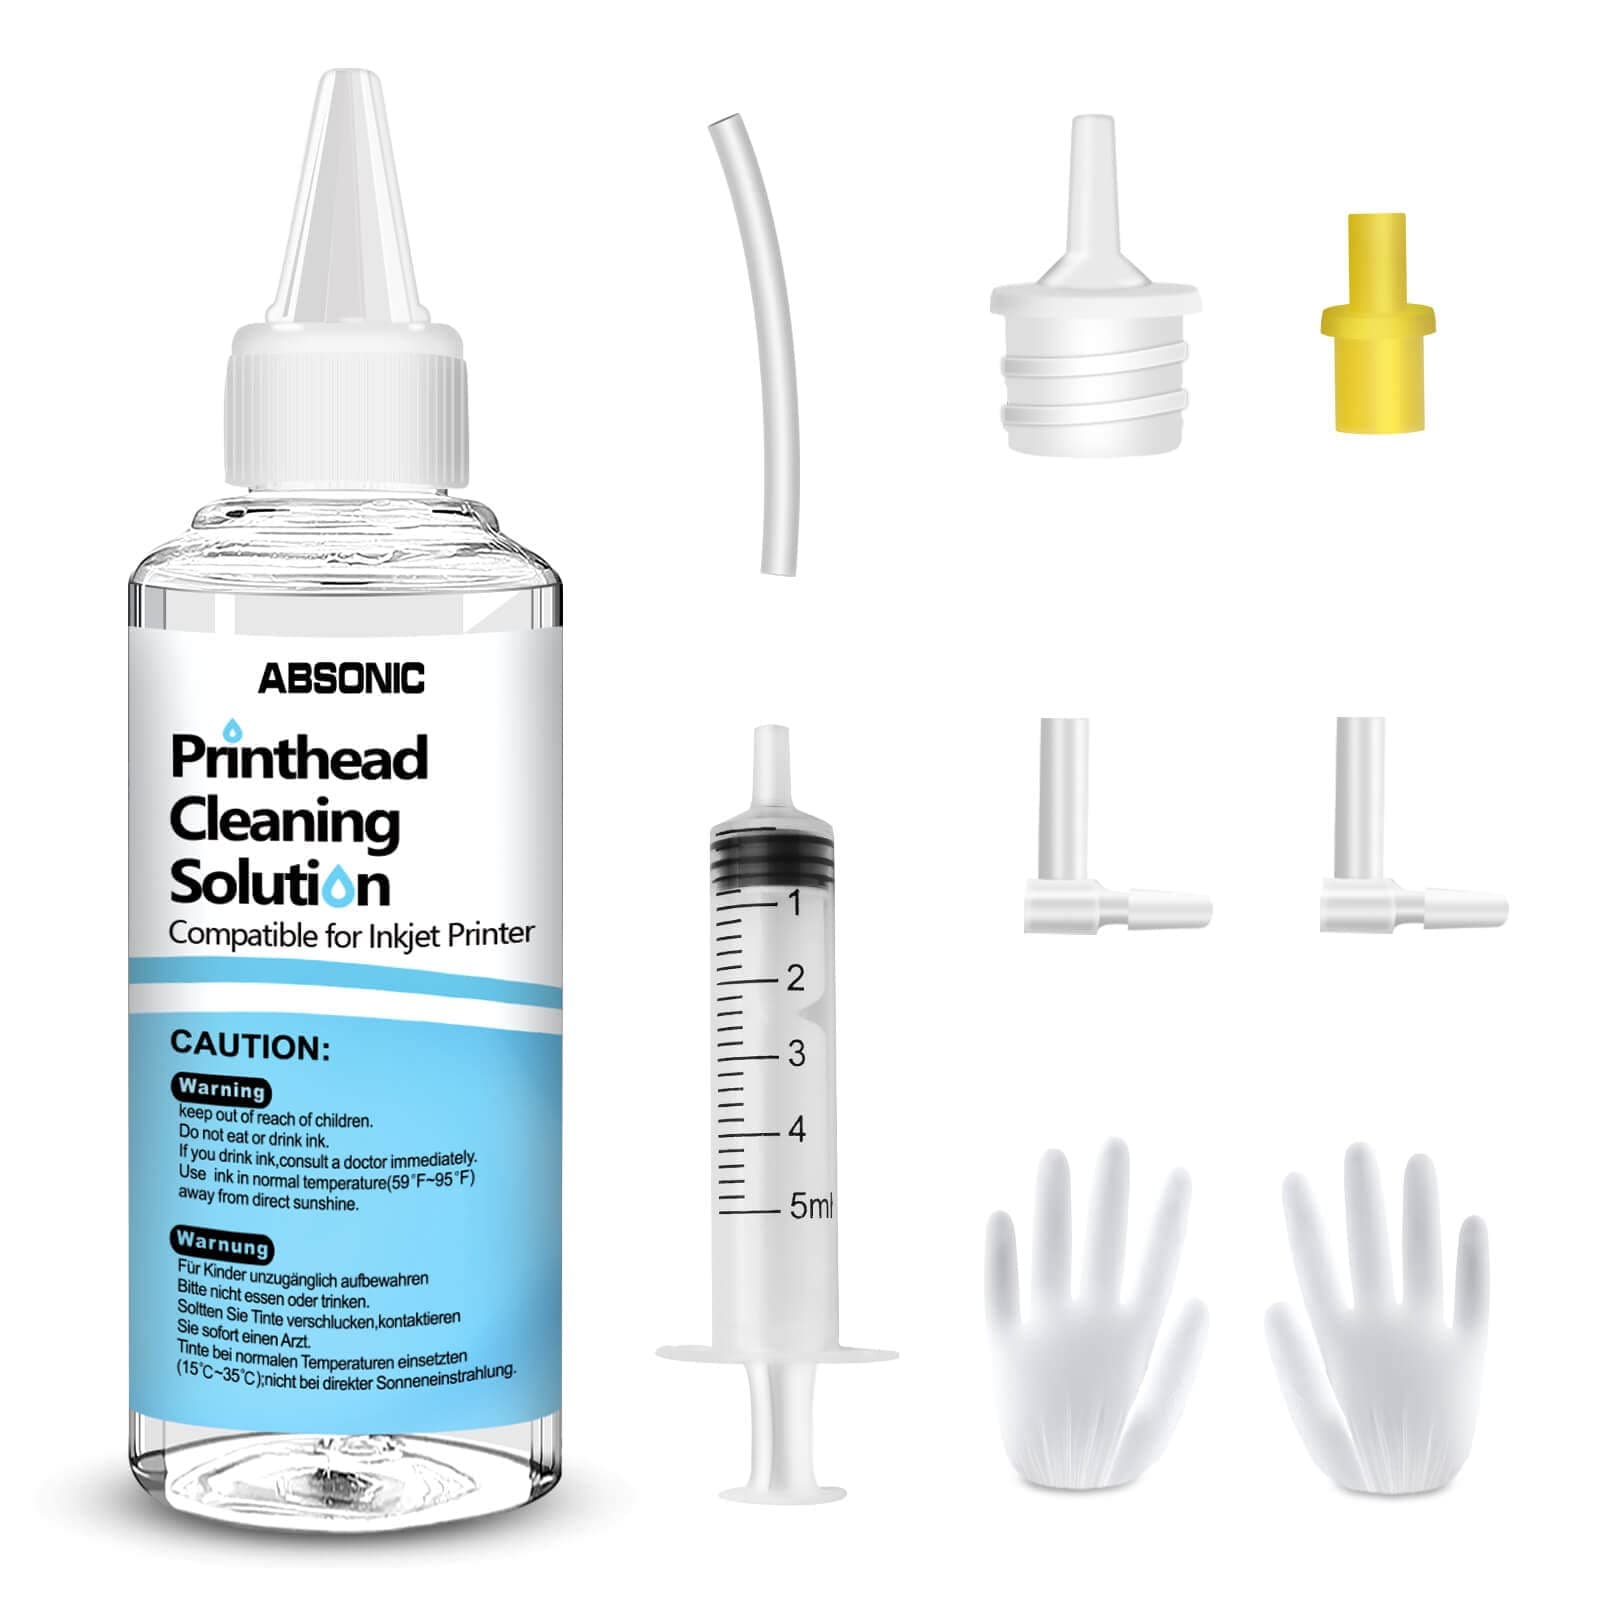
The Absonic Printer Cleaning Kit features 100mL of powerful printhead cleaning fluid compatible with all major inkjet printers including Epson, HP, Canon, and more. Equipped with a syringe, multiple nozzle sizes, silicone tubing, gloves, and clear instructions, this kit enables professional-level maintenance to unclog nozzles, restore print quality, and extend printer lifespan. Trusted by thousands, it’s the cost-effective solution to keep your inkjet printer running like new.


| ASIN | B09DFY6VWG |
| Additional Printer Functions | Print Only |
| Best Sellers Rank | #2,102 in Office Products ( See Top 100 in Office Products ) #104 in Inkjet Printer Ink Cartridges |
| Brand | Absonic |
| Built-In Media | 100mL Inkjet Print Head Cleaning Fluid, syringe, white nozzle, yellow nozzle, L-shaped tubes, silicone tubing, gloves, and instructions |
| Color | Printer Head Cleaning Kit 100mL |
| Compatibility Options | Compatible |
| Compatible Devices | DTF Printer, Ink Cartridges Printer, Ink Tank Printer, Inkjet Printer, Printhead Cleaner Kit |
| Compatible Printer Models | printer cleaning solution printer jet cleaner, printer head cleaning solution, printer head nozzle cleaner, printer syringe cleaning kit, universal printer cleaning kit |
| Customer Reviews | 4.3 4.3 out of 5 stars (2,431) |
| Ink Base | Water |
| Ink Colour | Multicolor |
| Item Dimensions D x W x H | 6.3"D x 2.7"W x 1.89"H |
| Item Type Name | Printhead Nozzles Cleaner |
| Manufacturer | Absonic |
| Model Name | Printer Nozzle Cleaning Kit Solution |
| Model Number | Inkjet Printer Cleaning Kit |
| Other Special Features of the Product | printer head cleaner fluid, printer head cleaner liquid, printer head clogger cleaner, printer head clogger cleaning, printer head nozzles cleaner flush |
| Page Yield | 1200 |
| Printer Output Type | multiple colors |
| Printer Type | Inkjet |
| Specific Uses For Product | Inkjet Printer Maintenance and Cleaning |
| Unit Count | 1.0 Count |
| Warranty Description | Printhead Cleaning Kit |
E**.
Amazing cleaner for clogged inkjets!!
AMAZING CLEANER!!!! I thought I was going to have to throw out my printer. Not a drop of black was coming out. I went through 4 cartridges trying to get the printer to clean the clog before I found this. Used just 5ML of solution out of the 250ML bottle and the printer is working like new again. I would give 10 stars if I could. The included tools made it easy to use. Just needed to add a microfiber towel.
B**R
Perfect alternative replacing a perfectly good printer!
this worked great! I have an EPSON 2850 that has been converted to sublimation and so ink tends to get a bit clogged. Usually if I run a few sheets through it, the clogs flush out, but this time I couldn't get my black to print at all. I ran print sheets through, did head cleaning, etc. but it didn't improve. So, $10 for a chance this might work, seemed like like at better idea, then pitching the printer. The process was super easy (there are some good video's on YouTube on the "how". Watch a few of them, but don't fall for the super expensive kits; this one works! Running like new!
T**A
Complete printer cleaning kit.
Nice cleaning set that was exactly as described. It worked well but did not fix my printer problem.
A**R
Print quality restored! Great product.
Great product. Easy to use and fixed my printing problems that I’ve been trying to solve for the last few years. I wish I had heard of this print head cleaning process sooner. I found a video tutorial on how to do this task, bought the product, cleaned the nozzles and now my Epson WF 7710 is printing like new again.
S**R
Fiddly, but worked perfectly
It was a bit difficult to figure out access to my inkhead, even after watching their video, but that's not their fault. I have ten minutes of intense fear after I did the cleaning, because I'd paused overnight and didn't notice there was still a sheet of paper in there. Teasing out all the soggy bits used up my quota of luck this month, so RTFM TWICE and doublecheck yourself. Assembling the syringe from random bits and forcing the silicon tube onto the ink stub was not easy. Good fingers, a hemostat or fine plier, and bright light are needed. Not easy. Not fun. But once I got it all done (and undid my paper jam mess) the printer fired up. Didn't tell me one color was out (as opposed to still clogged) but once I found that, eureka! The damn thing is printing again. I used two full syringes, after 6 "head cleanings" still hadn't purged the black, fwiw. I think the full kit would give you one full cleaning, 1x on all four colors. But for me, the black cart is the devil incarnate. If I don't print for three weeks...goodbye. Bottom line? This worked as claimed. Saved me from buying a new printer!
A**E
Sadly, failed to work with my C88+ Epson printer.
Sadly, failed to work with my C88+ Epson printer. I love the printer, one of the few that works with particle based inks which are the only ones that are water resistant. On the other hand, the printer is approaching 12 years old and has been reliable for that time. Epson appears to be phasing out their water resistant inks and it's hard to find a replacement.
T**E
Well worth the investment, fixed my clogged printer.
Compatible with my Epson MF-3720. Black was really gummed up and not working. It took a few times of forceing the fluid through with the syringe, at first just back flushing until it let go and statred flowing through. Ran a test sheet, good again! I cleaned all 4 just for good measure. All the fittings, the extra fluid I have for next time. All a bonus, making this well worth every penny. Easy to use, instructions included. Got rid of my clog.
C**M
Missing piece; vague incomplete instructions; didn't clear blockage; almost destroyed printer
I installed a brand-new ink cartridge into my printer that I use regularly. For some reason this black ink did not want to print, and I ended up printing blank pages. So, after numerous unsuccessful print head nozzle cleanings and test pages, I bought this cleaning kit. This cleaning kit almost destroyed my printer! First of all, one of the L-shaped pieces was missing from the kit. I'm not sure if they were the same or different sizes. The directions were very vague. They didn't explain what the other nozzle was even for. Was it an extra nozzle for the bottle? Why was it needed? The directions show a broken print pattern to identify which colors need to be cleaned. If your printer looks like this, do a print head cleaning through your printer or print an ink purge page first. Only use this liquid cleaning solution as your last resort, when you continuously get broken lines after numerous print head cleanings and a couple of purge pages. The directions state to "inhale" 4-5ml of cleaning solution into the syringe. But, they only want you to inject 1ml into the ink inlet that needs to be cleaned. That isn't enough to flush out the line, so you're left with cleaning solution and now diluted ink in the tubing. Other online videos using liquid cleaning solutions say to use 4-6ml per color to flush out the lines. And, you should probably wait at least 24 hours before attempting to print anything. Of course, the lines are going to be full of clear cleaning fluid, so it will take some time before ink flows through the tubes again. So, it's no surprise that people complain that they print out blank pages after using this cleaning solution. That's exactly what happened to me! But, the directions show a perfectly printed test pattern right after injecting the solution. BTW, the QR code at the bottom of the instruction manual is the same manual but in digital form. The yellow rubber piece did not fit into the ink inlet of my Brother MFC-J6925DW printer very well. I had to hold it on using needle-nose pliers. The directions don't clearly explain that you must remove the syringe as you're pushing in otherwise, when you remove the apparatus ink will get sucked back into the syringe so you must flush it out before using it for another color. Also, if you allow ink to get sucked back into the syringe, ink is going to spill out of where you attached the rubber piece to the inlet, leaving a mess. This happened to me multiple times. The directions have you wait an hour, then print a test pattern. If that doesn't work, then try again 2-3 more times. If that doesn't work, wait and try again the next day. Why? Instead of trying 2-3 times and wasting 2-3 hours, just flush each clogged line slowly with 4-5ml of fluid to completely flush out the line. Then, wait to do a test print 24 hours later. Otherwise, you’re going to get air bubbles in the tubing. Instead of just flushing out the clogged black tubing, I ended up flushing out the tubing for all the colors, too. Big mistake. I printed numerous blank pages. This whole ordeal wasted several hours. I did some research so I didn’t have to trash my expensive printer. I searched my printer model number and “printhead purge.” I found a YT video describing how to go into a special setting on my brother MFC printer to purge the ink better than the original default settings. You can manually do it per ink color. Low and behold it worked, but it wasted a lot of ink. At least 3 days later I was able to salvage my printer, no thanks to this cleaning solution and the vague instructions. My advice is to use this at your own risk and only if absolutely necessary to clear a blocked ink cartridge. Do some research online and watch videos of people using similar cleaning solutions.
S**H
100% work product super quality
A**I
منتج ممتاز جدا (اشكر البائع)
M***
After i didn’t use my printer for couple of days , it wasn’t able to print in colors and black. I tried to fix the problem by deep cleaning option but it didn’t fix the problem at all. I decided to buy this kit and thankfully i did. I followed Youtube videos tutorial and finally the problem is resolved. I highly recommend this kit if you want to revive and clean printer head.
M**I
الجودة
ترست بايلوت
منذ شهرين
منذ 5 أيام