🖨️ Keep Your Prints Pristine with Ease!
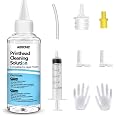
The Absonic Inkjet Printer Cleaning Kit is a comprehensive solution designed for all major inkjet printer brands, including Epson, HP, Canon, Brother, and more. This 100mL cleaning kit features a water-based formula that effectively unclogs printhead nozzles, ensuring optimal print quality. The kit includes various nozzles, syringes, and gloves for easy application, making it an essential tool for maintaining your printer's performance.


| Ink Base | Water |
| Compatibility Options | Printer Head Cleaner Fluid, Printer Head Nozzle Cleaner, Printer Head Cleaning Fluid |
| Compatible Devices | Ink Tank Printer, Inkjet Printer, DTF Printer, Ink Cartridges Printer, Ink Printer |
| Color | Printer Head Cleaning Kit 100mL |
| Compatible Printer Models | printhead clogger cleaner, printer head cleaner liquid, printer head cleaning solution, printer head nozzle cleaner, printhead cleaner fluid |
| Ink Colour | Multicolor |
| Page Yield | 1200 |
| Additional Features | printer head clogger cleaner, printer head cleaner liquid, printer head cleaner fluid, printer head clogger cleaning, printer head nozzles cleaner flush |
S**K
Incredible Results, Take Your Time
Very easy to use and very effective!Simplified directions for an effective cleaning:1. Go into your printer menu and have it start a print nozzle cleaning. Be ready to disconnect the power immediately after it starts.2. Unplug the power once the nozzle cleaning begins. This is important, it stops the printer head from moving and keeps it in an unlocked position.3. While the printer head is unlocked and the power is turned off, remove your secondary printer cartridges (if equipped) from the movable printhead. Mark each one to help remember the order they go in!4. With the secondary cartridges removed, you should see 4 little nipples/ports corresponding to each color cartridge.5. Grab a few paper towels and fold each one 3 times, lengthwise. Place 1 folded paper towel into the tray beneath the printhead assembly to help absorb the mess that is about to come out from it.5. Use the cleaning kit with the hose/tube FIRMLY attached to the syringe and fill the syringe with the cleaning solution.6. FIRMLY attach the other end of the hose/tube from the syringe to the nipple/port on your printer and begin applying pressure to the syringe plunger to eject the cleaning solution into the port. Once the syringe is empty, carefully disconnect the hose/tube from the print nipple/port and dab it clean on a paper towel. Now you can refill the syringe and repeat the procedure on the same port to ensure it is cleaned.7. After the second flushing, slide the printhead over to remove the paper towel beneath it. (It is going to be a soggy mess.) Take your second paper towel to replace the one you just extracted.8. Repeat steps 5 and 6 (and 7 if necessary).9. Once you have cleaned all of the ports, dab up any spillage from the bottom of the printhead before you reinstall the secondary cartridges and remove the paper towel from beneath the print head.10. Reinstall the secondary printheads making sure they go back in the correct order or your prints will come out discolored and odd looking.11. Run 2 or 3 print head tests on fresh paper to verify the printer is working correctly. It may take 2 (in my case 3) times for this test to complete properly with freshly cleaned ports because it needs to flush out the residual cleaning solution from the ports.12. Enjoy your Like New printer!
L**N
OMG it worked!
First of all, I am not a paid shill for any product, and I am not involved with this company in any way. I'm just a happy customer.Y'all, IT WORKED!!For maybe 8 months my Epson Workforce WF-7720 has been printing poorly. Specifically, the yellow would barely print anything. I tried running the "Print Head Cleaning" function on the printer so many times with no change. Finally, about 6 months ago I ordered this cleaning kit. Then I read the instructions and watched the video and I guess it seemed daunting so I never actually tried using it. It just sat there on my desk, mocking me. And in the meantime, I had this amazing printer that I love but it wouldn't print right. I'm sure everyone knows how it goes - it was on my list of things I needed to deal with but I just didn't get around to it. Until this week.This week, for various reasons, I became motivated to have a working printer again. So I read the instructions again and I kinda halfheartedly tried to use it. It didn't change anything. I started shopping for a new printer thinking this one was just dead. Then for some reason yesterday I decided to read the instructions again. Maybe I didn't do it right. It turns out, I needed to use some of the attachments that were included in the kit. You see, the kit includes all manner of little gizmos and, quite honestly, the instructions don't really help you figure out what to do with them. I suspect it is a situation where every type of printer is different so they just give you everything you need but they can't possibly do the simple thinking for you to help you figure out what to do. Turns out it was easy once I started looking at it. There's a little piece that fits perfectly over the nozzle on my printer, and a little tube and various attachment pieces to build a way to connect the nozzle attachment to the syringe. Honestly, this is where those little logic games your mom played with you as a toddler come in handy. Legos and Lincoln Logs, things like that. It's not difficult. The main key is that you have to end up with the little yellow connector piece snugly mounted to the print head nozzle in order for this to work. There's no special trick or anything strange about it, all the pieces are included for you to easily solve the problem. At least for my printer. (I included a picture of what my syringe contraption looked like after I put it together.)Anyway, I got it all rigged up with the included pieces and pulled the liquid up into the syringe. I attached the thing to the yellow print head nozzle on my printer and gently pressed the plunger and let it sit for a minute. Then I retracted the syringe and it pulled a bunch of yellow up into the syringe along with the cleaning fluid. I did that back and forth a few times and then disconnected it and cleaned up the mess (which was also much easier than I had envisioned). Plugged the printer back in and got it all back together, printed a couple test pages and then on the second one the yellow section was completely printed for the first time in ages! So I googled for a color printer test page and printed it and every color looked perfect!Oh, I also wanted to mention that the instructions mention something about putting "blotter paper" down under the print cartridge carriage thing to absorb the mess. I didn't know what blotter paper was so I took a paper towel and cut it into a long strip about 2" wide and then put it over the giant sponge thing that is under where the cartridge carriage thing moves back and forth. All the fluid I squirted through the print head made a bit of a mess but my paper towel absorbed most of it. I used a couple more paper towels to clean up the rest, and it looks fine now.In any case, this product worked exactly as advertised and saved my excellent printer from being replaced. I would definitely order this again if I needed it in the future.
D**C
Overall good. Needs tube with lager inner diameter for Brother INKVESTMENT printers.
Overall the kit is great. The only issue is that it doesn't directly work with Brother INKVESTMENT printers as these printers have a larger input nozzle and the tube in the kit is too small. I was able to fashion a solution with some other things I had around the house and then it worked just fine. It seems that all of the similar kits also come with a smaller hose/tube that works for most printers but where the inner diameter is too small for INKVESTMENT printers.
B**O
quick and effective
10 minute fix for HP 7600 that had 2 colors not printing. I had tried the alcohol soak method already and was worried the printhead would need replacing but this did the trick on the first try. I just ran the solution through the cartridge as shown in numerous YouTube videos, and didn't soak for an hour like the instructions said. Yes it's a few parts that would cost a few cents each, but not having to go find the parts that fit was worth a few bucks. Takes a minute to find the right combo of connections but I eventually found one. For my printer i ran the tubing directly into the top of the cartridge for a snug fit without the little yellow connector.
J**S
Has twice saved my mom's printer.
My mother has an Epson Eco-tank printer. She needs a color printer to print quilt patterns. It will sometimes go unused for a time and gets totally stopped up. This kit has twice cleaned it out and got it printing again.
A**R
Good for regular Maintence not for big blockages…….
Great value, however I missed the part where it says that it doesn’t do badly blocked printer heads.
ترست بايلوت
منذ شهر
منذ يومين