معلومات عنا
دعم العملاء
احصل على التطبيق

قم بتوجيه الكاميرا لتنزيل التطبيق
حقوق الطبع والنشر © 2024 Desertcart Holdings Limited


🔪 Sharpen Your Skills, Elevate Your Kitchen Game!
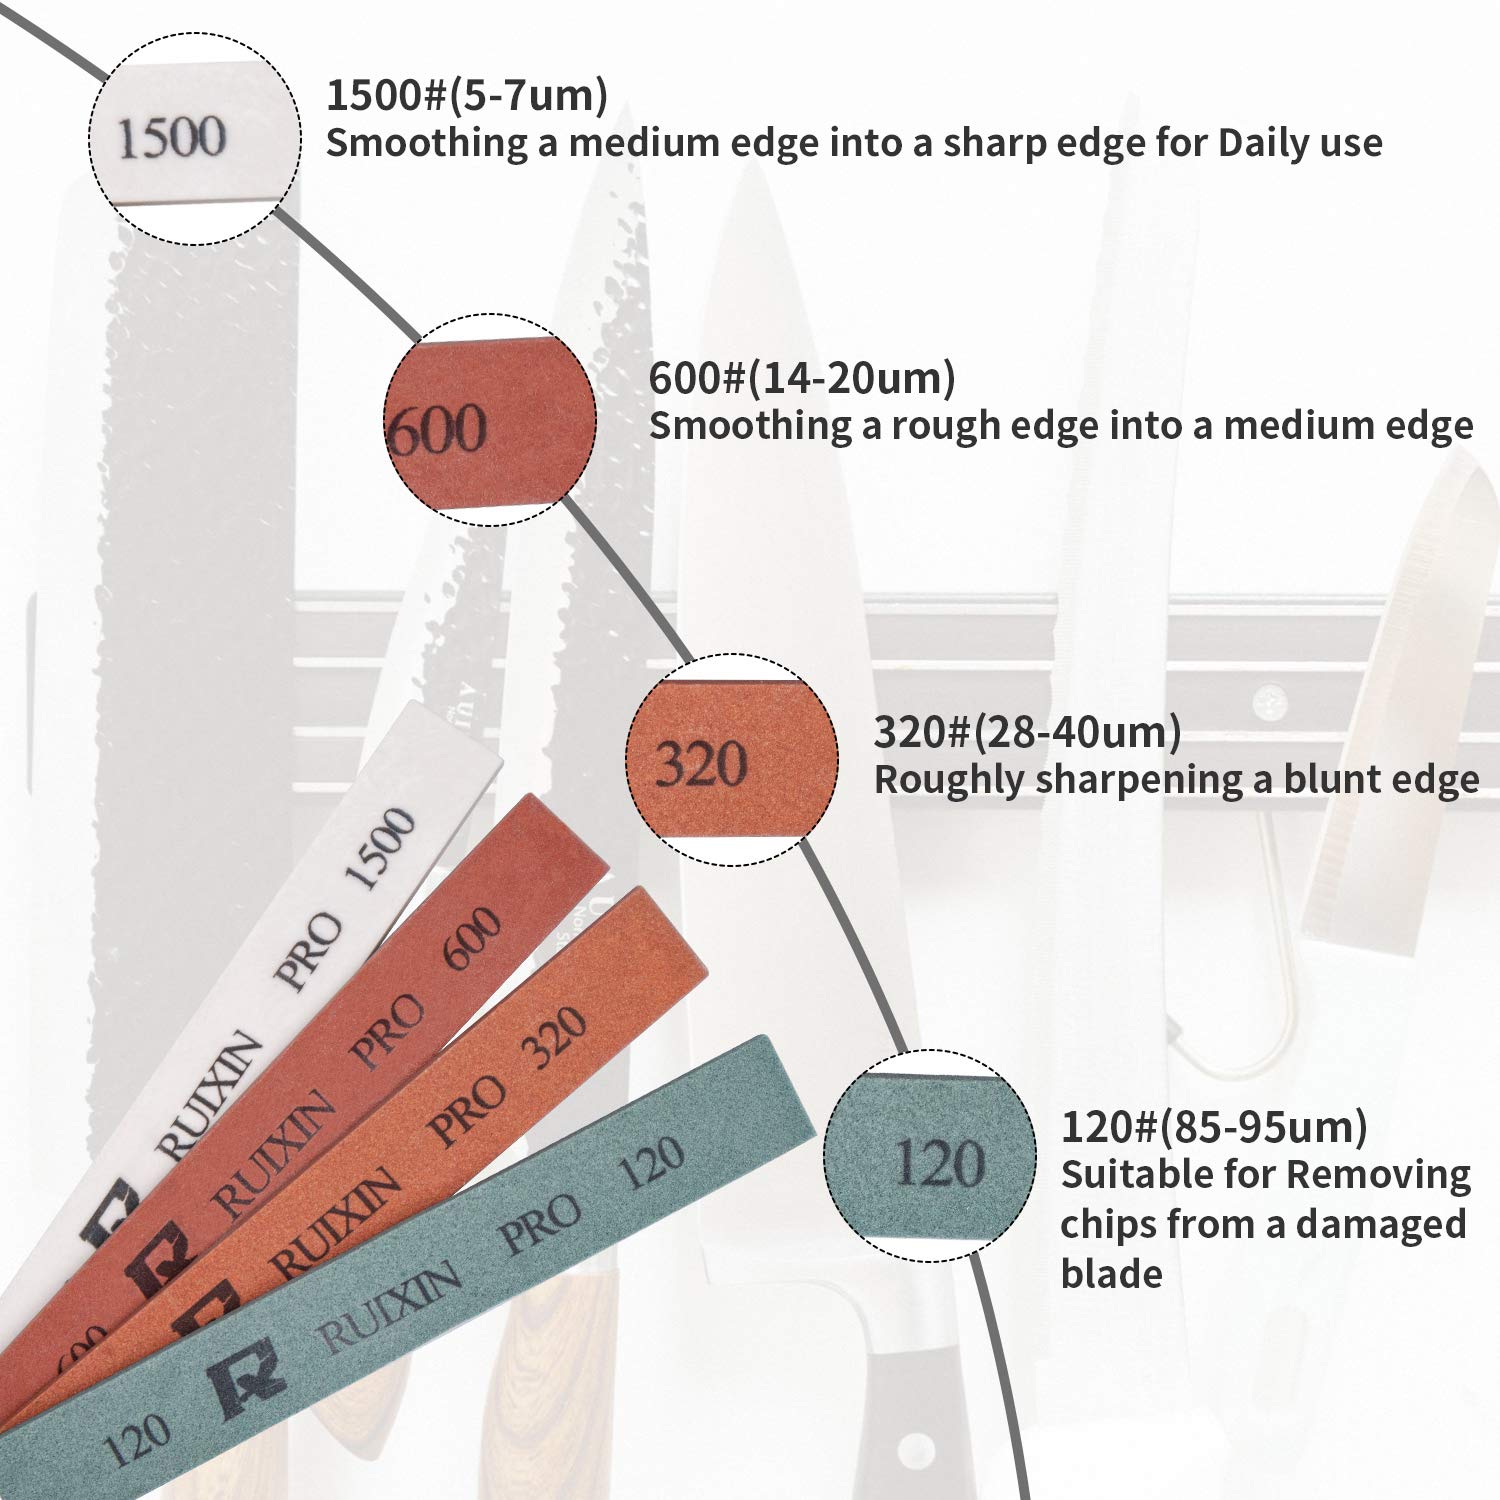
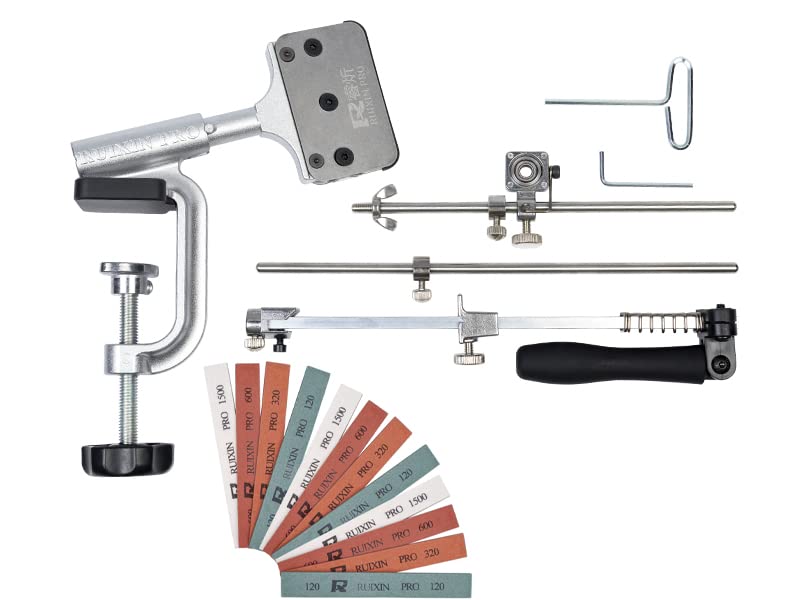
The RUIXIN PRO RX-008 Knife Sharpener Kit is a professional-grade sharpening system featuring a 360° flip rotation design, a precise slider, and a firm G-clamp fixture. It includes 12 high-quality sharpening stones and is suitable for a wide range of blades. Designed with safety in mind, this kit is easy to use and perfect for both novice and experienced chefs.
C**S
Tips and fine tuning the Ruixin PRO RX-008 setup
First I want to mention Anny with Cruitech customer service was very responsive and went way above and beyond to take care of the issues I ran into with the order of the kit. I was missing a rod stop, the 10K stone was scratched and the leather strop was not flat with glue coming undone. She sent me an entirely new kit free within days and told me to keep the kit I have. Like I said, way above and beyond!I watched countless videos and read as many reviews I could find of all the different popular sharpening systems. At the end I chose to purchase the Ruixin PRO RX-008. Going the Ruixin PRO RX-008 route was not because of the cost (although it was a factor), it was the flexibility of the system. I sharpen mainly mid to high end pocket knives, including Karambits. I have so far sharpened 8 knives. All to razor sharpness. Once one understands the system, it is highly effective and as easy to setup and use as can be. The caveat is the user must still understand what is an apex of an edge and the basics of blade sharpening.I have owned a couple of other well known systems including KME and Apex Pro II which are all in storage now. So here is what I have learned and how I improved or tuned the system:* The Ruixin PRO RX-008 is well known to change the angle when you rotate the blade 180 degrees. Mine from factory was 1.5 degrees off when rotating the blade. After the fix below it is now 0.1 degree off. I needed 7 layers of tape to achieve this accuracy when rotating the blade. The fix is...1) to place layers of thin strips of electrical tape on the bottom side behind the bolt holes. I included a pic. Once you have gotten close to perfectly the same angle when rotating the blade leave the bottom plate Philips screws tight and never loosen again. Not necessary to adjust again or loosen screws once you have it all setup.2) When placing blade in clamp, only place the flat part of the blade by the spine into clamp. Look at pic provided.* Another complaint by users is the connections in the system loosen during use. Yep if you follow the assembly instructions this will happen. Here is the fix...1) For the blade holder, use one of the rod lock clamps (this is what I call it). See pic.2) Tighten all connections with pliers. For the guide rod ball use the Allan head bolt, tightened with a Allan head wrench. Do not bother using that cheap one you get with kit.* The clamps have grooves to hold blade in place. Use painters tape like in provided pic to prevent marring of your blade.* I use diamond plates purchased on Amazon. They are called Value Pack diamond stones/plates. Were $25 for 10 of them ranging from 80 grit to 3000 grit. Works like a champ, have rounded edges and so far do not visibly see any wear on them. I also use the included three polishing natural stones that come with the kit, which also work really well. If you use the synthetic stones or natural polishing stones you must keep them wet with water otherwise you will wear them really fast and they will be inconsistent. Also round (get rid of the sharp edge) the edges of the synthetic and natural stones otherwise you will scratch your blade. This can easily be accomplished by laying a piece of wet/dry 150 or 180 grit sandpaper on a flat surface. Then with wet stones lightly rub the edge only over the sandpaper.* If installing the large C-clamp on glass, marble or smooth surface. Use a piece of rubber between the bottom of the clamp and clamping surface like in the provided pic. Very solid, nothing moves during sharpening and polishing.* There is a attachment that goes over the rod that holds the guide rod ball. It is a bar with a hook that you can move the guide rod that holds the stone or plate and rest the whole bar on. This is so the rod is out of the way while you are rotating the blade, inspecting it or whatever. I purchased mine from China (Ali-X) but also can be purchased on ebay and I think Amazon. Costed me $2.60 shipped, get it, super handy.* The guide rod ball is made from nylon or some kind of plastic. This can be replaced with a stainless steel ball that has tighter tolerances that eliminate the play that is inherent to the nylon ball. Again another few dollars. Will last longer than nylon ball and improves the precision of the system. I paid $8.60 shipped for this.* Recurve blades and Karambits can be sharpened with this system. But you will need to purchase rods that attach to the guide rod that hold the stones. I purchased diamond rods at $5 a piece for the varying grits I wanted. Can get from 80 - 3000 grits. Again Ali-X or possibly Amazon might also offer them.* The key to a fixed angle sharpening system is consistency. After rotating blade and angles are consistent, all the pieces of the system stay locked into place and do not come loose, then it is consistency with technique. I have watched countless videos where the user would basically sharpen the blade in a sawing up and down motion inconsistently across the blade. I have no idea as to how removing different amounts of material from different sections of the blade gives a consistent result. What works for me and provides 100% consistent results is...1) to start from the heel of the blade and work toward the tip. This is a slow-ish stroke using only the weight of the plate and plate arm. Especially with diamond plates, they cut fast, very efficient.2) Using whatever grit I want start with (depending on what I am trying to accomplish), 10 passes on one side, then 10 passes on the other side. I feel for a burr. If no burr I just keep at this until I can get a consistent burr across the blade. Then rotate and do the same. Always even amount of strokes on each side of the blade. Once I get a burr to form consistently across the blade on both sides, then lower the amount of stroke passes on each side, then I move on to a higher grit. If an area on the blade needs a little more I will give just that area more attention and then a full stroke across blade. While using the technique outlined above is not the fastest but will get consistent and great results. Using the technique above also eliminates any movement/vibration within the system.3) After every full rotation of the blade lightly wipe both sides of the blade with a clean soft cloth to remove metal that may scratch your blade or interfere with the sharpening or honing process.4) To really be able to feel how sharp your blade is during sharpening and honing and to get the best result I learned this from a knife maker... After each grit before proceeding to the next grit stage use the edge of a piece of cardboard or cork and lightly run it from heel to tip of blade twice to loosen or remove the burr on the blade edge. What you feel now is the edge you have.5) Another key to a sharp blade is the lowest grit, or first grit used you need to form the edge. If a consistent burr is not formed on both sides of the blade during this sharpening stage you have not formed an edge. Any further honing of the blade is just a waste of time unless a edge is formed at this stage!* Ok last tip I can think of off the top of my head. I am able to get mirror finished edges, razor sharp. To take it a bit further stropping is needed. The leather strop plate that comes with the kit is crap. This will roll and dull your refined blade. If you want to finish the honing and polishing steps by stropping and want to not change angle or take it to a manual or typical strop I figured out a way... Take the useless, uneven, cheap leather strop that comes with the kit and sand the leather flat. I used 400 grit wet dry, placed it on top of a glass surface and turned the plate with the leather facing down. Sanded the leather until it was flat. Then using Scotch double sided tape and the cardboard from the backing of a notepad on top. So the cardboard is the top layer, then the double sided tape and then the flattened leather strop. Used 0.5 Micron compound (green) purchased from Amazon (Taytools 1.2 Ounce Bar Green Chromium Oxide Micro Fine Stropping Polishing Compound 0.5 Microns or 60,000 Grit) purchased for $7.64 shipped. See pic included. The key here is the strop will be firm and slightly shorter in height than the stones or plates being used before it. This prevents the strop (usually softer and leather) from rolling the edge. Also the strop plate is shorter in height which automatically lowers the angle slightly making sure the edge angle is not effected. I found best results are to just make stroke passes again from heel to tip along the blade edge. This works like a champ and saves time.In summary this system works really well. Does need some tweaking but I expected nothing less, especially for $55 with tax and shipped. I am really glad I made the purchase. Hopefully this helps someone ...
B**N
You CAN get a quality edge but you DO need to work smart.
Everything arrived and I now have some RAZOR sharp knives. I do have some suggestions for future models like this one:1. The XL has the BEST assortment of stones.2. The blade holder does NOT present the same angle on both sides. The angle of the stone needs to be adjusted EVERY time the knife flips. Perhaps re-design the blade holder to hold the blade more straight.3. The width and thickness of the blade effect placement in the holder and thus the angle needs to be adjusted differently for each knife every time.4. Using a cell phone app for angle measuring is not convenient. There should be a way to measure the angle between the knife and the stone without trying to balance a cell phone for an exact measurement.5. The quality of the thumb screw and hex wrench could be MUCH better. The thumb screw required a wrench to tighten and loosen because even my strong hands couldn't tighten it so it would not easily slide back down.6. In fact, quality control over all leaves a lot to be desired. This is not a bespoke precision instrument. It is a usable tool with quality only a little above what you might expect from Harbour Freight. It is usable. It works. You DO need to know what you're doing.For users some tips:1. Remember to wet your stone frequently.2. LIGHT pressure.3. Long, diagonal, SMOOTH strokes.4. Take your time and do it right.5. Measure the angle CAREFULLY *EVERY* TIME you flip the knife.6. Have a pair of pliers handy and a better quality hex wrench than the one included.7. Use a Sharpie to mark the natural water stones included.My instructions (because the included instructions seem to have lost a LOT in translation and ended up less than clear in places... Don't get me started about the importance of hiring native speakers to edit instruction booklets! ...and marketing materials!):Setup:1. Clamp the holder to a sturdy table.2. Attach the vertical arm with ball slider & stop slider under it.3. Attach stone arm to stone holder.4. Insert the knife into the blade holder. Center it and make the blade edge as centered and straight as it can be. Tighten the center hex bolt first then the side ones.5. Determine the correct angle for this blade - usually 17deg for kitchen knives, 22deg for utility pocket knives. Some Asian cooking knives have lower angles. Some utility knives may have higher angles up to 30 deg. You can check and repeat the angle by marking the bevel with a marker and adjusting a fine stone till it removes the marker ink the full width of the bevel. Measure/calculate the angle between the blade and the stone.Sharpening:1. Check your setup is right.2. Use a protractor app on a smart phone to measure the angle of the FLAT surface of the /knife blade/. (NOT the blade holder as the instructions say)3. Add (or subtract, depending on the app) the desired bevel angle to this angle to get the angle the stone needs to be.4. Insert the stone holder rod into the ball joint and adjust the thumb screw to move the stone to the proper angle.5. Measure the stone angle and the knife angle again and re-calculate or adjust as necessary.6. Select the appropriate stone - low number grit for big changes and high number grit for little changes. Start with the coarsest (lowest number) stone you think you need and progress in order upwards.7. Wet the stone with water. Rub it in and/or soak it for 5 minutes or so. You can soak all of them now to save time.8. Insert the stone into the holder.9. Draw the stone diagonally along the blade tip to handle or handle to tip, & towards the spine. Use LIGHT pressure, not much more than the weight of the stone. Slow and smooth.10. Repeat 9 for about 10 strokes and WIPE THE BLADE with a clean, soft cloth.11. Flip the knife.12. IMPORTANT: Measure the stone angle and the knife angle again and re-calculate or adjust as necessary. IT WILL BE DIFFERENT.13. Repeat 9-10 on this side of the blade.14. If the edge is coming to where it should be, repeat 7-13 but with 5 strokes on each side this time.15. Repeat 7-13 but with 3 strokes on each side this time.16. Change to the next finer stone. (higher grit number)17. Repeat steps 7-15.18. Repeat till you've done this all with your finest stone.19. Insert the leather strop.20. Check and adjust the angle as necessary.21. Strop the edge from tip to handle or handle to tip but diagonally AWAY from the spine this time.22. Strop for 3-5 strokes on each side. Remember to re-measure and adjust your angle whenever you flip the knife.23. Wipe the knife clean.24. Rinse the stones. Rub the used side with a finger or soft brush to loosen the metal filings. Dry the stones with a clean towel and let them air dry the rest of the way before storing them.25. Disassemble the sharpening system and store everything in the carry bag.
C**Z
Great value
I was missing a nut, and the instructions are nonsensical but with some tweaking there is nobetter value. Go for it.
J**Y
Best bang for your buck - don't buy over priced name brand
Third one i've purchased between friend, family and myself. No negatives from the former, but an issue I noticed with the screw was a lump of slag preventing the flat head it was designed for from sitting flush. Ultimately causing the screw driver to slip out and slightly strip the screw head.Everything from all all orders has been threaded very well and have had either very little resistance or no resistance at all.Considering the cost of materials used, they still could have gone cheaper on the final price to consumer. That being said, it is still much better many of the other options out there for the than.Metal itself for a bulk of the product is a garbage mix of recycled metals in a sand casting, but otherwise a negligible point for the purposes of this product.They've added a resting clip for the sliding arm to keep it from falling while not in use, or it was missing from the first time purchase. Either they missed including an item in packaging, or they've attempted to improve the design. Not sure which it was.Overall, they could have gone cheaper considering the cost of materials used to produce this item. That being said, it is still a better option for $60usd over many of the others out there.
A**R
Pretty good
Maybe I need to work on my technique, or maybe the stones aren't that great but I was expecting my knives to be a but sharper then they come out. Don't get me wrong, it gives good results, just not brilliant. Will try some new stones and see if I get any better results, these ones so shed a lot of material.
M**D
Efficace
Je n'ai jamais réussi à affûter un couteau correctement jusqu'à maintenant. Avec cette appareil, une fois l'avoir pris en main c'est génial. J'ai enfin des couteaux qui coupent. Je recommande vivement.
M**S
Perfect. The bat so far
I have been avidly seeking this device in form and function for some years, always seeming to get a version from another manufacturer that doesn’t meet expectations in quality or function. That changed when I received this. It’s quality is excellent. Properly sized to accommodate various sized blades including long carving or hunting knives. Additionally the blade clamp is robust and secure - again a typical flaw in others I have purchased. This also has flexibility to fine tune to particular blade shapes or stroke lengths to ensure to slipping off the edge of the blade and bumping the sharpened edge. Overall it’s an 8.5 out of 10 but if you purchase the additional stones to supplement it’s a definite 9.5.. very pleased with this and feel the value was good. And of course it puts an excellent accurate reset to any blade and finishes with a razor edge
P**L
Very Impressive for the money
I recently had the opportunity to try out the RUIXIN PRO Professional Knife Sharpener, and I must say that it exceeded my expectations on multiple fronts. This comprehensive knife sharpening kit is a game-changer for both professional chefs and home cooks who value the precision and efficiency of sharp knives.First and foremost, the standout feature of the RUIXIN PRO is its 360° flip rotation fixed-angle design. This unique mechanism allows for effortless sharpening of knives at any desired angle, ensuring consistent and accurate results every time. Whether you're sharpening a delicate paring knife or a hefty chef's knife, the ability to adjust the sharpening angle with ease is a boon for achieving razor-sharp edges.The build quality of the RUIXIN PRO is exceptional, showcasing a sturdy construction that can withstand rigorous use. The sharpening stones provided in the kit are of top-notch quality, and they offer different grit options to cater to varying levels of blade dullness. I particularly appreciate the inclusion of both coarse and fine stones, as it allows me to restore heavily damaged blades and refine the edges to a polished finish.Using the RUIXIN PRO is a breeze, thanks to its user-friendly design. The clamping system securely holds the knife in place, eliminating any chances of accidental slips or injuries during the sharpening process. The rubberized base further enhances stability and prevents any unwanted movement, ensuring a safe and controlled sharpening experience.Furthermore, the sharpening process itself is surprisingly quick and efficient. With just a few simple passes through the sharpening stones, the RUIXIN PRO brings back the sharpness of even the dullest blades. The consistent angle and even pressure distribution across the blade contribute to achieving consistent results, regardless of your sharpening skills.One notable advantage of the RUIXIN PRO is its versatility. It can accommodate a wide range of blade sizes and styles, including straight edge knives, serrated blades, and even scissors. This versatility makes it a valuable addition to any kitchen or workshop, as you can sharpen various tools with ease, saving you both time and money.In conclusion, the RUIXIN PRO Professional Knife Sharpener is a true gem for knife enthusiasts. Its innovative design, exceptional build quality, and ease of use make it a top contender in the market. Whether you're a professional chef or a home cook, this sharpening kit offers precision, efficiency, and versatility that will transform the way you maintain your knives. I wholeheartedly recommend the RUIXIN PRO to anyone looking for a reliable and effective sharpening solution.
E**L
Parfait
Fait le job
ترست بايلوت
منذ 3 أسابيع
منذ أسبوعين