💾 Stack Smarter, Store Faster: Elevate Your Arduino Game
The Stackable SD Card Shield for Arduino by iTead is a lightweight, compact breakout board that adds high-speed Class 10 SD/TF card storage to your Arduino projects. Measuring just 3.1 x 2.9 x 1.2 inches and weighing 0.8 ounces, it supports write speeds up to 60 MB/s and features Bluetooth hardware interface for enhanced connectivity. Ideal for professionals seeking efficient, expandable storage solutions in their prototyping toolkit.
Special Feature | Light Weight |
Product Dimensions | 2.09"D x 1.85"W x 2.09"H |
Item Weight | 22.68 g |
Warranty Type | No Warranty |
Write Speed | 6-10 MB/s, 13-20 MB/s, 25-60 MB/s |
Hardware Interface | Bluetooth |
Secure Digital Association Speed Class | Class 10 |
Product Dimensions | 2.09"L x 1.85"W |
Manufacturer | iTead |
UPC | 610708262626 |
Wireless Type | Bluetooth |
Item model number | 3-01-0060-A |
Item Weight | 0.8 ounces |
Item Dimensions LxWxH | 3.1 x 2.9 x 1.2 inches |
Department | unisex-adult |
ASIN | B006LRR0IQ |
Is Discontinued By Manufacturer | No |
Date First Available | December 14, 2011 |
G**N
Works OK so far, but you should be aware of a few things
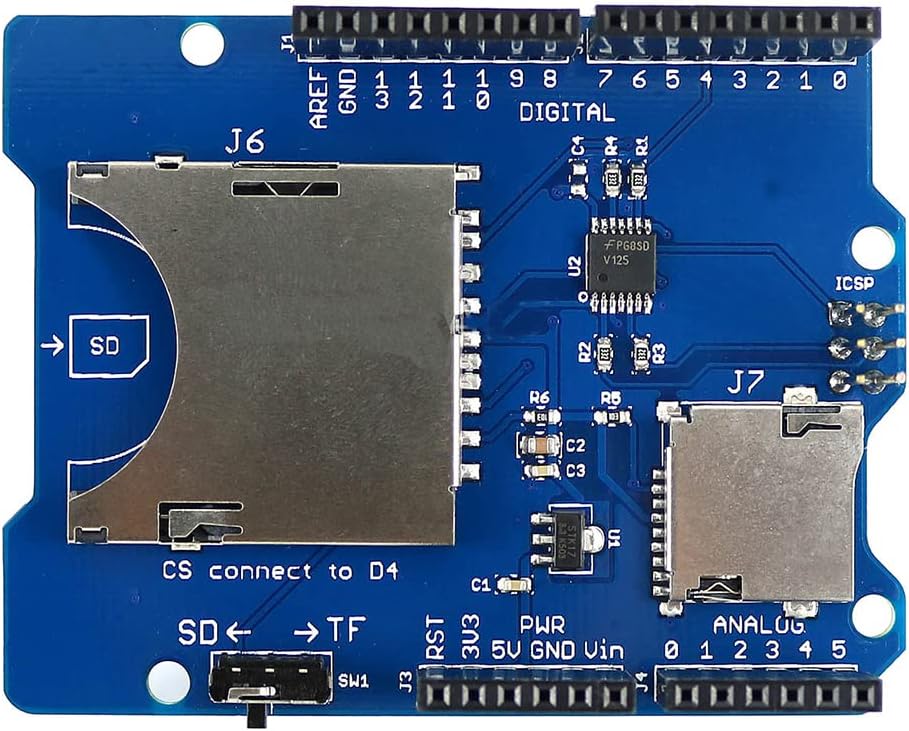
Needing some way to store and log data, I decided that an SD shield was the quickest, easiest, way to start. Looking online, there appear to be ways to pass data from the Arduino to a Windows file, but this looked too complicated to start with. My application is to build an eeprom programmer to program 2708s for my 30 year old 6800 computer.This shield seemed like a good, cheap, place to start. It came quickly, but there wasn't any box, instructions, or schematic. I could live without these but I was curious as to what the "3.3v/5v" switch did. This board is labeled version "2.0". Usually, you can go online and download whatever instructions/schematics you need. I found some info on version "1.1" but not "2.0". So, I just set the switch to "3.3" and pressed on. I know that SD cards require 3.3v or you could damage them.I installed the shield on a Mega 2560 R3 Arduino. I needed this version because I need a lot of I/O pins for my prom programmer. In general, I like to stick with the Mega, and, you can find it somewhere online for about $15. This makes it relatively cheap to dedicate a board to a project. In general, the Arduino designers did a good job with pin layout among the different Arduino boards. You can plug any shield, in general, into any Arduino as long as you "match" up the pins which are marked. But, as I will explain, this doesn't mean that it will work.So, I installed the shield on my Mega and ran the "Cardinfo" example in the Arduino IDE SD example file. This just reads the SD card and tells you that it's there, wired correctly, and communicating. It didn't work! Examining the code, I saw that one might have to change the ChipSelect pin (a.k.a., SS) depending on whose card you have. The default is "4" but it looked like it should be changed to "10" as noted. So, I did that and it still didn't work!I tried another SD card but that didn't work either. I know the two cards were "good" because I could read and format them with my Windows PC. Digging more deeply, I found that this shield would NOT work "as-is" with the Mega. That's because communication with the SD card is via SPI and the SPI pins on the Mega are DIFFERENT than on a Duemilanove, for example, which I also have. So, I put the shield on the Duemilanove, changed the chip select pin to "10" again, and Cardinfo ran as expected! Note that when you compile using the IDE, you have to CHANGE the target board to the board you are using or it just won't work.Looking online, I see that someone had simply jumpered the "standard" pins, 10, 11, 12, and 13, to pins 53, 51, 50, and 52, respectively, on the Mega. Note that when you look online, you will find that there is some confusion as to which pins are jumpered to 11 and 12. The jumpers I listed worked okay. Also, when you modify the code, make sure that you replace "10" with "53". If you use this method, you should not try to use 10 through 13 as outputs as it's not good to drive an output with another output.I'm not done with my testing so there may be other problems. For example, the jumpers may work okay but there's always concern about lead length and grounding. I also found that there are other SD libraries out there but I'm not ready to try them yet. Also, I found references to creating a "software" SPI interface that might be able to use pins 10, 11,12, and 13. But, this seems like another unnecessary complication at this time. I found that AdaFruit had a good tutorial on SD cards.
C**C
Setup instructions difficult to find, but nice cheap board
With instructions the setup is very straightforward, unfortunately, it took me an hour to find good instructions for version 3.0 of this SD shield:I found them by googling "SD shield 3.0" and clicking on the iTEAD wiki link. This wiki page will be referred to from now on as "the wiki instructions".In summary:- Put the SD shield on whatever arduino you have. Using the labels on the shield and arduino, make sure the pins match.- Use the wiki instructions' "Compatibility" section to find out what position the 3.3V/5V selector switch should be in, and whether you need to remove ALL 3 of the adjacent SPI Jumpers on the top of the board given the arduino board you're using. For the arduino DUE I had to remove these jumpers and keep the switch on 3.3V. It looks like for all but the Iteaduino MEGA 2560 it doesn't hurt or is required to remove the jumpers, including the arduino MEGA.- In the arduino IDE, use the "cardinfo" example, found through File > Examples > SD > cardinfo. Then just load the example on your arduino and see the results in the Serial Monitor.Unlike another review stated, I did not need to change the chipSelect from 4 to 10 in the cardinfo example (or any of the SD card examples), just leave the example as is for the V3.0 board.Nice cheap board, works so far, no problems after proper setup.For reference I used a SanDisk ultra 80MB/s 32GB card. Though from what I understand any micro or standard as card should work. Speed will be limited significantly, <<2MB/s, since the card is written to using spi.
W**R
stopped working after a day
Worked fine for a day then stopped working. The power source wasn't too strong for what it's rated and there was no damage. It just stopped working.
A**C
Works perfect right out of the box with my Mega 2560
Was super happy that it worked with the default Arduino sketch. I looked at the traces on the board and Chip select is 4 looked a the sketch and it had 4 as the chip select already. There is a switch on mine for TF/SD. SD is for the full size SD slot and TF is for the smaller SD cards. No instructions needed for this one works just like the default one is setup.
D**N
Has worked flawlessly for two months. I reduced this ...
Has worked flawlessly for two months. I reduced this to four stars because, with the Arduino Uno, the shield requires the use of two of the analog pins, leaving you with only four.
G**S
Great Product
3 years ago I bought a Radio Shack Camera Shield 2760248 and an SD shield to go with it. Little did I know that that old SD shield would only work with older SD cards (and not SDHC cards nor FAT32 cards), no more than 4 GB. Where do you find SD cards 4 GB or less? I had a lot of SD and micro SD cards.This new SD Shield 3.0 supports all my SD cards now. There is a new Arduino library. Instead of 'sdFat.h' I include 'SD.h' and it simply works. Works great.
H**.
Plug and Play
I just dropped it on aligning the 5v and grnd pins and the rest all fell in to place. I have the Elegoo Mega2560, that being said my digital pins are just labeled as numbers, while the shield has a 'D' in front of the letters which is a minor difference.All of the arduino IDE examples for SD cards work without any change.
G**T
Does it's job well
As others have said, this product should definitely include basic documentation, at least a note card with configuration set-ups. It has several jumpers on it that must be set properly as well as a switch that must be in the correct position depending on what model arduino you're using.If you pull on the SD card when it's in the reader, you will easily pull it out, so be careful. Take note that the SCA and SLA plugs are covered up by the shield when it's in place, but you can place a bent jumper pin in them. Other than that, no issues, definitely would buy it again for another project.
ترست بايلوت
منذ 5 أيام
منذ يومين