
🚀 Print Like a Pro, Level Up Your Detail Game!
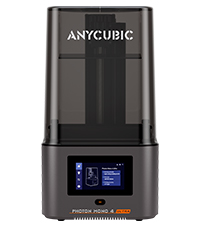
The ANYCUBIC Photon Mono 4 is a cutting-edge entry-level resin 3D printer featuring a 7-inch 10K mono LCD for ultra-fine detail, paired with the advanced LighTurbo Matrix light source for rapid, uniform curing. Its large build volume and stable platform design empower professionals and enthusiasts alike to produce highly detailed, smooth-surfaced models with minimal fuss. Pre-assembled and calibrated, it offers a seamless start and smart features like power-resume printing, backed by a one-year warranty and lifetime support.


| ASIN | B0DSL8XWNM |
| Best Sellers Rank | 6,105 in Business, Industry & Science ( See Top 100 in Business, Industry & Science ) 13 in 3D Printers |
| Guaranteed software updates until | unknown |
| Manufacturer | ANYCUBIC |
| Product Dimensions | 30 x 30 x 48 cm; 5.04 kg |
D**N
An astonishing piece of kit
Background: I have a heavily upgraded Prusa Original Mk2.5 FDM printer which I've been using for nearly a year now. I'd wanted to print some more detailed pieces so was messing about with 0.25mm nozzles and 0.07mm layer heights, but not been quite able to get the results I wanted. I bought the AnyCubic Photon with printing miniatures and scenery pieces for boardgames in mind (so the small build plate was not a problem), but nothing really prepared me for the absolutely amazing quality of details that can be achieved, even at the comparatively coarse setting of 0.05mm layer height (it will do half that at 25 microns). The machine itself is quite compact. The only thing you have to do out of the box is screw the included knob onto the door, then you can set about setting the 0-level (I watched the AnyCubic video which was perfectly fine). Since there's only one moving component (the z-axis), the calibrating process is simple. The build plate itself is mounted on a ball joint that gives it rotation in the other two axes, which is then braced in position when flat by screwing in a nut that clamps the ball joint. Note that you have to do this nut up extremely tight to prevent the build plate from moving away from level - I was worried I was going to shred the threads. I would say this is probably the weakest part of the system. I got the version with the yellow screens. I did a very brief and unscientific test with a UV torch, a piece of paper and some UV ink. I can confirm that the yellow perspex does indeed block a large chunk (but not necessarily all) UV light. I upgraded the firmware straight away, and it seemed to work. It's a slightly odd process because you have to actually print two of the files to apply the updates - and there's no confirmation that it has worked, and I haven't found anywhere to check the version numbers in the LCD menu. After that, fill up the reservoir 1/4-1/3 full with resin, and hit print. The test model printed cleanly first time in about 6 hours - I suspect it's printing at the highest resolution, but it doesn't use very much resin. There are helpful maintainence videos on the AnyCubic website for post-processing and cleaning up. Slicing: The Photon uses a proprietary slicer and file format (.photon). The slicer tool is pretty basic, but relative easy to use. The support generation is actually quite good, but editing existing supports can be a bit fiddly. Many people add supports in Meshmixer first, and then import them into the Photon slicer. Note that the approach to slicing with a DLP/SLA printer is very different than with an FDM printer, in that you will be wanting to support the print enough to prevent the suction forces pulling your print off the clear screen from pulling it off the build plate - but not too much support that the model requires more post-processing to remove than is necessary. This is where most of the fettling happens - tweaking your supports, the rotation of the model, looking for islands, etc. Once you've sliced your model(s), you copy the .photon file onto the supplied USB stick. Operation: Printing is as simple as selecting your model and hitting print. The downside of the vat based approach is that you can't see the model being created until the build plate clears the lip of the vat. This is quite frustrating as you don't know whether your supports have worked until after at least an hour or two's printing. Having said this, in general, failed prints tend to stick to the clear FEP screen, which effectively blocks the UV light meaning that you don't lose a load of resin. Resin: The supplied AnyCubic Clear Green resin is excellent. You get 250ml in the box. I've tried the AnyCubic White, and my subjective view is that there's less detail. The White certainly takes longer to slice (as you need to up the layer time to about 15 seconds from 10 with the green). I'll be going back to the green as I will always be painting the resultant models. The one downside is that resin is expensive. Post-processing: You will need a large supply of 99.9% isopropyl alcohol in sealable containers. Dunking the model in two consecutive IPA baths, and then a separate bath of fresh water should be enough to remove any excess resin (I bought a load of beakers for this). You must then complete the curing process with either sunlight or a UV curing oven. This just cures the bonds between the layers and hardens the model all the way through. Cleanup: There's no getting around it, resin printers can be messy, and the cleanup process is unpleasant. I recommend acquiring or printing a funnel and placing the supplied filters in there to strain out any cured bits of resin. AnyCubic have published a bunch of very good videos on. Summary: If you want a printer for small highly detailed pieces, this is definitely worth a look. Zero fettling, unbelievable price, and it just worked. Extremely pleased.
M**L
Amazing detail, amazingly easy
Bought for £260, delivered by Amazon prime. I love this printer. I’m not new to 3D printing. I’ve used and abused a Creality CR-10 for some time- it’s so heavily modified now it’s something else entirely. I used to use a friend’s DaVinci 1.0 AIO, and I’ve spent longer than I should on my local hacklab’s delta machine. I’m happy to report this is nothing like any FFF printer I’ve ever used. Why? Because it just bloody works. You slice the stl, put it on a USB stick, and you hit play. You don’t have to check on it every fifteen minutes to make sure it’s not reverted to a spaghetti gun, you don’t have to worry the bridges are going to come out saggy or the nozzle’s going to block. You just wait for it to beep and wash your model off. The detail and precision you can achieve is astounding, particularly when you compare it side by side to FFF. I’ve had success printing tiny mechanical parts, and gears I designed with 0.7 module worked first time. It’s not zero setup, but it’s pretty minimal. It comes assembled, and it’s a nice set-contained unit that’s surprisingly small. You just need to level the bed and run the test print. Between parts you need to check the FEP is clear before your next print, which I do by using the plastic spatula. Post-processing requires washing the parts in IPA to clear off the unused resin, which I suggest is best done using a series (two or three) of IPA baths (pickle jars) in a constant sequence. Then you leave them in the sun to harden properly. It’s not perfect, and sometimes parts’ll get stuck to the FEP or come loose from the bed, but it’s much less fiddly to make the process work than FFF. Most problems I’ve had related to exposure times (if it’s too short your parts won’t stick to the supports properly), or model and support placement. But it’s surprisingly forgiving, and at least when it fails the bits stuck on the FEP stop any further plastic being deposited on the broken areas so you don’t waste anything but time. The one thing that put me off resin printers for a long time (well, apart from the cost) is the resin. It’s not benign stuff, and it’s expensive. But anycubic’s resin is only about £40/kg, and while that’s about twice the price of FFF plastic, it’s not a huge problem particularly considering that these machines really excel at printing small parts rather than furniture. With regards to chemical safety, you should never let the uncured resin contact your skin (it’s an irritant and a sensitiser), and it can apparently smell a bit although I’m not sure about the health effects of the fumes. I haven’t noticed much smell from Anycubic Green, although I run the printer in an unoccupied room with the windows open. You should respect the chemicals, and always wear gloves and eye protection when working with them, but I find I only rarely have to do more than pour a little more into the vat.
M**O
Edited review: While the design of the vat is difficult to pour and caused me issues, Anycubic support reached out very promptly to offer me solutions and replacement for parts and materials that were missing during shipping. Besides the vat design I have nothing but great things to say about this printer. Affordable, surprising build quality for the price, lightning fast, very reliable print completion, and above all, very beautiful detail. Setup is a very quick and easy process and the printing part of the painless and easy. While I do have qualms with the included vat and it's ease of cleaning, this is an acceptable compromise for its price point as it compromises also most nowhere else and puts out print quality that rivals printers 2 to 3 times its cost.
J**B
From the ground up this is the best printer I ever owned, I have been full time printing the last 8 years and nothing can compare to the efficiency and quality this product offers. Before factoring in the low entry cost, this printer is easy to set up and print your first successful print. Of the 5 resin printers I have, the output and success rate is by far the best on the Mono. The build plate is a huge upgrade from the anycubic photon, I have not releveled the bed in over 30 prints so far and not to mention the extra size. I have managed to squeeze much more parts on the buildplate than I realized i would be able to when I ordered. Combine this printer with Anycubic resin, and the wash and cure station to launch your own startup business. I get between 1.2-1.8s layer times with all anycubic brand resins, none has been over 1.8s even translucent. Parts stick to the plate really well, and with the right support setups clean up is an absolute breeze. Overall this is my number 1 recommendation for a budget entry mono printer, nothing else has compared for me at this point. The seller, WiJorlan is very good with customer support. Very fast getting back in touch, and my order arrived earlier then Amazons expected date. I will buy all future Anycubic products from this vendor.
R**L
Llego muy bien parece un buen producto aún no la pruebo pero se ve muy bien
N**O
J’ai acheté cette imprimante il y’a environ 1 semaine, chose à savoir je n’avais jamais utilisé ni imprimante 3D ni logiciel 3D ou quoi que ce soit avant cela. Je l’ai acheté pour me faire des figurines de taille moyenne environ 15/20 cm. Le commentaire risque d’être un peu long mais j’aimerais faciliter le choix des débutants comme moi qui n’avaient jamais touché à une imprimante 3D avant. + Je trouve que le rapport qualité prix est excellent, j’ai pour le moment imprimé uniquement quelques pièces de différentes figurines et je suis vraiment surpris des résultats que cette petite machine peut produire, et attention ce n’est pas parce que les descriptions des produits disent « 4K / 8K » que les impressions seront incroyables, il faut se référer plutôt au nombre de pixels (4096x2560) pour ce modèle, et pour un premier achat elle m’est largement suffisante. + La prise en main est extrêmement simple le mode d’emploi indique toutes les étapes pour une première utilisation, mais je n’ai pas utilisé les paramètres d’usine lors de ma 1ere utilisation. + La taille est petite oui, mais ça veut aussi dire qu’elle n’est pas encombrante donc pas besoin d’énormément de place. + Je ne sais pas si c’est pareil pour les autres machines mais elle est très silencieuse, pas très important mais toujours bon de le dire. - Si vous voulez imprimer de plus grande pièces il va évidemment falloir augmenter un peu le budget, ou alors séparer les différentes parties que vous souhaitez imprimer pour que les pièces en questions rentre sur le plateau de l’imprimante. - Ce n’est pas vraiment un point négatif mais si vous êtes débutants il se peut que les débuts soient un chouïa compliqués car ils faut choisir votre logiciel de 3D « Slicer », je vous conseille la chaîne YouTube française « Polyworkshop » et le logiciel gratuit « Lychee Slicer » qui m’ont énormément aidés pour mes débuts :) Pour résumé, c’est une excellente machine qui produit de superbes performances pour son prix, oui plus vos pièces seront hautes et plus elles seront longues à imprimer mais je pense que c’est pareil pour toutes les machines, pour 200€ vous aurez une très bonne machine, compacte et simple à utiliser. (Attention aux odeurs de la résine je ne m’attendais pas à ça, Anycubic vendent des petits purificateurs d’air que je n’ai pas encore acheter donc à voir, sinon installer la machine dans un endroit aéré comme un garage ou une pièce dédiée) En espérant que ce commentaire puisse être utile à d’autres personnes voulant se lancer dans l’impression 3D :)
F**E
Work great.
ترست بايلوت
منذ شهر
منذ أسبوعين


