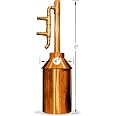
🔥 Distill Your Legacy with Pure Copper Power!
This 1 Gallon Copper Still Kit is a precision-crafted distillation system made entirely from high-quality copper in the USA. Designed for small batch moonshine production, it offers excellent heat conductivity and durability, making it perfect for enthusiasts seeking authentic, home-crafted spirits.
J**W
A fun albeit mildly challenging project. :)
This ended up being a great project. It took me about five hours to assemble and solder. I needed to brush up on some techniques and while there is certainly a steep learning curve (especially if you're trying to make it look perfect; I wasn't), it is also forgiving and if need be, if you get extra copper rivets (it seems like they included 2 extras), you could potentially disassemble the whole thing and start over.I ordered "Oatey 30132 H205 Water Soluble Paste Flux, 8-Ounce" (prod ID: B001BNWOX6) at the same time I ordered this still kit and it worked well except for when I didn't sandpaper a joint first. The flux residue washes away with soap and water. You may need to wire brush and apply more if trying to touch up a solder joint as the burned residue seems to get in the way of the solder (ONLY use a food/drink safe solder like "silver solder").POTENTIAL BIG TIP: One thing I should have tried doing for the joints was "pre-tinning" the copper. This would have involved sanding the joint surfaces, applying solder paste primarily to where the joint would be, then heating up and putting some solder along the entire joint face but let it flow out so its pretty thin. Let cool, apply more paste, assemble the joint, and apply more solder to secure the joint and seal. I think this would have helped guide the solder and complete the joints rather than trying to use the heat to flow the joint. I know pre-tinning works great for other projects I've soldered like electronics and circuit boards, I just didn't think about it at the time.Attaching the conical hood to the body, I took a length of solder and made a big ring out of it that sat in the over hang that needed to be joined. With the hood and body upside down, I leveled the body into the hood as much as I cared to, then using a welding glove on one hand, I pushed gently on the bottom of the body to close up the gaps between the edge of the body and the radius of the hood. Then I simply walked my torch back and forge until the solder began to melt. You don't want to have it get too hot because it'll just run down any gap it can find, but you want to use enough heat to reduce the solder wire to a gap-filling puddle. Just keep sweeping the heat back and forth until the solder starts to flow and loses its wire shape and you should be good.The parts that gave me problems were sealing the round top of the insert that sits in the hood collar. It's "petaled" like the bottom plate is and you have to bend up the petals to make a surface for the collar to join with, but I kept getting tiny gaps. I think my problem is that I didn't bend the petals right to the edge, which left solder-draining gaps during assembly. But again, it's forgiving. I was able to play the "heat & solder" game, applying a little heat, touch with solder, apply more heat if solder doesn't melt, repeat until you get some adhesion.The other part that was a pain was the bottom plate to body seam joint. It's a three way joint essentially right there. I got it sealed up when I did my tap water fill tests; but when I boiled water in it, I would get a tiny tiny leak. I ended up heating the whole area, applying solder, and rolling the assembly back and forth to settle the solder. THIS IS AN EXAMPLE OF WHERE PRE-TINNING PROBABLY WOULD HAVE HELPED A LOT.I used a couple of stepped drill bits to make a hole for the "3" Dial 2.5" Stem 1/2" NPT Threaded Stainless Steel Thermometer Moonshine Still Condenser Brew Pot Mash Tun" (prod ID: B00TZHWKX4) gauge, and using the o-rings, washer, and o-ring-ready nut from the "Weldless Bulkhead - Stainless Steel" (prod ID: B00JHM38RE) kit, I got the gauge sitting perfectly in the hood (see picture). If you use these parts to add a gauge, watch the o-ring between the hood and washer as it can bind up and twist if you twist the gauge rather than the nut. This was my assembly order: O-ring'd Nut + O-ring + Still wall + O-ring + Washer + Gauge.I am getting some steam leaks where the column sits in the hood (expected) and where the down spout sits in the column tee (expect, I didn't solder this joint as to allow me to modify it later). I am thinking of getting some silicon wrap (not the self-fusing type) or maybe a length of bike tire inner tube and figure out a creative way to seal these small, expected leaks. I could also try reworking the hood to column interface a little to see if I can get an interference seal.Over all, the kit is great, very well packaged and protected against common shipping damage, and a lot of fun to put together.
S**N
Copper still
My hubby won't even try to use itSays it looks like more trouble than it's worth
H**T
Excellent Kit Still
Professionally cut sheet copper was mostly easy to work with. Yes, you should be somewhat familiar with soldering copper and copper water pipe. Prep-work cleaning and fluxing makes all the difference in a successful assembly.Glad I purchased this instead of some imported Alembic .
S**N
Great little still!
This is a cool little still. Assembly wasn't too bad. I'm pretty handy soldering copper pipe but soldering seams on a sheet is a little more tricky but I got a lot better at it by the time I was finished and had no leaks. I would say that if you are a really handy person you won't have much trouble but if just sweating on a new pipe in your house is daunting then this might be a little much for you. Operation of the still is easy and it really works well. Being so small it's fairly responsive to temperature change and putting a copper scrubby in the column makes it work a lot better than without. Because it's small your end product is smaller too but I've just been running double batches back to back. If I make a change to it it would probably be to reduce the cooling input down to a smaller size because it really doesn't take much flow for it to work. A trickle is plenty.I like it well enough that if something happened to it I'd buy it again. Steve in Missouri
A**E
Waste of Money
This product is an absolute rip off. I highly recommend staying away from this product. This product was likely laser cut and you are to assemble it yourself. The instructions are exclusively by way of video on their website. The instructional videos do not allow for full screen and have ads so it can be difficult to see what is going on. The actual construction requires previous skill and the final product is very disappointing for the price. There are plenty of leaks. Why would you put soldered material back on direct heat? This was given as a gift and I felt too bad to send it back to obtain a quality product for a reasonable cost.In short this product is too expensive and will likely lead the novice distiller to disappointment and failure. If you are interested in getting into distilling I would recommend any other product than this. So sad companies charge these extraordinary prices for low quality products.
R**L
Figuring out how to put it together
Still haven't put it together
C**T
Great item
It's a great small weekend project and a great idea for any man's man!! Easy to put together and great resources on YouTube.
C**K
the Novice need not apply
Do not buy this kit unless you are really proficient at solid copper soldering. I could not get to to sweat together, and in the end while trying to get the solder to actually flow in melted through and wasted the project. No matter what I did the copper seemed to reject the solder even after cleaning it, and a light sanding. Could be me but I still cannot recommend this product
ترست بايلوت
منذ أسبوع
منذ 4 أيام