⚙️ Upgrade your faucet game with precision and style!
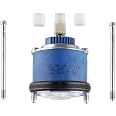
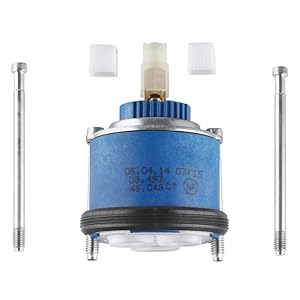
The Grohe 46048000 Single-Hand Mixing Valve features advanced SilkMove technology for smooth handle operation, a durable ceramic sealing system to prevent leaks, and an adjustable flow rate limiter for efficient water control. Designed for single-lever faucets, this chrome-finished valve combines German engineering excellence with easy installation and reliable performance.
| Brand | GROHE |
| Recommended Uses For Product | Bathroom, Sink |
| Mounting Type | Deck Mount |
| Finish Type | CHROME |
| Material | Ceramic, Plastic |
| Color | StarLight Chrome |
| Number of Handles | 1 |
| Included Components | Grohe 46 048 000 Ohm Ceramic Cartridge |
| Hole Count | 1 |
| Installation Type | Wall Mounted |
| Model Name | Grohe |
| Item Weight | 0.15 Pounds |
| Warranty Type | limited |
| Handle Location | Center |
| Manufacturer | Grohe |
| UPC | 703765989701 |
| Global Trade Identification Number | 00703765989701, 04005176008283 |
| Part Number | 46048000 |
| Item Weight | 2.4 ounces |
| Product Dimensions | 1 x 2 x 3 inches |
| Item model number | 46048000 |
| Is Discontinued By Manufacturer | No |
| Size | 1 |
| Finish | CHROME |
| Shape | Round |
| Item Package Quantity | 1 |
| Maximum Pressure | 3E+2 Pound per Square Inch |
| Certification | Yes |
| Batteries Included? | No |
| Batteries Required? | No |
| Warranty Description | “*1 year Limited warranty from date of purchase” |
O**E
Works great on old Grohe bathroom faucet.
When my Grohe bathroom faucet broke I needed to replace the cartridge. The faucet is 25 years old sobI thought it was a long shot at finding anything. This worked great. Advice: after removing old cartridge, clean the part under it well. Don't scratch or chip anything. Spread plumbers silicone grease on the seals before inserting new one and tighten screws. No leaks and the faucet functions as good as new.
C**Y
Straightforward (but not easy) repair for leaky Grohe Ladylux Plus faucet
It's pretty awesome that Grohe engineered their expensive faucets to use a relatively inexpensive one-piece replacement part to address leaks. My 10+ year old Ladylux Plus started leaking from the handle and googling the symptoms brought me to this cartridge on Amazon.The replacement cartridge was less than 10% of the cost of the original faucet and took me about 90 minutes to replace. Most of that time was trying to figure out how to remove the handle so I could gain access to the cartridge. If I had to do it again, it would probably take 10 minutes.Once you get the faucet handle off, replacement is relatively straightforward. Getting the faucet handle off mine was not easy. There is one screw to undo, but the handle was stuck firmly in place even after removing it. I ended up manhandling it off using a mallet to bang firmly but gently on the handle (not sure this helped that much) and screwdriver as a lever (this did the trick). I wedged the shaft of a flathead screwdriver between the short tail side of the handle and the cylindrical metal casing and levered it until it finally came off. As I worked on it, the entire old cartridge started to come apart inside. This disturbingly increasing looseness felt like I was breaking the whole faucet, but once I got it apart I realized that the old cartridge was taking the brunt of the force.I've attached a photo showing how the Ladylux Plus handle connects to the cartridge. The new cartridge is already installed. In my particular scenario, I had to re-use a few external fittings from around the original cartridge - the white collar around the cartridge as well as a plastic fitting that connects the metal elbow that the handle screws into. There's some gunk on the metal elbow where it attached to the handle - mineral deposits or corrosion that formed over time which I think made the handle hard to separate from the elbow. There were some leftover unnecessary parts that came in the new cartridge box that I didn't need.Protips:Cover your drain before unscrewing anything. You don't want to lose any parts down there.Take several sharp photo of the old cartridge and fittings as you take it out so you can recall how parts were oriented.Set aside plenty of time to work on this. If you're not mechanically inclined, invite a friend to hang out with you who is.All in all, I'm glad I was able to replace the cartridge and not the entire faucet. I do wish I had a photo like the one I'm attaching to guide me - all the diagrams I found were helpful but not literal enough to hint me into how much force I ended up needing to apply to get the handle off.
J**G
Fixed leaky faucet
Product worked well but enclosed instructions were quite vague. Took me 45 minutes to do a job I could do now in under 10.
C**E
Perfect replacement for my Grohe Bridgeford faucet
I noted that there was a slow leak coming from my six year old Grohe Bridgeford faucet, from right around the handle area. I did a google search and found that this was due to the cartridge, and that it needed replacement. Further googling I found that the cartridge part number for this faucet is 46048000.This particular faucet model is discontinued but replacement parts are still available. I found a plumbing supply shop that had the part, but on a whim, I decided to check Amazon.. lo and behold, here it is and at half the price of the plumbing supply shop. The relatively low price was a surprise, given that the cost of the faucet was an arm and a leg.This is an OEM replacement unit from Grohe, so no issues here. For the most part, the cartridge is exactly the same as the one I am replacing. However, my faucet had a rubber O-ring while this replacement model had a plastic sleeve. No problem - I just reused my old O-ring.Replacement was very straightforward, and I took care to take my time. I didn't take photos but I should have in order to remember the exact positions of the handle before I started. But that only slowed me down by a minute or so. You will need a phillips head screwdriver, and a 2.5 mm allen wrench. You will also need to shut off the water that feeds into this faucet. I estimated it took me 30 minutes (just being extra careful and examining each piece, testing the fit, positions, cleaning the reused parts, etc.) total. If I had to do it again, I could do it in 15 minutes now that I know what to do.I have another one of these faucets in the house, and if I was smart, I should buy another unit for that faucet, just in case (which at some point, the cartridge will need replacement in the future due to daily usage).
D**R
Perfect fit
Why did you pick this product vs others?:Worked great in our sink!
J**1
easy replacement
very easy to replace and the faucet works like new now.
H**Y
suddenly failed 1 yr 3 months later
Installation was easy... because you have to take the old one out which was several times more difficult. By the time you reached the stage to install it you feel it's so easy. To get the old leaking one out, 1. get the screw out 2. use WD40, and slightly and carefully hammer the handle down vertically-- edit --Today, 1 yr 3 months later it broke. Didn't notice leak until I saw water dripping downstairs.-- edit 2 --Turns out the leak was from other part of the faucet, not the cartridge. Decided to replace the whole faucet. Grohe design is extremely unfriendly. Had to take apart the whole faucet first, before it can even be removed from kitchen sink. Cartridge is good, but Grohe is a 1-star.
T**B
Missing parts
So this mixer worked. However the hardware was wrong/incomplete. recieved a long screw and a short screw. long was unusable so we reused the one for the mixer that failed after 4 years of light use. The plastic part that is supposed to allow for the handle sleeve to be screwed on does not fit the handle sleeve. We didn't use that part. The instructions for how to adjust flow were an icon that is explanatory, but lacks detail. each time you make a flow adjustment you have to take the whole thing apart to adjust flow. No instructions on how far to turn the screw to full open.
ترست بايلوت
منذ شهر
منذ شهر