🔧 Pierce, fit, and seal like a pro—upgrade your refrigeration game with AMI PARTS BPV31!
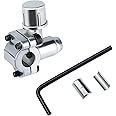
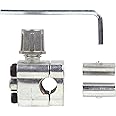
The AMI PARTS BPV31 Bullet Piercing Valve is a robust, stainless steel valve designed for universal compatibility with 1/4, 5/16, and 3/8 inch refrigerator tubing. It includes essential installation tools and adapters, directly replaces multiple popular valve models, and features a corrosion-resistant finish for long-lasting reliability. Ideal for professionals seeking a secure, easy-to-install solution for refrigeration line tapping.


| Material | Stainless Steel |
| Brand | AMI PARTS |
| Exterior Finish | Silver, corrosion-resistant metal |
| Inlet Connection Type | Barbed or Compression |
| Outlet Connection Type | BSPT |
| Number of Ports | 1 |
| Valve Type | Bullet Piercing Valve |
| Manufacturer | AMI PARTS |
| UPC | 740306406327 |
| Brand Name | AMI PARTS |
| Model Info | BPV-31-1 |
| Item Weight | 2.08 ounces |
| Package Dimensions | 3.35 x 2.72 x 0.87 inches |
| Item model number | BPV-31-1 |
| Part Number | BPV-31-1 |
| Color | Silver-1 |
| Material Type | Stainless Steel |
| Batteries Required? | No |
G**S
good item
works well, a good buy .
V**N
Easy first step for DIYers
I had never added freon to a refrigerator before but have done it many times to my vehicles over the years. This saddle valve system/application works perfectly when installed correctly. My refrigerator was not blowing cold anymore so I thought I had a compressor problem because it never kicked in. Actually, it kicked in and was running constantly, causing the starter to burn up. I replace the starter and then decided to check for leaks and found none. the refrigerator is a sealed system with no place to add freon. A car has the valve system for adding. I saw this valve in use on YouTube and thought I would give it a try.Installation only took a few minutes, followed by adding the freon. The refrigerator is now blowing cold again. Saving me some more money instead of calling a repairman.I am a long time DIYer and only recommend this conversion/installation if you have some previous knowledge with introducing freon to refrigeration systems. I got the part very quickly and it wasn't very expensive.
A**R
Just as described!!
Super fast shipping and exactly what I needed!!
D**N
Did the job.
Arrived on schedule. Works as described. Worth the price.
M**D
good
good quelity fast shipping
T**M
easy fix!
Used this to allow a refrigerant recharge to a dysfunctional dehumidifier. The adapters provided makes this truly a universal fit piece, able to fit any size refrigerant line you will encounter.
C**R
Instructions are questionable, design not great.
I received the valve and found that the connection port does not have a Schrader valve at the charge port (port covered with the large cap). Instructions are poor. It should instruct the user to: 1. retract the needle first; 2. then mount the valve to the copper tubing using the shims matching the tubing diameter, 3. connect the refrigerant line to the valve; 4. with the refrigerant line a bit loose, leak slowly for 1-2 second some refrigerant to replace the air inside the valve (not doing so risks to add water vapors to the refrigerant and ruin the compressor); 5. tighten the refrigerant line; 6. pierce the copper tubing; 7. retract a bit the needle to allow the refrigerant in; 8. fill the lines with the right quantity of refrigerant; 9. tighten the needle valve to seal the line; 10. disconnect the refrigerant line; 11. replace the cap. The design is poor because it does not have a Schrader type of valve installed in the refrigerant port, so upon refrigerant line disconnection, air and water vapors will be trapped between the cap and the needle valve. Because of these issues I am planning to return the valve provided I can find a better valve design.P.S. What the seller does not tell you is that if the refrigerant is completely gone you need to find where the leak is , then pump down the line until all water vapors are removed and then attempt to refill - unfortunately this is a very ellaborate process and requires equipment.P.S1 Installed the piercing valve today, July 25,2025 and recharged the dehumidifier. First I retracted the pin to be located visually behind the O ring gasket.It was installed on 1/4 copper pipe. For 1/4 copper pipe I used ( as per instructions) both spacers. Had the 1/4 cap tight, pierced the pipe,nretracted the pin ( to open the hole created by the pin and then slowly opened the cap for 1 second to verify whether there was any refrigerant left in the dehumidifier. THIS is an important step: if not refrigerant comes out more likely the system is empty and absorbed moisture. If that would be the case, the repair would be too complicated and it is not worth proceeding. Fortunetly I still had some refrigerant left so I proceeded with feeding small puffs of refrigerant. Closed the pin valve and replaced the cap.
L**M
Revive your fridge or freezer
I have used this on my parents fridge and my garage fridge. It works well. Any more units are meant to be thrown away so you have to buy new. This helps get more life out of your unit. If your a do it yourself kind of person and want to revive a fridge or something like that this part makes it easy
Trustpilot
4 days ago
1 day ago