معلومات عنا
دعم العملاء
احصل على التطبيق

قم بتوجيه الكاميرا لتنزيل التطبيق
حقوق الطبع والنشر © 2024 Desertcart Holdings Limited


✨ Illuminate Your Journey with Sylvania's Magic!
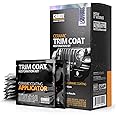
The SYLVANIA Headlight Restoration Kit is designed to restore sun-damaged headlights to a like-new condition in just three easy steps. It effectively removes haze and corrosion, enhancing light output and beam pattern for improved visibility. With a lifetime warranty and a trusted brand legacy, this kit ensures long-lasting protection and clarity for your vehicle's headlights.
| Manufacturer | SYLVANIA |
| Brand | SYLVANIA |
| Model | 38772 |
| Item Weight | 4.8 ounces |
| Product Dimensions | 8 x 2 x 6 inches |
| Country of Origin | USA |
| Item model number | HRK.BX |
| Is Discontinued By Manufacturer | No |
| Exterior | Machined |
| Manufacturer Part Number | HRK.BX |
| OEM Part Number | 38771 |
| Voltage | 12 Volts |
O**R
This is the one to buy!
This headlight restoration kit is priced right, and it just WORKS! Just buy it! I have a 2002 Tundra. The headlight lenses had become completely opaque, having over twenty years of accumulated damage resulting from UV exposure. I used the Sylvania kit, applying the treatment in accordance with the instructions. At first, I wondered if the amount of sandpaper included with the kit was enough, but it was. Be sure to mask the area around your headlights so that you don't scuff your paint or trim with the sandpaper. It took me about 45 or 50 minutes to do, and it's very easy. The kit came with everything I needed to clean and treat my headlights. The results were AWESOME! The final task is to apply a UV protective coating. My headlight lenses look absolutely brand new, and I can see so much better now when driving at night! It's been one year since I applied this treatment, and they're still perfectly clear! Hopefully, they'll continue to look great for a long time. But eventually, they will likely start to fade again, there's no avoiding that, especially for a vehicle that spends all of it's time outside in the elements. When that happens, it will be a much easier job, because I won't wait to let them get as bad as they were when I applied this treatment. But when it happens, I will definitely buy this kit again!
C**.
Headlights you thought you'd have to replace? Nope! This makes them like new. Really!
I own a seventeen-year-old Toyota Yaris hatchback (152,000+ miles), which has been parked outside in the sun and elements all of its life. I'd already had the headlights resurfaced (by the Toyota team) many years ago—but my headlights were, by this point in time, at the stage of not passing annual inspection. Replacing both headlight units at the dealership (including labor) would have cost in excess of $700, so I figured—why not try this, and see what happens!The results are really terrific. As "like new" as you're going to get with a seventeen-year-old car which is parked outside. Here would be my observations having just done this project this morning (without access to a hose, mind you!).The instructions are worth reading a couple of times before you take-on the project. It's, actually, a lot easier than the very detailed instructions might imply. Just go step by step, doing each step to both headlights before you move on to the next step, and you'll be fine.1) Bring lots of water, and a spray bottle (as recommended in the instructions). I filled up some clean milk-cartons I'd saved for the project, and just refilled the spray bottle from those as needed. Super easy. I used about three milk-cartons of water (1.5 gallons). You'll need lots of water-spray as you sand with the provided grades of sandpaper. I would recommend starting (with the first grade of sandpaper) with light to medium pressure, then move to more consistent medium pressure. The second and third grades of sandpaper really are very smooth and fine, and you can finish-off the third grade of sandpaper with a really light pressure. Be patient, and go for a truly smooth surface. I did the recommended circular motions both clockwise, and counter-clockwise, to ensure the smoothest possible finish. Worked like a charm.2) Regarding the activator spray (with which you will start and, toward the end, use again): I used about 2/3rds of the spray on the first stage (both headlights), dissolving the initial oxidation and grime. I feared I'd not have enough with just 1/3rd by the end, but I had plenty. I'd bring a soft sponge, too, just to ensure that you get the lenses fully clean between steps. I found having extra soft, clean rags helpful with drying as well.3) Painter's tape definitely protects your paint around the headlight, so take the time to mask-out your light, and protect your paint. The only thing I'd suggest, is to spray-clean your paint-surface after your remove the painter's tape following use of the polishing compound. Some of the polishing compound gets under the tape, so just give that a rinse before you dry the lenses and apply the final UV gloss-coating. Keeps things neat and clean around the lenses.4) As for the gloss-coating: you really can be very generous applying it to the provided blue-cloth. I was a tiny bit stingy on the first headlight, fearing I might not have enough product for the second headlight. Don't worry ... you'll have plenty of UV product left over when you're done. I'd really soak the entire blue-rag well, and apply generously. I can see a *very* tiny difference between the first headlight I did (where I was more stingy applying the UV gloss-coating) and the second (where I was more generous). It's so slight you'd never see it. Just rest assured that you'll have plenty of UV gloss by the end of the project, as it spreads evenly, smoothly, and well—so be generous in applying it.The best part? If I get any haze again, this was probably the easiest headlight-repair imaginable. I'll just do it again! And I saved about $700 to boot. You just need to set aside the time to do each step well and carefully. It took me perhaps an hour and a half from start to finish (and I was moving slowly and carefully), with some time thereafter cleaning up and just standing around to ensure no falling autumn leaves fell on the UV gloss while it was still wet. Just went to check on the headlights, and they're completely dry to the touch, and very smooth and glossy.This is a terrific product! Easy to use, great instructions, and a really fine result. I look forward to seeing the longevity of the product.
K**A
Excellent, honest product that delivers like-new results!
I was initially skeptical of how well this kit would work (I mean, it was only $20!) and I wasn’t sure if the foggy-ness on my headlights was inside the lens or on the outside.I read positive reviews on Amazon and looked at the customer’s images before I purchased the kit, but I’m always still slightly skeptical until I see it for myself, or personally know someone who has tried a product from online. But after seeing it for myself, I am now a believer!I buffed the outside of my headlights. You do not buff the inside, if anyone is curious. I can’t imagine buffing the outside would help if you had condensation build-up on the inside (although I’m sure you could apply to the inside of a clear lense?...just make sure you’re not buffing the tint or colored screen of a light. However, I’m sure the product wouldn’t advertise/recommend using on the interior of the lense due to possible damage it could cause). Most cloudy headlights seem to have sun/weather damage, though. This product will most certainly work great on that kind of wear and tear!For anyone saying toothpaste does the same thing, that is not correct. I’ve tried toothpaste. It helps but it doesn’t deliver the same results as this. This product has a pumice similar to the texture of toothpaste (but thicker and slightly grittier). But in addition to that, it provides lightly abrasive sandpaper, a stain remover, and a clear coat. So overall, it’s much more adept to ensuring as clean of a result as possible. It puts the toothpaste method to shame.I have not actually tried this product before, so I honestly have no idea how the durability/lifespan will be. However, if I’m going off how well this product worked, I would hope it holds up for a decent amount of time (months) before requiring another attempt. So I rated that aspect 5 stars until something proves otherwise, and I will update if that changes.The instruction manual was well-written and easy to read, as well as being intuitive and preempting you to get your other supplies ready and pre-reading the instructions before starting the project. It was written in perfect, fluent English; it was not overly verbose so the directions were easy to follow; and it was three simple steps on three small pages so it didn’t take a lot of time to read through the instructions.Things you will need in addition to the kit:- Water source (I used a hose, but you could use a large pitcher of water. You just need to be able to keep your sandpaper and lights consistently wet while sanding, and be able to rinse the lenses when the directions call for it).- Masking tape is optional though I’d recommend it. (The kit says the products will not strip the clear coat or ruin your paint job, but it suggests taping off your lights out of precaution. As long as the paint on someone’s car isn’t stripped of the clear coat or rusting/chipping before taping, then I’d definitely suggest taping off the lights with masking tape.)- Extra non-latex glove (if you want to wear one on both hands — because the box only includes one glove... I didn’t want anything on my hands, especially the chemicals, so I wore gloves the whole time).- Have a garbage can, nearby, for waste- Extra paper towels and/or a shammy for drying (I would have used a car shammy, but I had some soft, blue car-paper towels and those worked well.)The kit includes:-A spray that strips stains off the lenses- 3 soft paper towels that are used for drying, for rubbing pumice, and for applying the clear coat- 3 different sandpaper strips that you split in half and use one-half on each light (400 grit, 1000 grit, and 2000 grit— you work your way up from coarsest to smoothest grit).- Gritty pumice to polish the lenses after wet-sanding- And a UV Protectant Clear Coat to use at the last step (this step is essential because the lights dramatically shine and are exceptionally clear after applying this clear coat.)- I also kept my phone nearby so I could time my sanding/buffing. It recommends 5 minutes for each step, per light.Here’s what you need to know:- This particular kit is only good for 2 lights. My headlights were the main problem, but now that I see how well this works, I’ll probably do this to my taillights as well.- You need to set aside at least 1 hour for this project. Even 2 hours would be ideal but more than that isn’t needed. And you need to be willing to put some elbow grease into it with all of the sanding. (I’m sure you could use a small sanding buffer too...but people tend to buff too hard with a buffer if they’re not familiar with using one, so I wouldn’t recommend it to everyone. The product does not suggest to use one, but if you’re familiar with a buffer and have one on-hand, I could see how it could expedite the process. Just make sure to keep your headlights and the sandpaper wet while sanding.)- You are not to touch the headlights for at least one hour after applying the clear coat- You are advised not to drive the car or leave it in rainy conditions for 4-6 hours after applying the clear coat until the coating cures. (So set aside time to do this when you don’t have to drive somewhere; and make sure to do it on a sunny and/or dry cloudy day, although avoid direct sunlight and freezing cold temperatures).Seriously though, for $20, it makes it look like you basically have a brand new pair of lights! It is *so* worth the purchase. I’d highly recommend it, and whenever it wears off, I will certainly be purchasing another kit and doing this again.
ترست بايلوت
منذ يوم واحد
منذ 5 أيام