🌟 Elevate Your Drying Game!
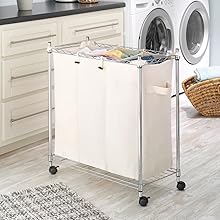
The Whitmor Oversized Metal Drying Rack offers an expansive 34.5 ft of drying space with 11 sturdy bars, perfect for garments, bedsheets, and towels. Its lightweight, foldable design makes it easy to transport, while the durable, rust-proof construction ensures it stands the test of time. Assembly is a breeze with just a Phillips screwdriver, making it an ideal eco-friendly alternative to electric dryers.
A**A
It is ginormous
This is a very sturdy rack and has lots of hanging space.I didn't find instructions but it is pretty easy to figure out. Some of the screws, or could have been the tubes, were hard to catch on. In the end I had to put a spacer on one tube to keep it snugged, but it works fine.I use a laundry center my my building and am hoping using this will save me some money.
D**I
Lightweight, sturdy, and easy to use
As others have said, this rack is a bit challenging to assemble, but with patience I was able to do it by myself. I really like that it is wide enough to accommodate towels. I can easily carry it out to my patio to dry clothes in the warm months. Inside, I can use it in my small laundry room if I don't open it all the way. It folds up nicely for storage. The bars are thick enough that they don't create a sharp crease in clothing hung across them.
H**R
Now that setup is over, My fav drying rack at our house right now
I have been starting to hang dry more and more clothes but running out of space on the 2 basic racks I already had so I bought this. For about the same price as an aluminum frame standard size drying rack, this is bigger and the design makes it a lot more air flow around items and works better for wide or long items.When it arrived, my kids had the day off if school so I had them help me put it together (ages 8, 6, 1) haha. Together we got it done in about an hour, which includes time the 1yo spilled the screws, and tried to take the bars apart as we went.First, we lined up all the horizontal rods to find the 4 that are cut slightly shorter. My daughter also noticed that these do not have threads in the ends for screws. We set these shorter rods aside. Then we screwed in all 8 long rods on one side of the frame. We laid that side on the floor so the rods went straight up in the air. Here we can put the remaining 4 in their spots as shown on box insert. We tried to line up the other side on top of the rods as best as possible, and began to screw them in. We started screwing in on the side with the least amount (will be the bottom when finished and upright) and we only screwed in to hold, leaving room to play as we still get the rest in their spots. Working gradually up the frame we loosely screwed/set in all the rest (short and longer). We had a few hang ups here where a few rods seemed to be too big for their holes, so we lined them up and kind of hammered the frame onto them with the handle of the screwdriver. After they were all in their spots we went back and tightened all the screws. Boom, done.It folds fairly flat. Very heavy duty. I have one rack made of wood/bamboo? And the legs on that are bowing and it leans as I put clothes on it..:this one will not have that problem. It holds well. It also has held up when my kids put blankets on it for a fort haha.
D**M
Took 50 minutes to assemble. It does fit in bathtub. Sturdy. Overkill?
I'm reasonably handy, so -- after reading the reviews about assembly -- I was hoping to assemble it in ~15 minutes, but it took me 45 minutes. A few of the fittings had metal burrs which I needed to file off (with a metal file) or clear away (with a screwdriver).Assembly tips:1) Be careful not to strip the threads when screwing in the screws! I sprayed the ends with WD40 to lubricate, and took care not to force any of the screws in -- do a little back-and-forth until it slides in easily (using a screwdriver or spinning the rod onto the screw).2) After you get one side loosely screwed in and you turn it so the legs are pointing up into the air, to install the second side, it seems a little daunting. 12 wiggling legs, like an octopus! Don't despair! 😊 The secret is to balance it as best you can, getting at least some of the legs into their hole, and then start with the screws at one end. (I started with the top end, with four rods). Install these screws loosely at first, so there is enough wiggle-room to work your way down, installing middle rods next, and finally the other end. Then go back and tighten up all the screws, on both sides. [I'm curious if it might be easier to assemble on the ground, flat, but I didn't try.]Pros & cons:+ More linear feet than other brands or models. It does work inside a bathtub (see pics) -- it doesn't open all the way, but the rows of clothing are still far enough apart that the clothes don't touch. (The bathtub shown is 24" wide at the top of the tub, but with the curve in the tub at the bottom, the legs sit only 19" apart. Even that is far enough that it is stable and spreads out the clothes. I put a fan on it, to dry the clothes and prevent mildew.)– It is more than we need, heavy, and is bulkier to store than a lighter wood model. Next time, I'd get a cheap wood one and see how it worked (for a small apartment).I gave it four stars; taking off one star for the minor molding defects, time to assemble, and bulky storage. Still, it's a robust drying rack with lots of linear feet to dry clothes, as described.
ترست بايلوت
منذ 4 أيام
منذ أسبوعين