معلومات عنا
دعم العملاء
احصل على التطبيق

قم بتوجيه الكاميرا لتنزيل التطبيق
حقوق الطبع والنشر © 2024 Desertcart Holdings Limited


✨ Craft Your Own Magic with Every Piece!
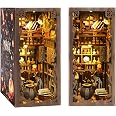
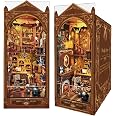
The Lisala DIY Miniature House Dollhouse Kit is a unique 3D wooden puzzle designed for adults and teens. It features a magical house design, precise laser-cut wood, and includes LED lighting. This kit not only serves as a captivating bookend but also as a delightful home decor piece, making it an ideal gift for various occasions. Assembly is straightforward, and customer support is readily available to ensure a smooth crafting experience.


D**X
Medium Level Skill Kit
This kit came with a pair of metal slanted tweezers and a nail file. There was a wood pointy tool called an "auxiliary tool" on board J to assist in removing small parts (popping them off the sheet). First of all though, some basic information about the kit itself... This kit is a "tab type" kit meaning you're going to have tabs that connect to holes that will "pop" the pieces together. Sometimes they are tight, and sometimes they fit just right. I did not run into any loose ones on this kit. I did have to "shave" one tab to get it to fit properly (with a razor knife I keep for just such an occasion). There are no beads or loose parts for this kit. It's compressed wood only.I do keep a "miniature tool" set though for my model projects. I've found it's not necessary but makes it easier when you do a kit that doesn't come with everything you might need. I have found over the many kits I have done (I REALLY enjoy this hobby!) that it's beneficial to have in my kit: glue, clamps, a mallet hammer, scissors, embroidery scissors, thread, needles, wire cutters, a paper squeegee, needlenose pliers, metal pointed tweezers, razor knife, small saw, metal files, etc, etc. All small items, but quite useful at times. I also keep a kit of various colored fine tip markers for coloring in places where the wood splintered or color came off. It helps me, but they're not necessary to be honest. If you do enough of these you'll probably end up collecting tools anyway! I did use my razor knife, my hammer, small clamps, and my own metal pointed tweezers when building this kit, as well as my own alcohol-based glue.This kit is made of compressed wood, which is nice in kits like these (a tab-type kit) as the pieces pop out of the compressed wood sheets fairly easily and generally with less splintering. Also, the pieces don't break as easily as they can with the thin wood sheet type of kits. I didn't have any issues with breakage on this kit. As always though, just be careful when popping out pieces, particularly if they have thin parts on them (like filigree). Be VERY careful when popping out the pieces (and putting them together!) with an "accordian-style" look to them. Although they make lovely finished pieces because the wood "bends" around whatever you're building... they can be finicky. I did not break any of mine on this kit and that's the first time I've ever not broken at least one in a kit if they're there! -whew-The instruction booklet is in color which is great, but I did have to use my magnifying glass with light on it several times. The darker bits (brown wood) were difficult to discern at times what went where for me.So - the reason this is four starts instead of five is that I did not feel that the lighting was very good on this one. It did not look good (it did not highlight certain items, for instance) and was just general lighting. The lighting for this kit is a touch-button control at the front floor of the finished kit. You can see the button location in the attached picture. The lighting is operated by two AAA batteries and there are 3 lights that illuminate the scene. One of the lights illuminates the back cabinet and the other two lights are simply installed at the ceiling of the kit to light up the rest of the area.The install of the push-button was easy, along with the light at the back cabinet. The two lights located at the top - although easy to mount to the ceiling - were difficult to get aligned correctly in the back of the unit. The instructions are not clear in showing the wiring layout so that was a challenge to get figured out. What's worse though is the instructions not explaining how much slack you need to have when you run the 4 wires through the top cabinet. If you have too much slack you have many inches of wire on the ceiling that you can try and tape in place, but it may not hold well. You can also try to pull the wires back from the bottom through the maze you just ran them through. I ended up having the unit pull itself apart multiple times trying to get the wiring in correctly - frustrating! There definitely could have been a better design for the wiring layout for this kit, and the "look" in the end just wasn't as sharp-looking as I would have hoped for.Overall this went together pretty easily though and was built VERY fast. It felt like a beginner-friendly kit to me. I really liked that aspect of it. I definitely recommend this kit!
ترست بايلوت
منذ 3 أيام
منذ 4 أيام