معلومات عنا
دعم العملاء
احصل على التطبيق

قم بتوجيه الكاميرا لتنزيل التطبيق
حقوق الطبع والنشر © 2024 Desertcart Holdings Limited


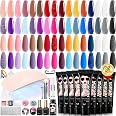
💅 Elevate your nail game with DIY magic!
The Poly Gel Nail Kit for Beginners is a comprehensive 2024 upgraded set featuring 32 vibrant 10ml gel colors, a UV lamp, and all essential tools for creating stunning nail art at home. This kit is designed for ease of use, making it perfect for beginners while ensuring salon-quality results with eco-friendly ingredients.


A**Y
Definitely recommend for beginners!
My nails always look awesome now. I have Easter colors on at the moment.. but this set kick started my journey into learning how to put on poly gel nails.. I LOVE it! I also recommend buying a primer for your nails, as well as a dehydrator, because those go on before the base coat and helps the poly adhere better to your nail and it helps the longevity of them. It also helps not lifting t the base of the nails. I also recommend buying a remover, I got mine for like 3 bucks for 2 on Amazon.. soaking your nails in 100 percent acetone will also take them off. Also get a bunch of extra nail files.. your gonna need them. Get the big block buffer too. I am not a professional, this was my first time trying this and I am not a nail person.. but now.. I think I am lol. Deff get this product if your a beginner!!
A**R
Good polygel kit for beginners
Lots of different colors to play with, even though there isn’t too much in each tube. The UV lamp isn’t that great, but that’s honestly to be expected at this price point - either cure a few times to make sure it’s completely cured or use a better light. Still a great complete polygel kit - especially for beginners as you have everything you need and don’t actually have to purchase anything else.
M**E
Product returned
I’m returning this item I have tried four different ways I have tried to do it more then once and it either wasn’t sticking, fell off within five mins of me finishing it. It took me two hours to do just for it to pop off within five mins. I have tried curing it longer making the poly gel thicker, thinner or in between nothing works so I am returning it.
K**T
Polygel kit
I love this brand of polygel. Goes on and spreads so nice, regardless of which brand of slip solution you choose to use. Would recommend for any level of user. I am personally a beginner.
N**E
Definitely worth it
Definitely worth it
D**.
Not enough
Amazing colors, however the tubes are so small I was only able to use each color on 1 person and then I was not able to get anything out of the tubes
G**R
The kits is lot’s of fun, but there is a bit of a learning curve
This kit is massive.Almost everything you will need is included.You will also need:01. Professional Nail Polish remover (high percentage of acetone), to help remove cured polygel from your fingers.02. 70% alcohol, to clean up uncured polygel, because once it gets warm it tracks everywhere.03. Nail dehydrator (the nail polish remover can be used in a pinch) and primer.The nail dehydrator and primer are just extra measures to ensure the polygel adheres to your nails and stays in place longer.04. Scotch Brite pad, I will explain later.I wish the light were a higher wattage because with it being only 5 watts I found I had to re-cure the polygel a couple of times per nail, which causes the little light to get warm after a couple of nails. Not alarmingly warm, but noticeably warm to the touch.I would also suggest making some sort of enclosure for the light that your hand can slip into, this way you limit how much exposure your eyes get to the UV light.I used a small cardboard box with a sheet of black paper underneath, this way the paper didn’t reflect the UV light back up into my eyes.There’s a bit of a learning curve, mostly in how to keep the polygel thin, but not too thin so you don't end up with blotchy color spots.The thickness you’re shooting for at the tip is about as thick as a credit card, with the nail arch being a little thicker because this is a stress point.It just takes a little of practice.I found that once I scuffed up the nail using the included emery boards that using a little piece of Scotch Brite pad to make the scuffs more uniform helped the base coat to adhere better.Your base coat is your foundation for the polygel, so it’s important that it adheres well to the nail.Long story short, my first nail was put on incorrectly (I applied it to the cuticle, oops!) and after a few days when the polygel had begin to separate from the cuticle the nail began catching on things. Anyway, when I went to remove the nail, the base coast took a thin layer of my natural nail with it, so the Scotch Brite pad really helped with adhesion.The kit comes with lots of colors of polygel and even glitter colors.I just wish there was a bit more in each tube because I found that my first couple of nails were way too thick, and when I started to get to the point where I was thinning them out more, I had run out of polygel for that color, so there wasn’t enough to finish an entire set that was the same color.So practice with colors you don’t necessarily like, then once you get the tricks down, youshould have enough in each tube to do a full set or medium length nails that are all the same color.Unless you want to do multiple colors or color gradient sets, then you don’t have to worry about running out.The kit is a lots of fun!I really liked the little rhinestones, which come with their own glue.There is so much to explore with this kit, it will take you a long time to learn it all.It is a good investment, especially with how much a full set of polygel nails can cost.
T**
Stunning!
This is my first time doing polygel. I used to get my nails professionally done, the polygel feels the same as my gel x and acrylics. I was so excited to do my nails on my own as I am a mom and we all know self care is needed. Needless to say, these are perfect, salon quality. I used a cat eye gel over the polygel and the gems in the kit. This has definitely created a polygel obsession. Love! Love! Love! And would highly recommend.
ترست بايلوت
منذ أسبوعين
منذ أسبوع