


🍦 Chill like a pro—your gourmet frozen dessert awaits!
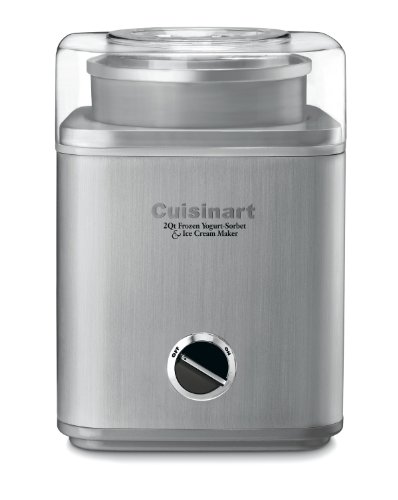
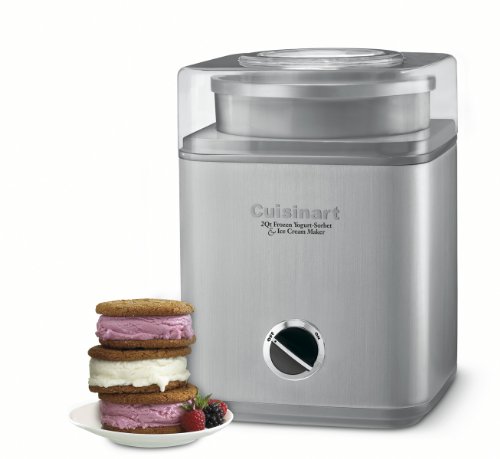
The Cuisinart ICE30BCP1 is a fully automatic, 2-quart ice cream maker featuring a double-insulated freezer bowl that delivers homemade ice cream, sorbet, and frozen yogurt in under 30 minutes. Its brushed stainless steel housing and heavy-duty motor combine durability with style, while the large ingredient spout and programmable operation offer effortless customization. Designed for North American electrical standards, this BPA-free machine includes cord storage for a neat kitchen and comes with recipes to inspire your next frozen creation.


| Product Care Instructions | Hand Wash |
| Material | Stainless Steel, Plastic |
| Color | Brushed Chrome |
| Item Dimensions L x W x H | 81.5"L x 8"W x 111.4"H |
| Item Weight | 12 Pounds |
| Capacity | 1.23 Cubic Feet |
| Operation Mode | Automatic |
| Special Features | Programmable |
Y**
Excelente producto
The media could not be loaded. I bought the Cuisinart ICE-30BCP1 a few weeks ago, and I couldn’t be happier with it! It’s incredibly easy to use — just freeze the bowl in advance, pour in your mixture, and let the machine do its magic. In about 25 minutes, you have delicious, creamy ice cream that tastes just as good (or better!) than store-bought.Cleaning is also a breeze. The parts are easy to disassemble and rinse, which makes the whole process very convenient.The quality of the machine feels excellent — it’s sturdy, well-built, and looks sleek on the counter. If you’re looking for a reliable ice cream maker that delivers great results without any hassle, I highly recommend this one!
S**.
Excellent ice cream machine, know how to take care of it, you will be rewarded.
This is a very good ice cream machine for its class (home use, freezer bowl). I'd owned the 1 1/2 quart Cusinart model and liked it a lot. Then someone in my house put the drum in the dishwasher and I found out when I tried to make a batch of ice cream that wouldn't freeze. Using the 1 1/2 quart model I was always scaling down recipes or hovering over the ice cream as it churned with a spoon, stealing spoonfuls ice cream as it threatened to overflow the ice cream maker because I overfilled it (not that I really minded that). I like the 2 quart size for those reasons,If you've never owned one of these types of ice cream makers before, here's an overview. There are two main parts as far as what makes the ice cream. There is a paddle and a drum, aka the freezer bowl. The night before you intend to make ice cream (or earlier) park your clean freezer bowl in the coldest part of your freezer overnight. This is essential that the bowl be frozen through with no sloshing sound. This drum is what chills the ice cream.When you're ready to make the ice cream, put the frozen freezer bowl into the base of the ice cream machine, put the paddle in and put the top on, start the machine and then pour your cold (repeat COLD) ice cream mixture into the freezer bowl as it runs. The cold of the freezer bowl chills the ice cream mixture, the paddle scraps the sides of the freezer bowl as it turns which scrapes off the freezing ice cream incorporating it back into the ice cream mixture and churns air into the mixture. Let the machine run for 20ish minutes. Give it a peak every once in a while because watched ice cream never freezes ;). When it's done, you'll hear the motor struggle a bit more because of the thickness of the ice cream, the ice cream will be soft serve consistency and will be done as far as its adventure with the machine. From here you could eat it as soft serve, or scoop out the ice cream into a freezer safe container and freeze it for a few hours. let the freezer bowl warm up a little, then wash by hand with warm soapy water and a soft sponge or cloth.The negative comments that people have left seem mostly to be due to them not understanding how this machine works or that they expected something different, or both. Yes, you have to freeze the bowl overnight -- that's how this type of ice cream machine chills ice cream. It doesnt have its own refridgeration unit. If you want that, then pay 5x+ the price for a different type of machine. No, this machine doesn't produce solid hard ice cream -- it produces soft serve consistency because it churns and you can't churn rock solid ice cream. And You MUST WASH THE FREEZER BOWL BY HAND. This isn't a "to keep it looking it's best" issue like you sneak your pots and pans in the dishwasher even though you shouldn't -- the heat from the dishwasher will destroy the freezing liquid in the bowl and the bowl will never make ice cream again. You can tell that a well meaning relative put your bowl in the dishwasher because the bowl will still sound sloshy even though it's been freezing for days.The It Never Froze My Ice Cream comments -- the person either put their freezer bowl in the dishwasher or the bowl wasn't cold enough. Or the freezer bowl was defective.The It Won't Make Ice Cream Immediately, It Makes Soft Serve...comments -- that's true, but that's how this machine works.Some have commented that they have to let the finished ice cream (after being I the freezer) sit on the counter for 15 minutes until they can scoop it. My suggestions are: 1. Use more fat in your recipe, 2. Let it churn more air as the machine runs, 3. Know that most commercial ice creams have a ton of what they call "overhead" which is basically air in the ice cream. You may notice that the same volume of two different brands of ice cream weigh differently. Ultra premium brands like Haagen Daaz have little overhead compared to, say most grocery store brands. Lower quality ice creams also have thickeners and stabilizers that hold the ice cream together but keep it from really forming solid. Ever leave a bowl of ice cream on the counter overnight and the next day it's a little melted but mostly in the same shape? That's the stabilizers. All of this makes commercial ice cream soft and easy to scoop even though it's frozen. Take heart that better quality ice creams like the one you are making are naturally harder when frozen, and therefore may take a sturdy ice cream scoop and perhaps a little muscle to scoop. On properly made ice creams (enough fat, enough churning) I've never made a batch too hard to scoop straight from the freezer.In short, this machine works beautifully and its make quality ice cream. I'm very happy with it.
S**S
Nothing beats homemade!
The media could not be loaded. This ice cream maker has been such a great buy. The machine is super easy to use, churns in about 30 minutes, and the ice cream turns out amazing. It freezes firm in reusable containers (like real hard ice cream), but stays softer in throwaway ones. The machine does make some noise, but it’s not a huge deal. For beginners, it’s important to know that the bowl spins instead of the paddle. The machine doesn’t move around on the counter when it’s turned on. Pretty sturdy!The recipes that come with it are actually really good. You can buy extracts and just add that plus food coloring to the basic vanilla recipe. Highly recommend this for any home looking to experiment with dessert making!
Y**
Great Ice Cream Maker for beginners
This Cuisinart machine has been a great addition to my kitchen. It's very easy to use, even for someone who’s new to making ice cream at home. One of the features I appreciate most is how simple it is to clean after use—it doesn’t require much effort at all. It’s also worth mentioning that the machine is not noisy, which makes the experience more enjoyable. In just 25 to 30 minutes, it produces delicious ice cream with a smooth texture.The machine comes with a small recipe book that is quite helpful for making your firsts ice cream. However, for those looking for more variety, I’d recommend purchasing a more comprehensive recipe book, you can your own recipes, but you have to consider not to exceed the maximum capacity of the machine. So far, I’ve only used the machine to make ice cream and haven’t tried making gelato or slushies yet, but it’s great for what I’ve tested.
Trustpilot
2 weeks ago
5 days ago


