🖤 Elevate Your Media Game with AtlanticMaxsteel!
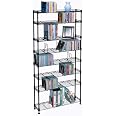
The AtlanticMaxsteel 8-Tier Heavy Gauge Steel Wire Storage Shelving is a robust and versatile storage solution designed to hold up to 440 CDs, 228 DVDs, or 264 Blu-Ray/video game discs. With its adjustable shelves and sturdy steel construction, this shelving unit is perfect for organizing your media collection in both home and office settings.
Item Weight | 17 Pounds |
Item Dimensions D x W x H | 5.75"D x 23.62"W x 48.75"H |
Required Assembly | Yes |
Style Name | 8 Tier |
Color | Black |
Finish Types | Steel |
Material Type | Alloy Steel |
Mounting Type | Wall Mount |
Room Type | Office |
Shelf Weight Capacity | 17.3 Pounds |
Recommended Uses For Product | Media |
Shelf Type | Wire tiered shelves |
Number of Shelves | 8 |
Additional Features | Adjustable |
A**N
Not hard to put together. Unsure if mounting is a good idea.
I was a bit worried about the purchase as it seemed there were a fair share of reviews criticizing the build & quality. Maybe they received ones with issues or aren't okay at figuring out construction without very clear directions. I'm going to try to provide a few paragraphs to help you with your decision.4 stars for ease of assembly. 4 because the legs are awkward until you've got about half the racks on, and the directions are basically a paragraph worth of text with 8 pictures. However, it's not hard to figure out once you get all the pieces out & see how the first (base) rack gets installed. It's basically 3 steps. The only part I would criticize is when it comes to step 2 & 3, I think they should be all one step. If youre like me & follow the directions then you will waste about ten minutes doing step 2 before reading step 3. But, it was a small inconvenience that maybe was partly my fault for not thinking about what i was doing & just mindlessly following directions instead of thinking about the "why" of what i was doing.Also, if you're building it alone (as I did) keep the box, grab something to sit on it (i used literal weights), and slide the legs' base underneath each corner of the box to keep the legs from falling over when you're starting to slide on your first rack.4 stars for sturdiness. immediately after assembling I moved all my CDs (about 250) on the racks. And, on the top I sat an empty hardshell guitar case (like 8 pounds I'd guess) & I am very confident that it will hold up. The reason for the 4 is more about when there's nothing on the racks. When this thing is empty you better lean it against something. I did build this on carpet & it's placed in a carpeted room so maybe that's partially to blame. But, I'd guess even on a flat wood or concrete surface that this thing will want to fall backwards. Not a problem once it had a wall to rest against and/or weight holding it down.4 stars for maneuverability. First off, I didn't know wall mounting was even an option until I opened the box...I cant imagine that being a great idea. But, I gave it 4 stars because once put together it is kind of awkward to move. Your first instinct is to grab it by the rack in the middle on each side with your hands to move the unit....that's not going to work. The racks merely rest snugly on the "clips", they do not actually lock into place on the clip. The only option is to grasp the rods on each side & move it that way. The unit isn't heavy...but, it's not light either. And I don't know if I would want to move it very far for fear of the rods either being bent or maybe becoming compromised in some way which would possibly result in deformity.So why 5 stars? Well, for the price. This is obviously Made in China. Not something I love to support, but sometimes cheaper alternatives are what's needed. And I have to say this is B grade shelf for an A+ price. I think even if you're going to place this in a room that guests will be seeing often, it's not ugly or cheap looking. And, if you need a storage rack to even set something a bit heavier than physical media (tools or Knicks knacks etc.) then this could be an option for you as well.
K**R
Worked well to hold dvd's
Sturdy and not too difficult for my husband to put together. We had to put some DVDs on their side, but still able to hold a lot of ones we had extra.
B**N
Definitely worth the money!!!!!!!!!!!!!!!
Let me start by saying I think this is probably the best "shelf" I have ever bought for movies and I was lucky to receive one that did not have any damage like some of the other reviewers had. Now I did read lots of reviews on this shelf before I decided to spend my money on it. And I am glad I bought it and glad I read the reviews first, which made assembly easier. I bought the 8 shelf black unit and the dimensions of the unit are 4 feet tall by 2 feet wide. The shelves can hold 39 dvd's across and approx. 39-41 blu-ray's. I have to mention this review will not be about holding cd's, as I am not using it for that. (sorry) Now on to the actual pro's and con's.Pro's:It can hold approx. 234 standard dvd's in total and more if you are doing all blu-ray. Remember it can hold approx. 41 blu-ray's per shelf and there are 8 shelves. I personally don't have enough blu-rays to do a detailed review for just blu-rays but I can gauge a guess based on what I do have on the shelf so far. Also, very important, you can not keep the blu-rays in their cardboard outer shells (if they came with one) "IF" you want to get the maximum use out of the shelving space. I will go into detail of how I spaced the shelves towards the end of this review.Pro: This is an extremely easy unit to put together if you follow the tips given by several other reviewers that I will repeat in this review.Pro: This unit is small enough to fit in almost every home and yet sturdy enough to hold hundreds of dvd's, blu-rays, or cd's without worry. Now the key to this unit being successful in its job is to anchor it to the wall when done with assembly.Pro: This unit can actually be taken apart if you ever had to move to another home and you didn't want to try and move it as a whole unit which could scratch it. Which leads me into the con's.Con's:The unit has a very thin layer of outer coating for the finished paint. It can easily be chipped if accidentally banged by something or if when putting it together you are not careful. I was putting mine together and was using a mallet to hammer the shelves down onto the clips and accidentally hit it to hard and chipped the paint right off of one shelf in a small section. Not really a big deal since you won't see it when it's covered by hundreds of movies. And my unit is black so I could paint it if i felt the need.Con's: The clips are a little tricky to get on but with a tip I got from another reviewer it was a lot more simple than it would have been. (more on the clips later)Con's: Even though the unit comes with 8 shelves I was only able to get 7 shelves on the unit due to spacing issues. (more on that later)Con's: The backs of the shelves which have a backing to prevent the dvd's from falling off the unit backwards could have been a little taller, but they do get the job done.Assembly:Now if you decide to buy this unit, this is how I suggest you put it together based on my experience alone. First off when you are checking your parts to make sure you received everything, remember that the part labeled (2) which is a little spirally looking chrome piece that connects rod A to B is actually already in rod (B) so don't panic if you don't see it in the parts bag. Now the directions say to attach the round foot piece to the bottom of rod B first and that I did do as they said. I connected all four feet to the bottoms of the "B" rods and stood them up ready for the next step. The feet are able to spin even after they are screwed in all the way and this is normal. The next step is to attach rod "A" to rod "B" using the spirally screw that is sticking out of rod "B". Do this to all four rods. Then from there I did the rest in a little different order to make it easier to do since I was by myself. The next step was to attach one set of plastic clips to the bottom of the rod for shelf preparation. Now this step is a little tricky. The clips are all the same and they say "top" on them to make sure you put it right side up, but snapping them together is somewhat of an art form. First start at the very bottom of one of the "B" rods near the feet as far down as you can go. This is to make sure you get as many shelves on your unit as possible. I will go over the exact spacing as I put mine together as we continue on this review. As one reviewer suggested, place and hold one clip "top" side up on the desired section of the rod and then place another clip onto that one interlocking the groves as you do. Now remember you won't get them to close all the way just yet, so don't try at this point or it will just frustrate you. Now holding both clips together gently twist and slide them up just slightly (squeezing as you go) and slow enough that you don't pass the first indent in the rod. That indent (or visible line) is your grove. When you reach that first line you will hear a click, that is the clip snapping into place. That means you have succeeded in getting the clip properly set. At this point the mfg. instructions say to start putting on the shelf but I slightly disagree since I was putting it together by myself i didn't want any problems with trying to get the shelves on straight. And if you start to put the shelf on one clip at a time then you have to constantly be adding the additional legs and trying to hold the unit while doing it and therefore adding more grief to your set up. But that is just my opinion from already putting this unit together. So I put all four clips onto all four rods and then I got ready to put my first shelf on. When sliding the shelf onto the rods just make sure that your legs are spaced in the appropriate way on the floor so all you have to do is just slide the shelf over the rods and slide it down. Now when you are sliding the shelves down over the clips the first shelf is a breeze because you "want" it to go all the way down, so there is no way to make an error. So just slide the first shelf all the way down to the bottom and when you reach the clips don't go to fast or you will accidentally pop one of the clips off just from force. Slowly push the shelf down over the clips a little at a time on each clip so as to keep the shelf straight. Don't try to get it on one clip all the way at first, just do each clip a little at a time until they are all down on all four clips. Now the instructions didn't say anything about using a hammer or mallet to secure shelves on the clips but I decided to use a mallet because I wanted the shelves to be on the clips tightly. I don't suggest doing this unless you are extremely careful because even I chipped the paint a tad while doing this even with extreme caution. But it does ensure that the shelf goes on tightly and is secure. Use a cloth to protect the paint if you do. I didn't think about that until it was too late for me. Now the spacing on my unit went as followed: The first shelf was all the way at the bottom, then the next shelf was 7 notches up (meaning there should be 6 visible notches between shelves). You will see a partial notch from where the previous shelf is actually sitting but that partial notch does not count when you are spacing so don't count it as a full notch when spacing, just ignore it. So count each whole section between the lines (or grooves) as one "notch". If you're not sure what I mean then get a standard dvd and place it on the shelf and hold it in place with the "book ends" that came with this unit. They get attached by simply squeezing them at the bottom and placing them on shelf where you want it, then let it go and the "book end" will hold your dvd's up by themselves. When you have the dvd on the shelf the next shelf up should sit practically right on top of the dvd. But don't worry there is still enough room to get it out even if it doesn't look like it. Now that you know where the next shelf should be placed repeat the above steps for placing the clips and place the next set of clips on the 7th notch on all four legs. Then add the shelf as you did before. However the only difference now is that you need to make sure that when you are sliding the shelf down onto the clips that the clips don't move off of the notch you have placed them on. This can happen if you try to push the shelf on to hard. That is where the mallet comes in handy. Because you can hold the shelf in place with one hand and use the mallet carefully with the other hand and gently hammer it on without moving the clips. If the clips do move don't worry just gently hammer the shelf up from the underneath with the mallet and it will come loose and you can start over. This did happen to me because I got over zealous with the mallet trying to hurry. I was able to get 7 shelves on this unit with 6 of them being for dvd's and one shelf for blu-rays. I put them on in this order starting from the bottom and going up:1st shelf all the way on the bottom2nd shelf is 7 notches up from last one (remember you should see 6 full visible notches (from line to line is a notch) between shelves)3rd shelf is 7 notches up from last one4th shelf is 7 notches up from last one5th shelf is 7 notches up from last one (this shelf was used for blu-rays that is why NEXT shelf is spaced differently)6th shelf is only !!!!!!!!!!! 6 !!!!!!!!!!!!!! notches up from last one7th shelf is 7 notches up from last oneWith this spacing I was able to only get 7 shelves on the unit. But I didn't have more than one shelf of blu-rays since this unit was going in my bedroom to hold all of the rated "R" movies and keep them out of reach of my younger children. I have lots of blu-rays but they are the kids movies and they are in a different movie cabinet in the main part of the house. So I spaced these shelves with the plan of holding more standard dvd's then blu-rays. However if you want to space for blu-rays just space them 6 notches apart. With that spacing you "might" get that extra shelf on the unit, but I can't say for sure as I have not tried it. And if your using this unit for cd's you will absolutely get all the shelves on for sure.When I was finished assembling this unit I placed it in its desired "home" in the bedroom on the wall and I used the provided anchors to secure it to the wall. Before I anchored it I adjusted the feet by making the front two feet less screwed in than the back so the unit slightly leaned back onto the wall. That was just an added precaution to prevent the movies from falling forwards and off the shelf completely. The anchors are a little bit tacky looking but remember you won't see them if you utilize the top shelf for dvd's which will cover the anchors completely. It is hard to explain how to use the anchors but the instructions do explain it a little bit. But what I can tell you is that when you have them on correctly you should not see the screws at all. I will attempt to explain how to attach the anchors but bare with me it is complicated to explain.Anchor assembly:First hold white anchor with the plastic clip on top and the two velcro strips on the bottom facing the wall. To get the right placing you will first have to loop the anchor strap through the plastic clip by folding down the top end (with clip) down towards the bottom near the velcro end. Now pull the bottom of the strap up to meet the clip and loop it through so the velcro meets back with itself to velcro to itself. This will give you an idea of how it will look when you have it on the wall and how much room you have to work with. Remember you should not be able to see the holes where the screws go once it's on the wall. Now that you have practiced looping it, undo it and now loop it again but this time make sure you include the back of the top shelf in the strap. Do this by wrapping the strap through the bar of the back of the top shelf "THEN" wrapping it through the plastic clip as you did before. Now you can use a pencil to mark inside the provided holes on the straps so you know where your screws will go. Once you have your holes marked undo the straps and drill your holes for the provided screws. Screw in the strap with screws that are provided and attach the strap as you have practiced before. Make sure you have the strap looped when you mark holes or you might get the holes to high up and you won't have enough "give" to secure the velcro to itself. That is why I suggest you have it looped when you mark the holes so you can get it spot on the first time.After the shelf is secure, place your movies accordingly and ENJOY. I hope this review helped with your decision to buy or help with assembling your new unit. If there is anything important that I left out please comment and I will adjust my review accordingly to help others out. Thanks for your time.P.S. when you take the shelves out of the box these little blacks caps fall all over the place. They were used for shipping purposes only as far as I can tell. So there is no need to keep them.
Trustpilot
2 months ago
1 month ago