Desert Online General Trading LLC
Dubai, United Arab Emirates
Desert Online General Trading LLC
Dubai, United Arab Emirates


🛠️ Clean smarter, not harder!
The Holikme 30 Feet Dryer Vent Cleaner Kit is an essential home improvement tool designed to enhance dryer efficiency and safety. Featuring high-quality synthetic brush heads and flexible rods that extend up to 30 feet, this kit allows for easy cleaning of dryer vents, ducts, and exhaust ports. It can be used with or without a power drill, making it user-friendly for all. Regular use helps prevent lint buildup, a leading cause of dryer fires, while saving you money on costly professional services.


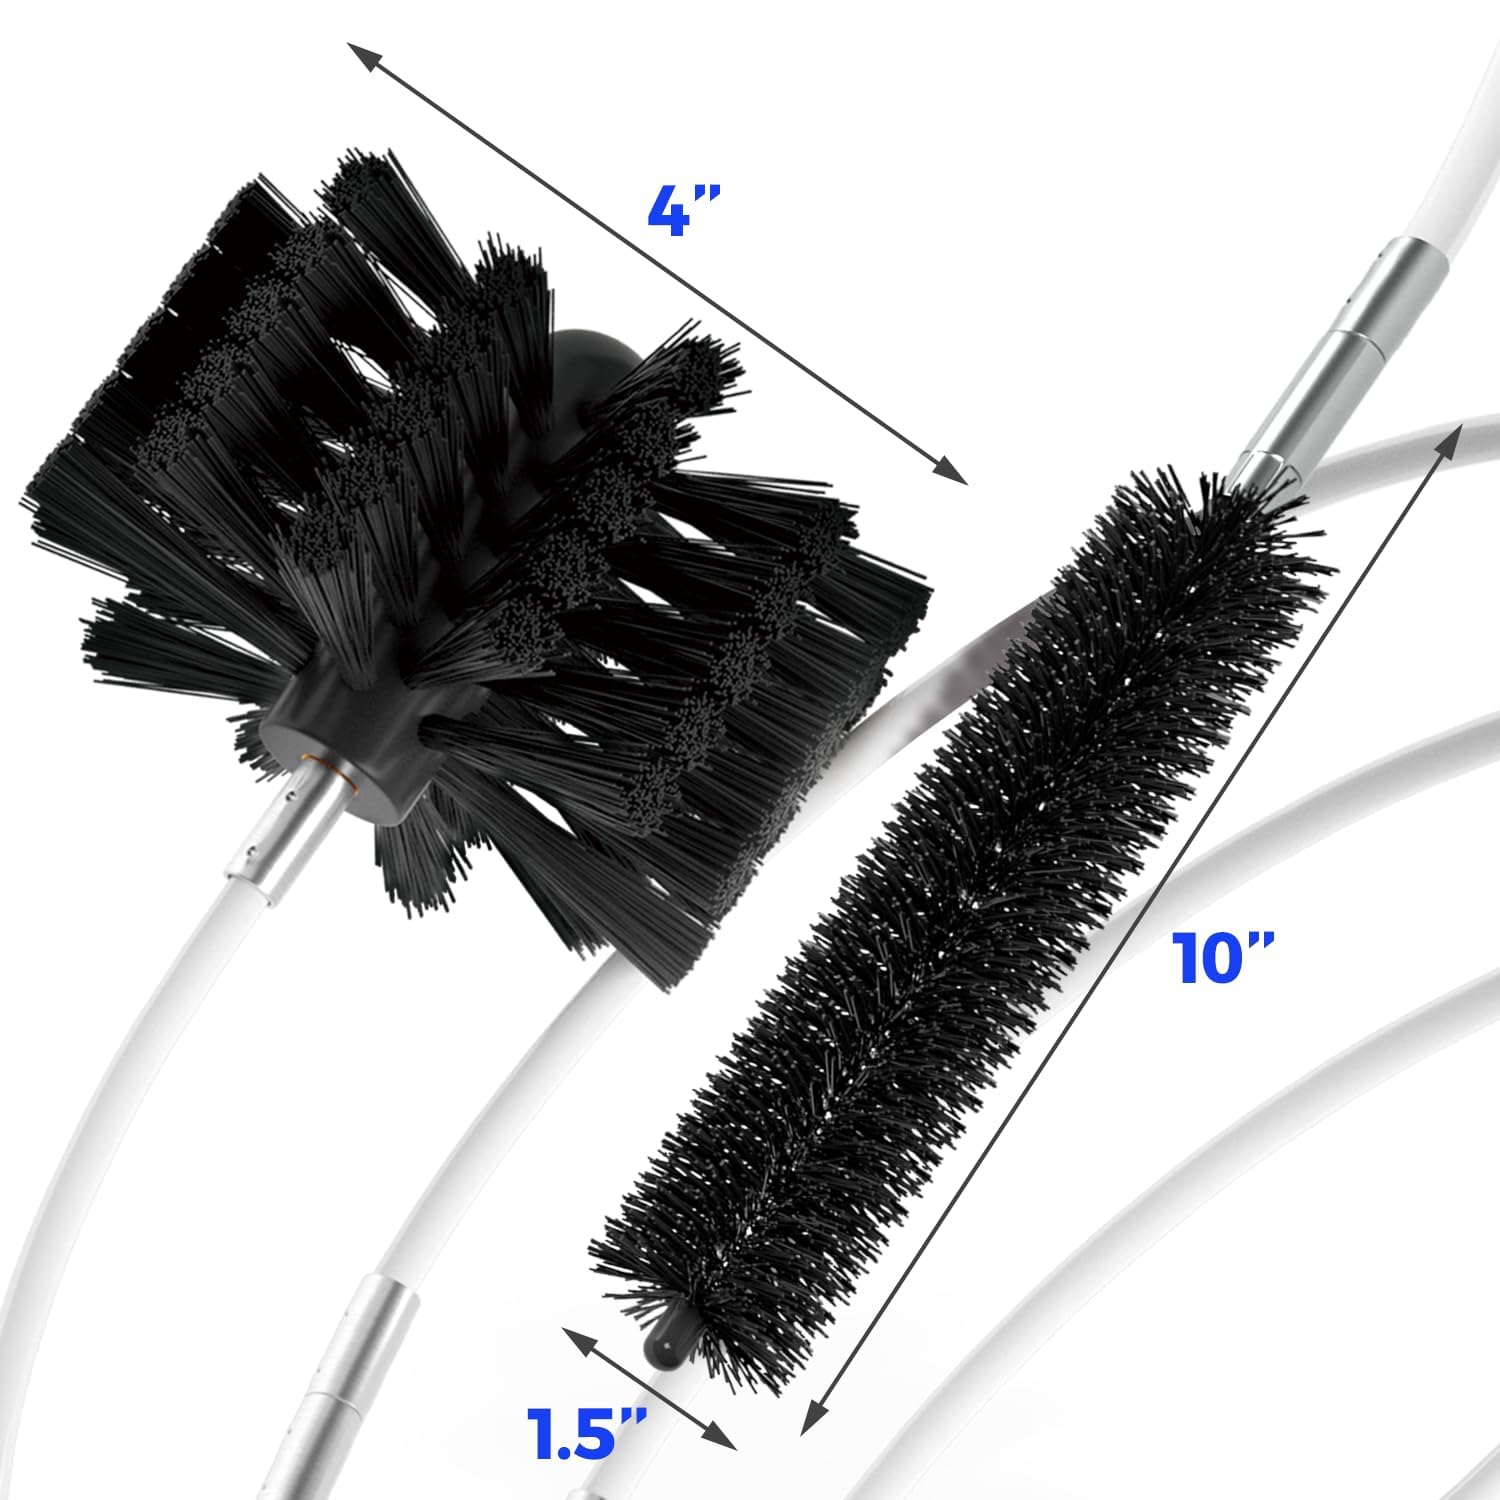
| Material Type | Synthetic |
| Handle Material | Plastic |
| Item Weight | 0.78 Kilograms |
| Item Dimensions L x W x H | 4"L x 4"W x 360"H |
| Item Shape | Round |
| Theme | Dryer Vent Cleaner Kit |
| Color | Black |
| Item Firmness Description | Soft" or "Medium |
| Special Features | Flexible |
D**A
Have a dryer? You should have this.
Very pleased with the performance. I installed the 4" hard pipe myself 8 years ago, with 1 90 and two 45 degree bends. I needed 22 feet, and using a drill, the brush and rod negotiated the canal with ease. Once got to the vent, I simply pulled it back through, and got very little resistance. I took an electric leaf blower and stuck it in the pipe, wrapped a rag to seal it, and ran it for a minute. There outside, lay a huge pile of lint! Shop vac took care of that. This goes on my calendar for yearly maintenance from now on. I additionally removed the dryer back, pulled and cleaned the duct and vacuumed all around. The rods that came with it seem to be very sturdy, with clean threading, and require only a little effort with 2 pliers to break and separate. The money I saved, and the experience I got, was was worth far more than the 20 bucks this cost.
M**C
Works Great
I have no complaints! It works great and it comes with so many extension segments to fit your needs depending on how far you need to go. It’s easy to affix to a drill. The smaller tool is perfect for getting in the dryer vent inside the machine. I thought I was doing great in keeping the lint catcher clean, so I was a little shocked to see how much gets by with very little notice until there’s an issue. This is great for keeping up the maintenance and for worry free nights from the risk of fire.
K**Y
Good product to increase dryer function and reduce fire hazard
Good product, works as advertised. A little labor intensive (screwing rods together and taking apart.) did a good job of removing excess lint from dryer vent
R**R
If possible, pull the brush from the inside of the house to the outside.
Worked great. Easy to piece together, easy to use. My 20-ft vent pipe is now as clean as new. I recommend feeding the rods from inside the house, adding one after another. When you have enough rods connected, add the brush head to the inside end and connect the drill (using the adapter) to the outside end. Pull slowly with the drill spinning (at a slow speed) to keep the lint from getting in the house. I ran the brush three times (each time connecting the rods inside and pushing them outside). I then used my leaf blower to blow all the remaining dust outside.
T**S
Work Great on My Ductwork
Had some problems with my dyer properly drying clothes in a reasonable amount of time. It got so bad that larger loads were taking 2 hours to dry. Eventually I blew the thermal fuse in the blower housing. It was then that I decided to do a deep clean of the blower and the dryer vent ductwork. Up to this point I would stick a shopvac as far into the duct as I could, thinking that I would get most of the stuff, but, let me tell you, it was an eye-opening experience when I put this brush on the end of my drill and let it do its thing.As you work the brush in and out, the debris comes literally pouring out of the duct. I really couldn't believe how much crap came out of my ductwork. Somebody posted a video in one of the reviews here, and it was just like that for me. Really awesome!I love the nylon (?) rod sections. They're flexible and soft enough not to do any major damage to the ducts, and allowed me to maneuver the brush through the elbows. If you've got a lot of twists & turns, attack it from both ends of the duct to minimize the potential for entanglement. My only word of caution: If the thing binds up and gets momentarily stuck, do not try to put the drill in reverse or you can lose the brush in your ducts! (Don't ask me how I know this). Just pull it out! Also, if you haven't figured it out, this thing stirs up a mess of debris at the opening of the duct, so it's helpful to pair it with a shopvac to suck up the lint as it comes out.This brush set joins the list of things that I wonder how I ever got by without. It's relatively inexpensive, highly effective, and very gratifying to observe in action. And, yes, my dryer is working like it's a brand new machine again. I enjoyed my experience with this brush 100%.
B**E
Works better with a few extra tips...
I used this brush last week and was quite happy with how well it worked. A neighbor hired a contractor to clean out her dryer vent. When she showed me a photo of all the lint that came out, I became alarmed. I have lived in my home 8 years and never cleaned the vents. And who knows if the original owner ever cleaned it!First, I disconnected the hose from the vent behind my dryer and cleaned it with a smaller brush. It has an elbow fitting that goes into the long duct under my crawl space. I used the vacuum and cleaned the inside vent and around the dryer really well. I reattached the flexible vent hose to the housing.Outside, I went into my crawl space to assess how long I would need to make the brush. I have a straight aluminum duct that goes from the vent outside to the elbow fitting near the dryer. I removed the vent cover, then assembled the flexible rods to the brush leaving a couple of feet leeway to start. I mounted the drill bit that is included to the last section and attached it to my cordless drill. I inserted the brush, turned on the drill and slowly pushed it into the vent. I kept the drill going while I removed the brush to bring the lint back through the duct. Then I made it longer and repeated the process several times.After there wasn't much lint coming out, I got my shop vac. I was able to use all the attachments to make it about 10 feet long. I put the cone end on and inserted it into the duct. I vacuumed the vent for several minutes, moving it in and out.I ran the dryer on "air" for about 20 minutes as suggested in a Home Depot video. Not much lint came out. So I installed a new vent cover and considered the job done. Today I washed a large load of towels. I put them in the dryer. After about 15 minutes, I went outside to see how the new vent cover was working. To my surprise, the cover was totally blocked by several inches of accumulated dryer lint! (pictures below). I used my fingers and cleaned out the lint... filling half a bucket. I hope the duct is clean now!Two things. I could not get the drill bit off the end of the attachment. I tried everything. That's fine because I won't lose it. (LOL) The flexible rods are quite hard to pry apart after use. The centrifugal force of the drill really cements them together. UGH!! Eventually, I did get them apart. BTW - I am a over 65 and a woman. Anyone can do this job with some patience and determination.
Trustpilot
2 months ago
1 month ago