✨ Elevate Your Space, Hide the Mess! ✨
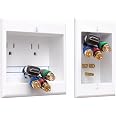
The PowerBridge TWO-CK is a dual outlet in-wall cable hider system designed for wall-mounted TVs. It includes essential components for easy installation, such as a 6-foot power cable and extension cord, ensuring a clean and organized look by concealing wires. This kit is compatible with various wall types and meets NEC safety standards, making it a reliable choice for modern living spaces.
G**R
A well designed DIY Product - I can't believe I installed this all by myself!
When we got our 75" Samsung TV (for our basement home theater) this December, we hired Hello Tech for mounting the TV. I purchased the TV Mount from Sam's Club and this PowerBridge Dual Outlet was recommended by a friend of mine (who is a super-duper handyman). I ordered this and the Hello Tech Technician did a great job, with concealed wiring. I watched him do install the Dual Outlet In-Wall Cable Mounting System and he told me "this is easy to install, all that you need is a helping hand to mount the TV".Almost 5 years back, I got the our Family Room TV mounted on the wall, but did not do any concealed wiring & cable management. I decided to replicate the Hello Tech Technician's work, ordered my second PowerBridge Dual Outlet Recessed In-Wall Cable Management System from Amazon.I have never cut the drywall so far! My Handyman Humbarto says: "Sir, you need to have patience while cutting the drywall and do it slowly; it is more of an art work". Yes, he is 100% correct. I took time to cut the drywall (of course, after identifying the 2x4 studs), did it slowly, but accurately. OMG, I can't believe that I could cut dry wall so precisely!Once you cut the drywall, the rest of the steps are as easy as 1...2...3..!! Just fix the top box first behind the TV, run all Power, HDMI & USB cables through the top box. Then run them through the bottom box and connect them to your devices (Cable box, DVD Player etc.). It is good to run at least one USB Cable (or) an additional HDMI cable, in case you wish to connect a laptop to view pictures. If you buy the pre-wired version, life is quite easy (to connect the top box & the bottom box).The last step is to power up from the bottom and there we go! My wife could not believe that I did it all by myself (esp. cutting the drywall). No loosely hanging wires... all hidden behind the wall.This is a well designed DIY Tool for concealed wiring. Excellent product, that's worth it's price.
J**L
Absolutely perfect!
Absolutely fantastic product and exactly what I was looking for! It’s a perfect cheating alternative to running power from your panel box and fishing wire through the wall.Take your time to read through the directions and really plan out each step as you’ll be making some pretty serious cuts into your walls. Have a reliable stud finder to ensure you’re installing between two studs. Use the templates or the back of the fixture boxes to mark your wall. I used a hole saw to have a place to start my cordless handheld jigsaw and cut the two holes. Each box is designed to internally grip the drywall to secure the box. I had some heavy gauge conduit laying around that I used as sort of improvised fish tape as you really only need to drop your cables a couple of feet down and pull them through the lower box. Then connect your internal power cable and clean up! Just take your time and most anyone can do it.I absolutely recommend this product to anyone who has a bit of “I can do that!” spirit in them and wants to hide those unsightly cables from your wall mounted TV. Easy to install, fits securely, does the truck, and all at a reasonable price!
H**Y
Quality product
Easy install and definitely plug and play setup.
T**Y
High Quality, easy to install, American made! Rather expensive though
Pros:Well-made productConvenient cardboard template for cutting wallClear instructionsProtective plastic film to protect during installationSimple to install with a variety of cablesCreates a clean, mostly professional lookAvailable for next day deliveryCons:Rather expensive for what it isA bit unprofessional looking with wires coming out rather than connectorsThe product appears to be very well made in America! The packaging and instructions were clear. The power cable was plenty long for my installation, perhaps a bit longer than needed. It does seem that it could be problematic to connect the two ends if you are at the full length as the connector would be inside the wall.While the installation instructions are clear, I deviated a bit using techniques I’ve used when running wires in walls that I believe made the install easier. I started the installation with the template provided for the top box by the TV. I traced the template with a pencil, and cut a hole in the drywall with a plunge drywall saw. The only tricky part of this is getting it started. I first score the cut lines with a utility knife, and then carefully start the beginning of each cut poking the tip of saw into the wall. I ended up with a perfect cut that matched the template. As suggested by the instructions, I did use a level when locating the template.I have a length of metal chain that I use for dropping wires in the wall. I then roughly marked the vertical position of the bottom box to align with other electrical boxes and then used then held the chain from the center of the top hole and marked the bottom hole. This provides perfect plumb alignment. Then, similar to the top hole I marked the cut out with the provided template and cut another hole to match the bottom box.This is where I really deviated from the instructions. The instructions tell you to use the wire from the top to snake through the wall, and to do multiple steps. The wire was rather bendy and while this would possibly work I used a much simpler method. I took the same chain, and attached the electrical cable, and all the signal cables I was running, along with an additional piece of nylon string using some electrical tape. Be sure to securely attach all the wires so they don’t pull off in the wall. I also make sure any connector ends are covered with tape to protect them from damage, dirt, or snagging in the wall.Then I take the chain, drop it down the top hole and feed it until I can see it in the bottom hole. I then grasp the chain and use it to pull all the wires through. Feed the wires through the top portion prior to this to ensure you leave the length you need at the top.I then remove the electrical tape and connected the electrical connector from the bottom box to the connector coming out of the wall, and fed all the signal wires and the string through the opening in the bottom box.I then pulled the wires through the bottom box and the top box working a bit back and forth as pushing the boxes into place in the wall. The excess electrical cable I shoved back into the wall. Once I had about the right length at the TV and the remainder pulled through the bottom I tightened down the screws on each box. You may want to use the level again at this point. While the cut out is about the perfect size, there is some gap that allows the some movement of the covers.I can’t speak to the issues others have noted about the clips breaking if you remove it after initial installation. This is the purpose of the string though. If you should need to pull new wires, you can use the string to do that. Just attach the additional wires to the string, and a new string for the future, and pull it through.I pulled through 2 HDMI cables, 1 Ethernet cable, 1 RG-6 antenna cable. The second HDMI cable is a spare as is the antenna cable presently. I would pull through any wires you need now as well as possible spares. The TV had 4 HDMI inputs, but I didn’t pull all 4. I did go with the dual outlet box also for a spare power outlet. This way a future FireTV stick or other device could be plugged into the TV directly, and also have a power outlet available. The TV itself was a Roku TV, so no need initially.This provided a clean wire free installation of a TV in a bedroom. The TV was mounted a few feet above a dresser. The bottom box is behind the dresser, and the cable box sits on the dresser so no wires are visible. This allows using standard pre-made cables of whatever length you need and was a fairly quick install. Taking my time, triple measuring it probably took about an hour or so to install.Personally, I would prefer where there are connectors on each plate with short jumpers, and the electrical would be wired directly into a nearby outlet box and not have another electrical cord. That however would be a LOT more work, and all the connectors and cables degrade signal integrity, so actually this also works better. This also doesn’t require any electrical work, and the electrical wires in the wall are safe.I would probably use this solution again if the need arises. Given that it just provides a path for the signal wires, it is highly flexible for any needs. You could easily add another 2-3 more cables without getting too tight. That should be enough for most uses. That would provide for 4 HDMI cables, an optical TOSLINK cable, and another Ethernet which would seem enough for any TV installation.Note that I purposely did NOT use HDMI cables with ferrite bead ends. While those have advantages, you may not be able to pull the large ferrite bead through the cable opening. I actually used Amazon Basics high speed HDMI cables and Amazon CAT 7 Ethernet (overkill for current TV, CAT 5e would have been sufficient). Keep in this in mind and don’t use unnecessarily thick cables.What was also really nice is that everything was available with either same day or next day delivery! I did need to select what was available quickly (thus the CAT 7 Ethernet), but this was great to have this quick.
J**E
Power Bridge TV Hidden Cable Kit
Quality parts and easy to install. Good value for the price paid.
D**A
Looking for this for a while. Excellent Product
I hand been looking for something like this for a while. I had cut holes in my drywall years ago to run the wires for my family room tv.This product fit the bill. From the feel of it I think it is well made, designed and adorable.Really cleaned up the install.Highly recommend!
Trustpilot
3 weeks ago
2 weeks ago