Some deliveries may take a little longer than usual due to regional shipping conditions.

DOWNLOAD THE APP


Customer Services
Copyright © 2025 Desertcart Holdings Limited
DOWNLOAD THE APP
🖤 Stitch your style, drive with pride!
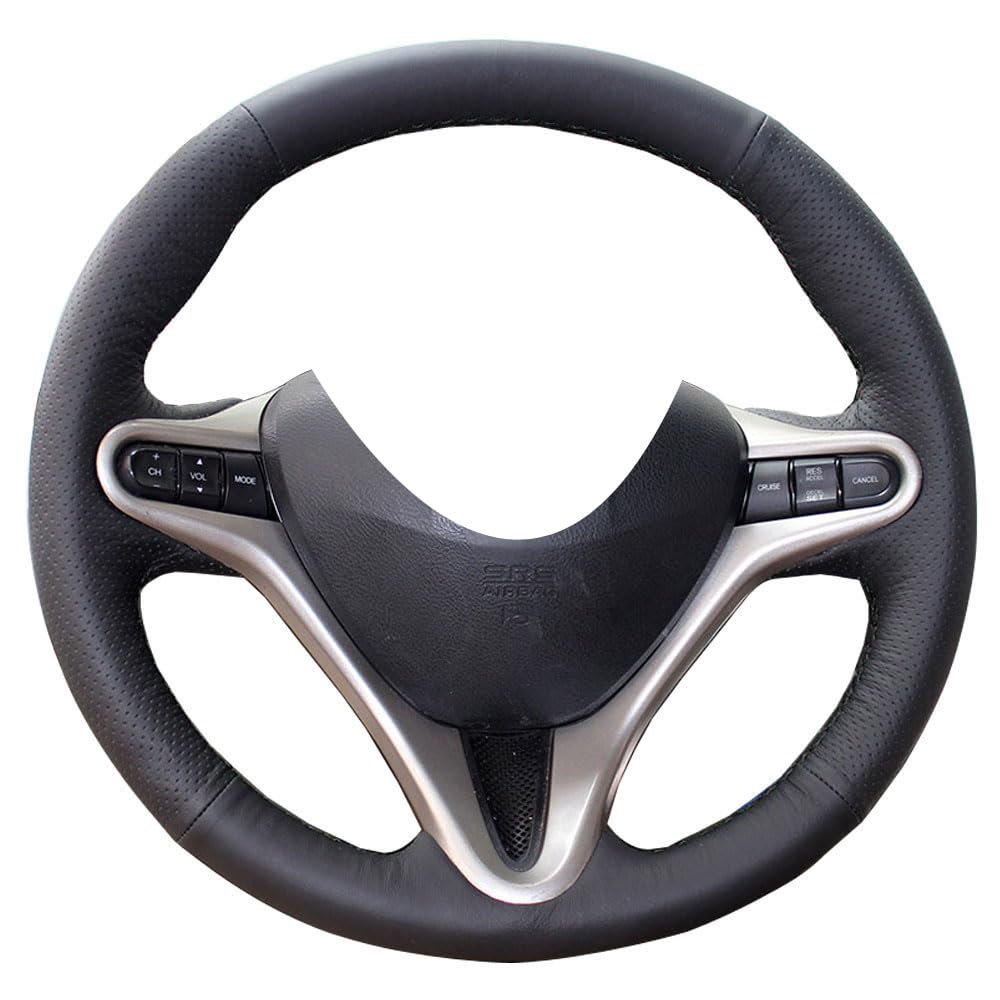
The Eiseng DIY Steering Wheel Cover is a premium, exact-fit leather wrap designed exclusively for 3-spoke 8th generation Honda Civics (2006-2011). Made from 100% genuine black leather with black stitching, it offers a luxurious feel and enhanced grip. This cover requires a hands-on DIY installation using the included tools, delivering a personalized, professional finish that protects your original steering wheel while elevating your car’s interior aesthetics.
| ASIN | B01MCUR7K4 |
| Best Sellers Rank | #531,975 in Automotive ( See Top 100 in Automotive ) #1,800 in Steering Wheel Covers |
| Brand | Eiseng |
| Customer Reviews | 4.2 4.2 out of 5 stars (176) |
| Date First Available | March 9, 2017 |
| Is Discontinued By Manufacturer | No |
| Item Weight | 6.9 ounces |
| Item model number | QC-CIVIC-000000006 |
| Manufacturer | GL |
| Manufacturer Part Number | QC-CIVIC-000000006 |
| Package Dimensions | 10.71 x 6.89 x 1.38 inches |
J**N
Nice leather wheel wrap, hard to put on
The quality of the leather is good and the red stitching is nice. My wheel was really beat up so this transformed the feel and look of the wheel. It was a pain to sew it on. I ended up just taking the wheel off the car and doing it inside my house. Would I do it again? Yes, definitely worth it if you don’t mind spending 2-3 hours on it
K**D
Looks Like it came this way...
My Honda wheel has been flaking apart and it was time to fix it. This wheel cover is a perfect fit, but let me tell you that if you want a professional look, you need to spend about 3 hours making it look that way. If you think you'll be done in an hour, you won't have a nice looking wheel cover and probably get frustrated. You must have patience and like me, be a bit anal to making it look good. 1. It comes with double stick tape, I used some on the main parts between the spokes, no need to use it on the "tabs" 2. Get it aligned and start by tucking in the "tabs around the wheel spokes, the provided plastic tool is great 3. Unstick the double back tape and stick down the cover to the wheel, you can pull the tape up and stick back down to get it just right, it will look bumpy, but once you start sewing it, it will tighten up. 4. Sew it up, check out youtube, there are several videos that will help build your confidence to do it 5. Enjoy a great looking steering wheel
A**R
Fitment not 100%. Might be my fault
Overall I love this. I have a Si model, and was replacing the worn leather that was on the steering wheel. I took the old leather off first, and in hindsight I wish I wouldn’t have. I think the added thickness of the original leather would have helped this fit better. Not hard to do at all. I did struggle because of all the excess material. Like I said I believe that was my fault. Comes with everything you need. Take your time. Watch a few videos. I know my technique was good. And I started from the bottom. You can see that looks better, than as I got to the upper portion there was just nowhere for the material to go. Looks good tho. Better than it was. So that should tell you how bad my wheel was. Overall, I wish I wouldn’t have got this, took the red stitches out, taken a small bit off all the way around, and re stitched it then installed. That would have made up for my mess up but it’s on and I’m gonna leave it. I would recommend it. I just messed up. Edit: 10/9/25 added the third picture. Seems to be holding up pretty good.
T**J
Installation takes time and patience, but it's worth it!
I ordered this after watching a few YouTube videos to get an idea of the installation difficulty. I figured it was worth a shot. I used the supplied double-sided tape to line everything up as carefully as possible. Before you start stitching, make sure you've lined up the wrap perfectly with the three spokes, then tuck everything in. It will take a bit of force to get the material under the plastic, so get someone with a bit of arm-strength to help if you don't feel comfortable with that. Once everything is tucked, the rest is pretty easy. Look at youtube videos for examples, but essentially you're just going back and forth, skipping one loop every time. I threaded every loop in the "nooks and crannies" of the wheel to make it a bit tighter. One major tip I have in regards to stitching: You can do all the stitches, but don't tie off the end right away. Instead, leave the end unsecured, and start back and the beginning and pull up the thread, sort of similar to tying a shoelace. Keep pulling the extra slack up (I used the plastic tool they provided) and simultaneously use your other hand to pinch the leather together. Again, youtube is your friend here, but hopefully this makes sense. I saw someone mention a chemical smell, and I would say while there is a scent to it, it's actually quite nice. Smells like dyed leather. Almost has a new car smell, like a BMW with leather seats. All in all I'm really happy with how it came out, looks almost like it was installed in the factory.
S**Z
Don't buy this cover unless you have at least 3 ...
Don't buy this cover unless you have at least 3 hours to spend putting it in. It too 2 of us to do this. One pushing the needle into the leather and the other pulling it through with channel locks. The end result is o.k. It is not as smooth as the picture is. We have a Honda 2010 Civic and it was really difficult to push the extra leather into the gaps at the 6, 3, and 9 positions. All and all this is way too hard to put on and way too time consuming.
M**G
Better than a generic steering wheel cover.
The leather seemed to be very nice until I got the wrap sewed onto the steering wheel. The left side perferations are showing tiny tears but the right side is still good. Sewing this thing on was ridiculous. A couple areas had the stitches pull out when they were threaded together and to fix it would have required me to undo half of the area I've already sewed. So I got it to "good enough" and hopefully it lasts. The leather wrap is better than the foam coming apart on the original OEM steering wheel. So there's that...
T**M
Just installed after 3-4 hours of stitching. Seems nice
Other than the 3-4 hours I spent sewing this onto a steering wheel, this product is great. I bought a junk wheel from a yard and disassembled it so I could see this in easily. It was still an undertaking to get this sewn on and I had every advantage possible. I would not recommend doing this to a wheel attached to the car unless you’re very flexible and skilled with a needle. Quality seems good. Time will tell in the az sun. With it installed this wheel feels brand new. Spent $80 on a junkyard wheel and the cover rather than 400+ on a brand new one. It was worth the neck pain
E**.
Take your time
This kit is a great replacement. To install I recommend taking your time and going slowly. Use tape on the more intricate areas so they aren't as baggy at the spokes like mine ended up being. the stitching may take the longest time and is well worth it if you go slowly. I took about 5 hours to install mine
X**H
This take patience and alot of it. It took me about 3-4hours to complete but came out nearly perfect. Use plenty of double-sided tape as it helps keep the wrap in the right place. Don't pull the thread too quick as it can bunch up and screw your progress. You may have to squeeze the wrap where it meets as you pull on the thread to help close the seem. If you take your time, you'll end up with something decent and not wrinkley.
S**W
The steering wheel cover is an excellent excellent product I put one in my car it was so easy to install it was easy to sew I love it it gives the car a nice look and the weather is so nice and it's smells just as nice as a leather jacket it's an excellent product and I would recommend it to anybody if you're looking for a steering wheel cover that looks authentic like it came from the factory by the steering wheel cover it is the best it is phenomenal I can't say enough good things about it
S**N
Beautiful!
Trustpilot
1 month ago
3 days ago