
DOWNLOAD THE APP


Customer Services
Copyright © 2025 Desertcart Holdings Limited
DOWNLOAD THE APP


🎯 Hide the mess, flaunt the finesse!
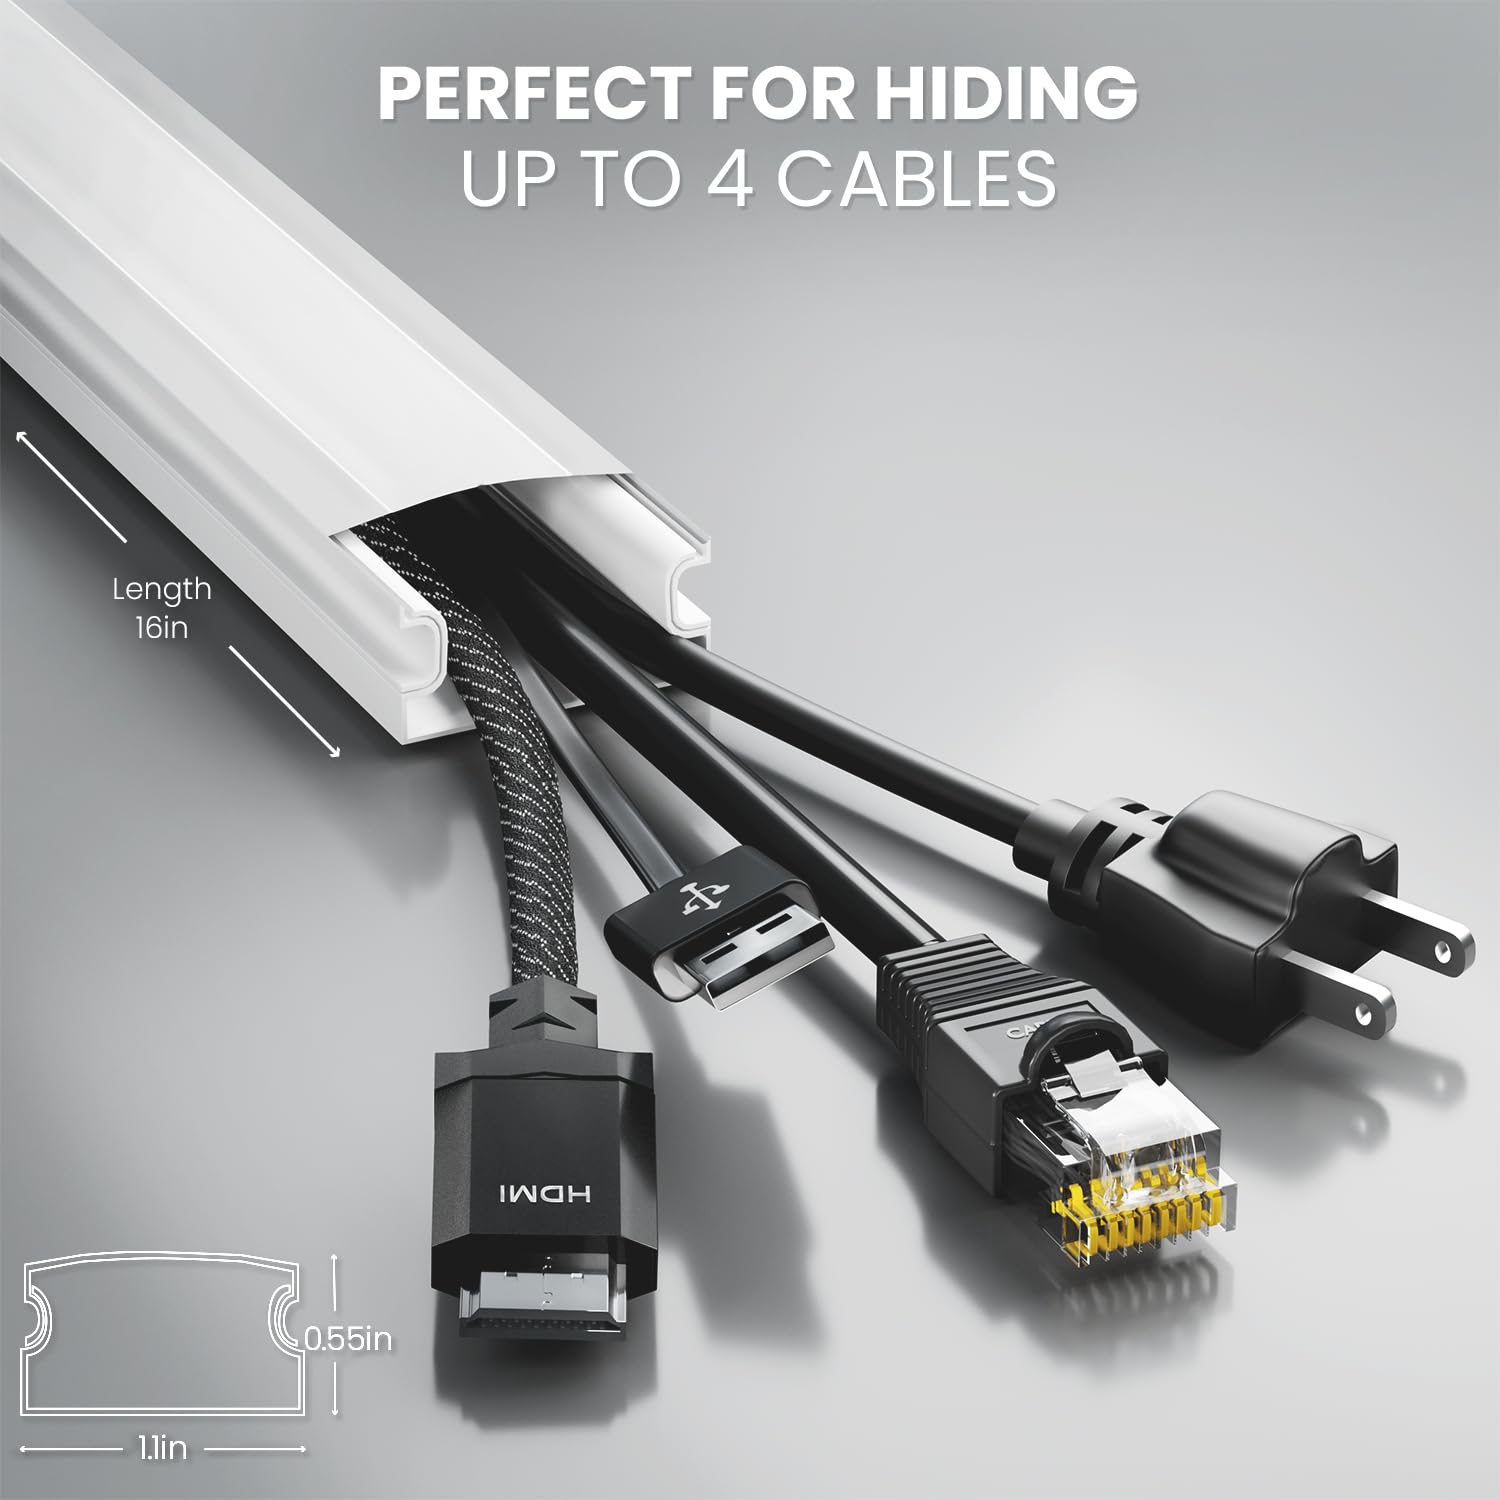
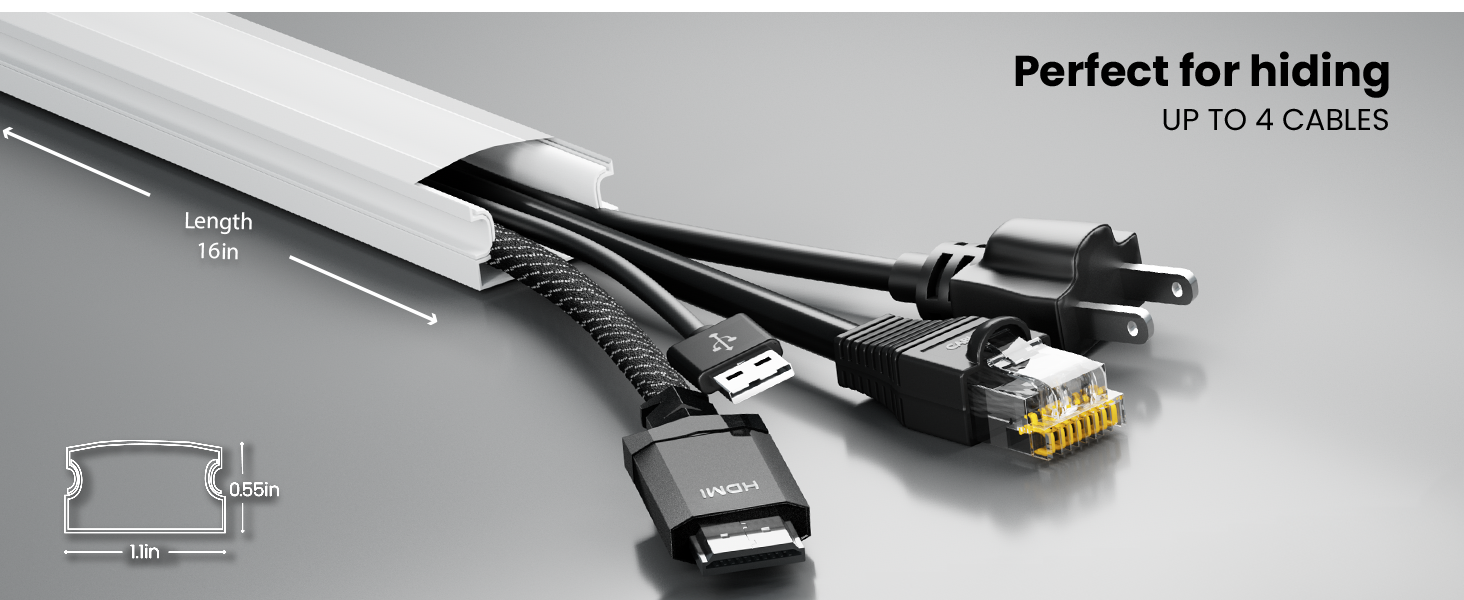
The EVEO Cable Hider Wall 306” is a premium cable raceway kit offering an extensive 306-inch length of paintable, slim-profile PVC covers. Designed for easy installation with adhesive tape or screws, it provides a sleek, customizable solution to conceal and organize cables on walls, perfect for renters and homeowners alike. Its durable design enhances safety by protecting cables from pets and tripping hazards, making it the top choice for professional-looking, clutter-free spaces.


| ASIN | B0982247D1 |
| Best Sellers Rank | #1,681 in Electronics ( See Top 100 in Electronics ) #23 in Cable Raceways |
| Customer Reviews | 4.6 4.6 out of 5 stars (5,488) |
| Date First Available | February 12, 2022 |
| Item Weight | 4.05 pounds |
| Manufacturer | EVEO |
| Product Dimensions | 306 x 1.05 x 0.55 inches |
J**N
Looks good and does the job well
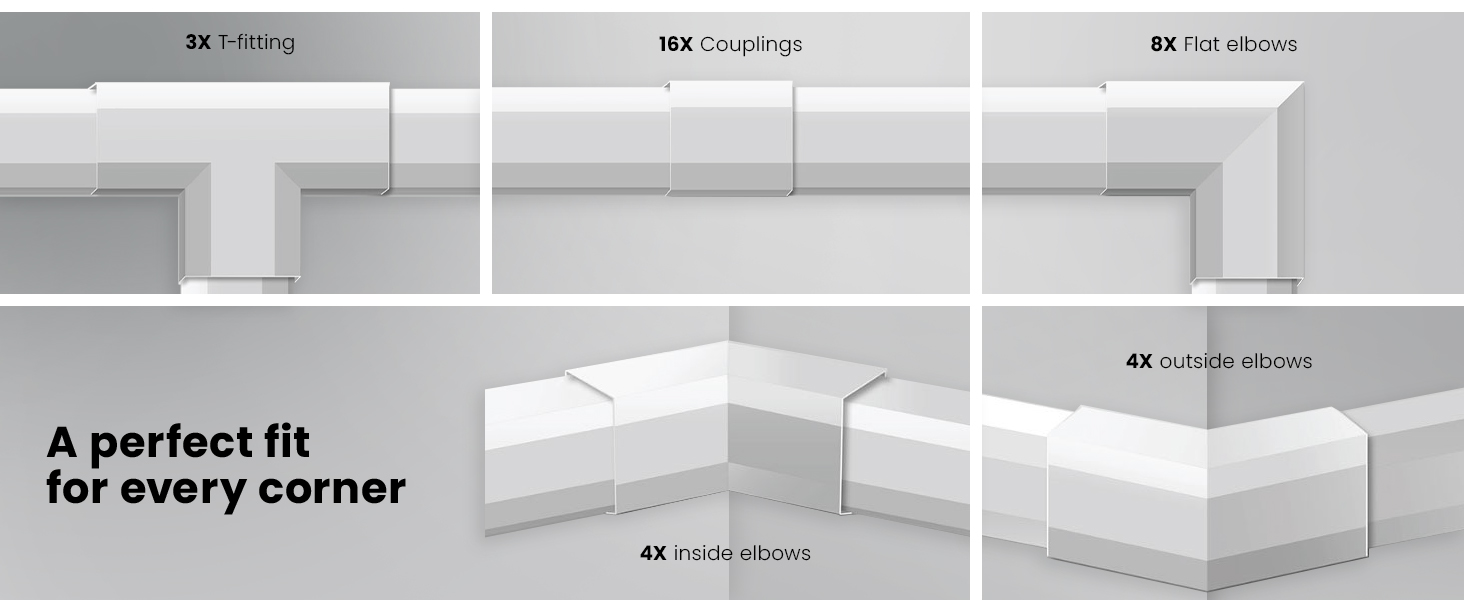
I currently live in a rental (townhome) and needed a way to run an ethernet cable up to my room without it looking absolutely terrible. We just upgraded to gigabit internet and the wifi was only giving me a fraction of the available bandwidth. Plus, I wanted a hard wired ethernet connection for my PC and Xbox. I originally just ran the cable using those plastic clips you nail in. It looked pretty bad. So after a little research I settled on this cable management trim. Here's why this stuff is great. 1) It comes in 4 colors (black, grey, white and beige) so you can usually make it look good without having to paint this trim/cord cover. 2) Not everyone can run cables through either their walls or basement, or rather it can be a real pain (especially for two story homes or ranch style homes with a finished basement/drywall on the basement ceiling). Also, this is a great option if you are living in a rental and need the ability to quickly revert the dwelling back to the way it was before moving out. 3) If you use clips to run a cable then A) the cable is exposed, B) you have to keep tension on the cable, otherwise it looks really bad not being straight and being slightly curled. This trim solves that issue because you don't have to worry about having tension on the cable. Plus, it looks really unprofessional doing it with clips unless you are running the cable in an unfinished basement or something of the sort. 4) This stuff has the adhesive tape already applied which makes installation go much faster than with the ones that require you to cut the tape to size and apply it yourself. Plus, this stuff sticks REALLY well. It sticks so well that I hope it doesn't cause damage when removing it. It probably won't, but I'll find out when I move out... 5) You can either slide the top part of the trim on or just bend the base part a little inward once it's adhered to the wall and push it on. This is great because when you get close to corners it's much easier to attach the base part first, then put the top cover part of the trim on vs. having to slide it on. My only gripe is that there are no 45 degree couplings. They have every possible coupling except that one. It would have been nice because as part of my run I ran some trim up my staircase near the trim at a 45 degree angle. I don't have a coupling at the bottom and top part of that run because of this. It would look a little nicer/more professional if they included this type of coupling! I am very happy with the result. If I ever need to run cables and can't do it through the walls or basement, this is the way I'm gonna do it from now on.
J**A
Conceal and Organize with Ease!
As a cable clutter warrior, I recently got my hands on the this product. Let’s dive into the details of this cable management wizardry! What’s in the Kit? • Spaghetti Lifting Magic: Okay, not really, but close! This cord cover wall kit conceals up to 306 inches of unruly wires and cables. • Paintable Wonder: Made from sturdy polyvinyl chloride (PVC), it’s ready for your artistic touch. Paint it to match your wall seamlessly. Mine had no issues with white and black paint. • Easy Installation: Choose your weapon—tape or drywall anchors and screws. In just 15 minutes, transform your living room from chaos to zen and eliminate wife complaints about cable messes! • Safety First: Beyond aesthetics, this cable raceway ensures safety. No more tripping hazards or curious pets nibbling on loose cords. Why I Love It: 1. Customizable Chic: Paint it white, black, or unicorn rainbow—it’s your canvas! 2. DIY Delight: Cut it down to the desired length. No cable is too long for this superhero. 3. Sturdy Locking System: The unique connector kit keeps everything snug. No cable escapes!
A**R
A fantastic solution for running cables for a home theater.
I purchased a much smaller kit than this for our bedroom TV and sound bar. For the home theater in the living room I needed much more, but Walmart no longer sell it or show it on line. So I purchased this kit from Amazon and it is a perfect match to the original system and cheaper. It's very easy to use, I used the adhesive tape, but first cleaned the wall area where they would stick and after a couple of months they are still stuck to the wall. I would purchase this again. I would have liked to have run the cables to the speakers through the wall, but we have an older home and the walls have diagonal cross beams between the studs which makes adding wires in the wall very difficult.
P**N
The Cadillac of wire concealers...Almost
First I did not use the adhesive on these strips I uses screws for all of them so did not rate that. Last weekend I installed about 1 and a half boxes of this to run some wires from one side of my bedroom to the other. so about 38 ft. When it arrives this kit is packaged really nice and the layout of parts makes it easy to find what you want. Again I used screws to mount each strip just because I've had bad experiences in the past removing adhesive strips from the wall. Slapping putty on a hole is much easier to me then clean those things after many years. Installing each track was simple. I'd drill the holes on each end of strip. Line the strip where I wanted and drill the hole. Easy. I'll be painting it in the near future so will report if any issues. Going to try with out sanding on a small piece first to see if I can save time. Few issues I hit: - The smell of this thing when you open the box is potent. I left the box opened in the garage to help let the smell go away before installing. - The screws kinds suck. A few times I hit a stud so no anchor. When I put the screw in on a few of these the head broke. - The screws are tapered. A few times when tightening them down the track curled which caused the cover to be loose on the track. I think pan head screws would be a better choice. - I have tools at the house but call me lazy I used the included saw it boy was I sad. It work best as a pull saw and the teeth were too large so it would get stuck. If they included a saw with smaller teeth would make it easier to cut. - The included anchors aren't the best. On a few screws I was not able to tighten them down because the anchor started spinning in the hole. I was using the correct site drill bit for the whole that they specified in the directions. Over all a nice product but could use a few improvements.
J**I
Es fácil de instalar y tiene buen acabado
F**S
I wasn't looking forward to doing this because I'm a huge noob when it comes to home improvement stuff. I don't own a saw, don't own a drill, etc. When I came across this and how it was all-in-one, I was instantly sold. Some reviews about the difficult installation did make me worried. Yesterday I finally had some time to attempt installing this, and it went better than I had hoped! Some tips that worked out well for me: - Use tape to construct the entire layout, with the wires inside. This forces you to work out all the nitty gritty stuff before committing, and it provides you with the alternative of reworking it. - When cutting with the saw, just mark with a sharpie and use the provided saw. I used the box as a cutting board actually, and it worked great. (Told you I literally have no tools at my disposal). Yeah edges look a little jagged, but it's fine since it's covered by the connecting joints. - When you're happy with the layout, don't take all of it down. Slowly remove section by section (the rest should still be held in place with tape). When you remove that section, remove adhesive and press down. I actually reapplied the tape to hold it back it place, hoping that it would help with the adhesive bonding. - Important: Remember to account for the connecting joints when you tape it down! The joints are another millimetres or two, so if you taped down that section without that, you'd most likely not be able to fit it in. That's it! Mine's still held up with tape, so I can't attest to the strength of the adhesive yet. Will update again if the adhesive comes off the wall.
G**H
I was afraid that it would not reliably stick to the wall like my previous DIY trunks. But they are working well so far!
Trustpilot
1 week ago
1 month ago