Some deliveries may take a little longer than usual due to regional shipping conditions.

DOWNLOAD THE APP


Customer Services
Copyright © 2025 Desertcart Holdings Limited
DOWNLOAD THE APP


Print Smart, Live Bold! 🖨️
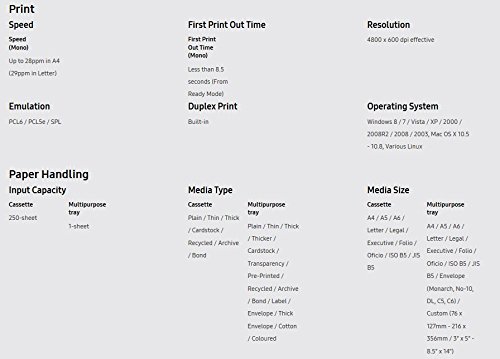
The HP SS342B#BGJ Samsung Electronics SL-M2825DW is a wireless monochrome printer designed for efficiency and cost-effectiveness, featuring fast print speeds of up to 29 pages per minute, a low-cost 2-piece toner system, and built-in double-sided printing to reduce paper waste.
J**B
Great printer, Great price
I purchased this printer to replace an HP LaserJet 1200 that I had owned for many years. I could not be more pleased with the price I paid for this printer on Amazon) or with the capabilities it has. Even though I read a review before I purchased it that said in the Cons of the review:"No additional paper handling options available."I am not sure what the reviewer meant by that statement or what additional paper handling options he thought it should have, it has all of what I think of as paper handling options that the LaserJet 1200 had and then some. If he meant that it does not have a manual input option, then he is mistaken. This printer has a door on the front face of the printer directly over the paper tray that when it is pushed on in the center of the door (marked by three raised dots, you have to push on the center dot), the door opens to reveal the manual paper port that can be used to feed in single sheets of paper or envelopes. (Granted the LaserJet had better manual input capabilities, it could accept several sheets of paper or envelopes and had a platform for the them to rest on, but I have not seen any low price laser printers with that feature recently). The paper guides for manual input can be adjusted for widths from 2,8 inches up to 8.5 inches (the paper guides for the paper tray adjust from 3.8 inches to 8.5 inches). On the back of the printer is another door which can be opened to provide a straight through path for printing on heavy paper, card stock, envelopes or even plain paper that you do not want to have curled.In addition to these mechanical paper handling features, the printer options can be set to inform the printer of the type of paper that is being printed on. It has paper type settings for plain, thick, thicker, thin, bond, color, card stock, labels, transparency, preprinted, cotton, recycled and archive. According to the user guide the thick and thicker settings cause the printer to heat the page sufficiently to fuse the toner, which is a great paper handling option to my way of thinking. I have some thick paper, thicker that traditional card stock, that I could not print on with the LaserJet unless I performed an additional step to fuse the toner with a heat gun because the printer would not fuse the toner. I have not yet tried that paper in the M2825, but I am betting that it will handle it without requiring me to fuse the toner with a heat gun.Those options along with the capability to do automatic duplex printing seem to me to be all of the paper handling options that I need, let alone would want to have. The only other paper handling options that I can think of are the capabilities to fold letters and stuff them in envelopes, and I don't mail enough letters to need that capability.I gave this printer 5 stars because Amazon doesn't allow partial star ratings. In my opinion it is 4.75 stars because of a couple of minor complaints. First, getting the paper seated properly in the manual port can be a little tricky the first time you do it. Second, the paper level indicator makes it take a little extra force to close the paper tray, when the tray is not full, even more force is required.
P**Y
Fast, clear and compact.
Ok, first let me say, after reading other reviews here, I was concerned about the initial set-up. My set-up was/is Wi-Fi only and I use Ubuntu.The packaging comes with the Manual in the CD but for you Linux user, go to Samsung support website and download the Universal Linux Drivers..... Read the Manual first (Inside the CD) on how to set up the printer using the WPS on your Wi-Fi network through your router. (Provided your router has WPS) If your router does not have WPS then you will need to the USB and install the CD into your machine and run the software in a Virtual Machine environment (see below). (This was the approach I took). If you manage to achieve a connection and the router says that the printer is connected, you can now access the "SyncThru Web Service Steps" as directed below.Installation via Virtual Machine:The installation CD allows you to communicate to your printer via the USB cable and then allows you to set up the printer via Wi-Fi to your router in a Virtual Machine Windows environment. Easy and simple. Run the CD in the Virtual Machine and follow the installation process and enter your router information. The printer will connect to your router. Now you can go to your Linux OS and proceed to connect to the printer normally via Add a Printer and using the "Network Printer" options. See below for the "Connection Method" in Linux.SyncThru Web Service Steps:Use the CD:Find the SyncThruTM Web Service process and Click Login on the upper right of the SyncThruTM Web Service website.Alternate Method :Press the power button on the printer, wait for the green line to come on (blue light goes out), then you can press and hold the orange "X" button on the top of the printer for 4 seconds. As soon as you see the green line flash about 3 rapid flashes, release the "X" and wait for the printer to print out it's Network Configuration" page. Now you will have the Printer's IP address which you can now use to enter the Syncthru Web Service website using your browser.In your browser's address bar, enter your printer's IP address that you have on your "Network Configuration" page printout.192.168.1.100 or whatever is shown on the "Network Configuration" page. You may want to add "sws/index.html" after the IP address ...example: 192.168.1.100/sws/index.htmlNow you should have access to the web interface.Type in the ID and Password then click Login.• ID: admin• Password: sec00000Change your login info and proceed to manipulate all the settings you wish.Connection Method under Linux (Ubuntu):After you have connected the printer to the Wi-Fi, you can disconnect your USB cable, go to your Add a Printer menu in your Linux OS and select "Network Printer", and at bottom in the "Connection" select "AppSocket/HPJetDirect" or similar and "Apply"Now your printer icon will appear as a stackable printer and the "Device URI" will be as such:lpd://192.168.1.143/9100 (my printer's IP address)Now print your test page and print to your heart's content.Now go back up to access the "SyncThru Web Service Steps" or use the address that shows in the printer "lpd" minus the "/9100" and manage your printer.Good Luck
Trustpilot
1 week ago
2 months ago