
DOWNLOAD THE APP


Customer Services
Copyright © 2025 Desertcart Holdings Limited
DOWNLOAD THE APP

🔧 Master Your LS Engine Valve Springs Like a Pro!
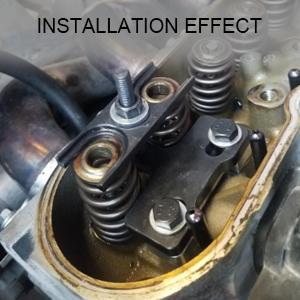
The 3mirrors 67605 Valve Spring Compressor Tool is a precision CNC-machined, heavy-duty steel kit engineered for LS engines ranging from 4.8L to 6.2L. Featuring high-strength grade 12.9 hardware and a pneumatic valve holder compatible with standard 14mm and 18mm spark plug holes, it enables efficient, safe valve spring removal and installation without cylinder head removal. Trusted by thousands of professional mechanics and enthusiasts, this tool delivers reliable performance across Camaro, Corvette, GTO, CTS-V, and GM trucks, making it an essential upgrade for serious LS engine maintenance.


| ASIN | B07RGFHMJ4 |
| Assembly Required | Yes |
| Brand | 3mirrors |
| Country of Origin | USA |
| Customer Reviews | 4.3 4.3 out of 5 stars (1,278) |
| Date First Available | 19 June 2019 |
| Item Weight | 331 g |
| Item model number | 67605 |
| Manufacturer | 3 |
| Manufacturer Part Number | T003GM02 |
| OEM Part Number | 26906-16, 5462, 67605, HM1885 |
| Package Dimensions | 16.79 x 10.11 x 3.2 cm; 331 g |
M**K
Did the job good keep well lubed did my 5.3l no hassle
S**T
Out of all the different cheap tools for valve springs, this is the only one that worked for me. I'm really glad I didn't shell out the money for the name brand version. Was able to get all 8 pairs of valve springs set back into place on my 2013 GMC Yukon (6.2L Vortec). Like other reviews say, it does in fact take a bit of practice (and some cursing). Didn't have to do any re-threading or modifications, just had to mess around with it. Once I got the hang of it the rest was a breeze. A few things that helped me: 1) The instructions show that you can install the aluminum spacer two ways, top or bottom. In my particular case, I had to have the spacer installed on the bottom as shown in the 2nd picture. 2) When putting everything together, I used a small bit of engine assembly lube on the center screw that is used for clamping down the springs. After doing all 16, there's no noticable wear on the threads other than the paint now being gone. Only other bit of wear I noticed were shavings around the center nut & washer after doing a couple springs. Looks like it was just paint coming off, both from the screw and the washer spinning against the clamp as I was tightening things down. Just be sure to wipe it off and be careful not to lose any debris inside the cylinder head. 3) Holding the tool in place when bolting it down to the cylinder head helped make sure both springs were covered correctly. 4) Lastly, I tightened down the center nut just until it was snug against the springs. Then, while holding the "clamp" part of the tool against the springs (as shown in pic #3), I was able to nudge the springs as needed with my other hand or adjust the positioning of the clamp as needed. Doing it this way helped make sure the springs were centered around the valve stem as I tightened it down and allowed me to set the keepers properly. Hopefully this helps someone spend less time figuring out how the thing works. Other than the trial & error this was a wonderful time saver.
M**E
Works great, just use oil on threads. Came with an extra center bolt but Ive done 2 pairs of heads so far and with the oil haven't had any issues.
M**T
Works good, Took a few minutes to get used to but it works great! Cheap and works good! A must for Sloppy mechanics tool kit. I installed a set of pac 1219’s in some 706 heads
L**.
This especially beneficial for the the difficult to reach valve springs near or slightly under the firewall. This type of compressor makes it easier to remove and install to keepers. The only thing that could be improved is to have the vertical bolt angle a bit more upwards to match the angle which the spring sit. This way the arms holding the top circular spring retainer would be more centered (equal).
Trustpilot
1 month ago
3 weeks ago