🚀 Elevate Your Mac Experience!
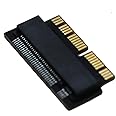
The Sintech NGFF M.2 nVME SSD Adapter Card is designed for upgrading 2013-2015 Mac models, providing compatibility with a wide range of NVMe SSDs. With a lightweight design and easy installation process, this adapter card ensures a seamless transition to faster storage solutions, backed by a 6-month warranty.


| Package Dimensions L x W x H | 10.5 x 5.2 x 0.7 centimetres |
| Package Weight | 0.02 Kilograms |
| Item Weight | 0.01 Kilograms |
| Brand | Sintech |
| Colour | Black |
| Part number | ST-NGFF2013 |
| Size | Long |
| Warranty description | 6 Months |
| Style | ST-NGFF2013C |
| Guaranteed software updates until | unknown |
N**E
Works perfectly,,,,
I used this adapter in my 2015 MacBook pro 15". Be careful when installing. If it's "bowed" and not flat, it is installed improperly or the screw is overtightened and it will fail. I paired this with a Sabrent Rocket 1TB NVME SSD TLC. I don't recommend the cheaper QLD drive as it's longevity rating is about 1/3 of the TLC version. I get 3200 MB/sec read and write speeds and with a simple kext installation, lower power usage and longer battery life. You will need the latest MacOS to ensure compatibility. I used Big Sur and put it on a bootable USB drive. You will need a bootable USB drive as the new SSD doesn't have a MacOS recovery partition. Install the SSD and boot the Mac from the USB drive. Install MacOS to the new internal SSD. The installer will create the recovery partition, boot partition and data partition on your new SSD... Now, just enjoy the lightning speed and expanded storage. You can also use the Sabrent Rocket 2 and 4TB SSDs as well.
M**D
When prepared, works exactly as intended!
This review will be scored based on the product, but will include a note about how it's used.Overall the physical installation process was relatively seamless - upon installation, I believed it was too long and so took a microfile to the screw section in order to fit it, until I put the SSD in and the installation force of THAT pushed the Sintech adaptor even further into the socket than I was willing to go with the bendy-ness of the adaptor. This meant all my filing was pointless.....with a bit of effort and a lot of my Other Half's trust in me around her Macbook, I could've fitted it without mods and it would have worked.I used a Crucial P1, one of the SSDs on the list. Upon installation the SSD wasn't detected, even when using diskutil on Terminal. THIS IS HOW TO INSTALL:1) USE A USB - Internet Recovery didn't like what I was doing one single bit2) USE OFFICIAL APPLE - I tried using a .dmg from another website, and there was no luck at all. BEFORE installing, use your old install to update to the latest version, do a Time Machine backup, and then create USB installation media following Apples instructions!I spent hours troubleshooting, so hopefully this solves anyones issues before they have to re-dismantle their laptop. This was on a mid-2015 Macbook Pro 13".The screws you'll need are all 5-point star heads, I in particular used 1.2 and 1.5 and they seemed to do the job. Not official Apple, but worked nonetheless. KEEP THE SCREWS SEPARATE AND ORDERED - it's Apple after all, so they have specific holes to go back into!
G**.
Worked perfectly with a MacBookPro early 2015 A1502
Worked perfectly with a MacBookPro early 2015 A1502. Fitted just right (which another brand did not fit or work) and was overall as good as it gets. Even had Mac specific help.
S**A
Works brilliantly, the set up can vary (see instructions in main body of review)
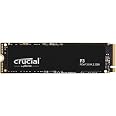
Works brilliantly, though may take a few minutes to get working so it requires a small amount of patience. My write speed has tripled, my read speed had tripled, the laptop is noticeably more faster.If you are having problems installing please see the instructions I have listed below, there are a couple of extra steps requiredMy MacBook Pro is a 13" mid-2014 retina, A1502 model.The NVMe SSD I have installed is a Samsung 970 Evo NVMe M.2 SSD - capacity of the drive is 1TB.Steps to install:1) Create Time Machine back up of MacBook. For those that don't know Time Machine is free, it is made by Apple and comes pre-installed on your MacBook.2) Install the drive with the adapter into the MacBook3) Turn on MacBook, immediately after turning on press and hold 'Command/cmd' and the 'R' Key, this will enter the Apple Restore Partition4) Enter disk utility to see if the drive is present, if it is present then click ERASE. Name the drive whatever you wish. Set the format as 'Mac OS Extended (Journaled) and the Scheme as GUID Partition Map.5) Then exit out of Disk Utility (press the red button in the top left of the Window), Plug in your hard drive that you are using as your Time Machine and click the Restore Using Time Machine option. Install it to the Drive you named in Step 4. sit back and let it complete.Additional steps:4a) for me the Disk Utility would not show the Drive, so what I had to do was shut down the MacBook.4b) When the device has fully shut down press the Power button again, when you press the power button hold down the following Keys: 'Command/cmd' and 'Option (sometimes this is shared with the alt key as it is with mine)' and 'P' and 'R'4c) Hold the 4 keys, you will here the MacBook chime, keep it held until it Chimes again and then release4d) After then wait for the MacBook to boot up into the Recovery Partition and look in Disk Utility, you should see the drive in Disk Utility now. The laptop will reboot a few times before booting into the Recovery environment4e) continue with steps 4 and 5as they are listed above the additional steps.
Trustpilot
1 month ago
1 day ago