Desertcart purchases this item on your behalf and handles shipping, customs, and support to EGYPT.
🚗 Upgrade your ride’s comfort with power and precision—don’t get left with a stuck window!
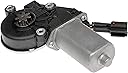
The Dorman 742-600 Power Window Motor delivers reliable 12V power and a smooth 60 RPM speed, engineered for direct fitment in select Toyota, Lexus, Mitsubishi, Chevrolet, and Suzuki models. Backed by US quality control and designed for easy DIY installation, it offers a cost-effective, durable solution to restore your vehicle’s window functionality with confidence.


| ASIN | B000E35WEC |
| Best Sellers Rank | 713,269 in Automotive ( See Top 100 in Automotive ) 768 in Car Motors |
| Brand | Dorman |
| Country Of Origin | China |
| Customer Reviews | 4.2 4.2 out of 5 stars (347) |
| Global Trade Identification Number | 00019495073260 |
| Included Components | Dorman 742-600: Power Window Lift Motor |
| Item Type Name | Dorman 742-600: Power Window Lift Motor |
| Item Weight | 1.25 Pounds |
| Manufacturer | Dorman Products |
| Manufacturer Part Number | 742-600 |
| Material | attribute not appiicable to product |
| Model Name | Dorman 742-600: Power Window Lift Motor |
| Model Number | 742-600 |
| Product Warranty | Dorman warrants its products to be free from defects in material and workmanship under normal use and service. |
| Speed | 60 RPM |
| UPC | 019495073260 |
| Voltage | 12 Volts |
J**U
Perfect Fit!
This was cheaper than an online auto store. I installed this into a 1999 Toyota Sienna. It took no more than 10 minutes to mount the motor onto the lift. Do not worry about tapping the mounting holes with a tap & die set. Just use your pre-existing screws and start to thread it prior to mounting it on the lift. This saved me a lot of money over my local auto store and works just a good as OEM. Here is a quick guide to replace it on a 1st Gen Toyota Sienna - - Remove the screw inside the door handel cover. - Use a flat head screw driver stick it just above the lock "button" at 12 o'clock gently pry up/down, do the same at the 6 o'clock position. - Remove the door arm rest by sticking a flat head screw driver in the crack and pry gently up/down. Once that is off remove the 2 black screws. - Remove the entire door pannel. Tape the end of a flat head screwdriver and slide it along the door frame and plastic pannel. gently pry all the away around. Slowly pull up and out to lift it off the top lip. Watch out as you still have 2 connectors to disconnect. 1st is the door light, 2nd is the power window/lock control. - Peel back the plastic sheeting 75% up. use some tape to hold it up while you work. - Remove the power control unit from the door panel and reattach the wire harness. lower the window until you can see the 2 bolts holding the window to the lift. remove the left one and then line up the right one with a access hole in the door frame. it should be a 1" hole. once that is completed roll up the window all the way. use ducktap or packaging take and from the indside over the top door frame to the outside. Basiclly it is a upside down "U". Use blank sheets of paper and place it over the painted part of the door fram to protect it from the tape. - Roll the lift all the way down to the bottom. The glass should now be held in place by the tape. There are 5 gold 10mm bolts holding the lift and 1 black/sliver/gray bolt. Watch out for this one as it has a washer that easily falls out. Disconnect the window motor wire harness and pull the entire lift out. - Note the gears in relation to the motor. Remove the old motor. Caution there is tention and the gears will move. - Prep the new motor and pre tap the mounting bolts with the existing screws. - Mount the new motor and now you are 90% done. - Reverse all the previous steps and you are now done.
A**R
Easy Peasy!!!!!
Watched a " YOU TUBE" video on installation of window motor, everything came out EASY other than clip breaking on arm rest & wiring clip on master switch!!! Had it done in just over 1 hour!!! Screws holding mtr. to regulator re threaded into new mtr. EASY!!!! Note, re lube all pivots & gear with white grease while you have regulator out. window works very smooth & saved a "TON" of $ doing it compared to dealership $ 1000+ taxes!!!!!
A**N
Toyota replacement window motor.
The product was approximately half the price of the opposition's product and fitted and worked perfectly. As other customers have mentioned the polarity is the opposite of that of the motor being replaced but it is not a major issue. If I need to replace other window motors in my vehicle I would definitely use this company's products.
C**E
Great for a 2001 Corolla
Installed in the driver side of a 2001 Corolla without any problems. Works great and the provided electrical cable (one of the 3 different types provided) clipped right in. The speed is about the same as the other windows and the noise is slightly louder but comparable when putting the window up. The only thing worth mentioning about the installation (besides the fact that there isn't a whole lot of room to work with inside the door) is that the holes for the screws on the motor housing are not yet threaded so you will want to use the screws (which should be self tapping) to create the internal threads prior to placing the motor inside the door where you will not have the leverage required to tap the screw. This product worked perfectly and fixed my window problem. It's only been installed for a few weeks but externally it seems at least as well built as the original motor. I'm thinking about getting the passenger side version of this motor even though that side is only beginning to show signs of failure.
M**E
Works for 1989 Supra Driver Side Window
Bought this to replace the original Toyota window motor for the driver-side window on my 1989 Supra. I installed it on the original window regulator, and as other reviews have noted, the mounting holes on this Dorman motor do not have threads (not "tapped"), which is annoying, but you can still use it and you do NOT need special tools. First, make sure you have all the original screws from your old window motor, and second, set the motor aside, separate from the regulator, then carefully insert one of the original screws into one of the holes and start screwing it in. You will need to keep the screw nice and straight and apply some force initially, but the screw will start to dig in and self-tap the hole, meaning it will create its own screw threads. Do this for the other two holes, then back the screws out, THEN mount the motor to your regulator. I also had the problem where the window was moving in the direction opposite of what I was pressing on the switch, but this was an easy fix as well. At least for the plug Dorman includes for Toyota, they use a type that makes it easy to swap the black and red wires around, you just need a small flat-head screw driver to push the white plastic tab away from the wire lead, and then you can push it out of the plug. Do the same for the other wire, then reinsert them in the opposite slots, and after that your window should go up and down as expected with the corresponding switch press. As for the overall performance of the Dorman motor, the sound is fine and it moves the window up and down at a reasonable speed -- not too fast, and not too slow. I am a little concerned about longevity, and almost wish I went with the reman motor from Cardone (as I believe it's a remanufactured Toyota motor), but I'll give the Dorman a chance and see how it goes.
Trustpilot
3 weeks ago
2 days ago