


🧼 Clean Prints, Happy Clients!
The Cleaning Kit for Epson Desktop Printers includes a 110ml bottle of Piezo Flush, a special cleaning cartridge, and a syringe, providing a complete solution to restore print quality in various Epson models. Compatible with a wide range of Epson printers, this kit ensures your prints maintain their professional quality.
| ASIN | B00EEDICRC |
| Additional Printer Functions | Print Only |
| Best Sellers Rank | #473,634 in Office Products ( See Top 100 in Office Products ) #16,311 in Inkjet Printer Ink Cartridges |
| Brand | PiezoFlush |
| Color | Red |
| Compatibility Options | Compatible |
| Compatible Devices | Printer |
| Customer Reviews | 4.0 out of 5 stars 233 Reviews |
| Ink Color | Red |
| Ink Colour | Red |
| Manufacturer | Vermont PhotoInkjet |
| Mfr Part Number | ACC-110-FLUSH-KIT |
| Model Name | Cleaning Kit |
| Model Number | 1319339 |
| Number of Items | 1 |
| Other Special Features of the Product | Print Head Cleaning Solution |
| Page Yield | 50 |
| Print media | Paper (plain) |
| Printer Model Compatibility | Epson Stylus C120, Epson Stylus CX5000, Epson Stylus NX125, Epson Stylus NX127, Epson Stylus NX130, Epson Stylus NX230, Epson Stylus NX330, Epson Stylus NX420, Epson Stylus NX430, Epson Stylus NX515, Epson Stylus NX530, Epson Stylus NX625, Epson WorkForce 1100, Epson WorkForce 30, Epson WorkForce 310, Epson WorkForce 320, Epson WorkForce 323, Epson WorkForce 325, Epson WorkForce 435, Epson WorkFor… |
| Special Feature | Print Head Cleaning Solution |
| UPC | 811179010000 |
| Unit Count | 110 Milliliters |
M**Y
Tedious to Use, Great Results
My Epson R800 is old but still prints beautiful photos. However, the print heads clog on a regular basis. Normally, the printer's built-in clean cycle clears them. But it can take several runs, each consuming about 3% of the expensive ink in all 8 of the installed cartridges. So every time you push that "clean" button, you might as well light a $5 bill on fire. Recently, a couple of the colors clogged so hard no amount of cleaning would clear them. I thought the printer was permanently damaged and I'd have to replace it. As a last-ditch effort I purchased this cleaning kit. This cleaning kit is messy and tedious to use, requires patience and steady hands. But it did the job. It's the only way to gently force cleaning fluid through the actual print head to clear even stubborn clogs. All 8 of the heads are now clear and my R800 prints like new again. And, it saves the ink wasted in repetitive automatic cleaning cycles.
G**H
It fixed my printer!
I have a Epson Workforce 845 all in one printer/copier/fax machine. It's probably about 5 years old or so. In fact, I have two of these machines and have really liked their ease of operation and print quality as well as wireless connectivity. One of the machine recently began to print very faintly and then basically not at all. I searched the net and Amazon for a solution and came upon this cleaning kit. I watched the how to video a few times on You Tube and then ordered the kit. I found the cleaning process using the items in the kit to be simple and straightforward. Be sure to clean the print heads from below and above using the included solution and absorbent paper towels. In my case, I needed to goes through the cleaning process twice with a couple of days in between when I was busy doing other things. I was concerned after the first cleaning that it didn't work so I tried it a second time and lo and behold this time the machine began to print again! There's still enough solution left to do more cleanings on my machines if I need to. I've read that one way to prevent clogs is to run the printer regularly so the ink doesn't clog up as well as to turn it off after a p;printing so it goes through its self cleaning procedure. I've been able to avoid needing to buy another printer thanks to this product!
P**8
OK,...I Guess
This stuff seems to work OK, but it was not enough to save my clogged Epson print head. If your Epson print head clogs, junk the printer and get a new one. The time, trouble and aggravation of replacing a print head is not worth the effort unless the device is still under warranty. Even then, if you have not been using Epson ink cartridges you may STILL be out of luck.
P**T
Good but not great
I had not used my Epson 845 printer for several months and the black ink wouldn't print at all even after head cleanings. I like the kit because it is made for Epson printers and has a fake cartridge that fits in place rather than just attaching a tube like some systems I've seen. The instructions were fairly clear but they said to draw in 2 ml of solution into the syringe. Two problems with this... the bottle of solution has a nipple on it so you can't connect the nipple on the syringe to the nipple on the bottle. This was easily solved by removing the nipple from the bottle so there was an opening to put the syringe into. The second problem is that there are no markings on the syringe to indicate where 2ml is. By experimenting with another syringe I had, I determined the syringe provided held about 3ml so fill it about 2/3's full to get 2ml. There was a huge improvement after following the procedure... black began printing but the nozzle check still showed some gaps so I repeated the procedure which improved it even more but I still don't have a complete image on the nozzle check and I have some gaps when printing in draft mode. It looks good at higher quality print settings. Note that it says to run the head cleaning routine 2-3 times after the flushing. Once is enough. There was no further improvement after a second cleaning and that process uses a ton of ink. Bottom line, it got the printer working again if not perfectly. The real moral is don't let your printer sit for long periods of time without being used. Update 11/3/13: The black ink is now working perfectly. I have been using it in "fine" mode for the last week and decided to do another nozzle check and it showed 100%. Switched it to economy mode and it is great. It looks like it took some printing to really work things through. Again, I would not run the head cleaner repeatedly (maybe once) as that doesn't help much and uses a lot of ink. Just keep printing at higher quality and it may work itself out.
W**T
Piezo Flush Saved my Epson R3000 Printer!
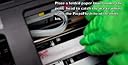
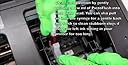
I was a skeptic prior to purchasing this product. I had tried over a dozen things to unclog my cyan and light-cyan inks, and nothing seemed to work. I found the videos re: Piezo Flush on YouTube, and though I was a skeptic, I purchased the product to give it a final go before replacing the printer; $23 vs. a few thousand is a no-brainer. The trick is in the patented dummy cartridge they include. You simply remove the cartridge that is not printing, pop in the dummy cartridge, and follow their steps to inject and draw the Piezo Flush in a direct, concentrated flow that focuses only on the problem nozzle. It is VERY important that you lie down the paper towel in the printer as they instruct. I ended up using about 12 towels by the time I was done flushing, but I was also worried about over-saturating the towel and damaging the printer. Also, you should keep Qtips on hand, both to help catch any overflow, and to dry off the nozzle when you are finished and before replacing your ink cartridge. The process is messy. The included syringe is not high-quality, and sticks in use, which causes Piezo Flush to splash about. I'd have given this a perfect 5 stars if the syringe was not so cheap, as it does cause for unnecessary mess. You will also need a small disposable cup to pour Piezo Flush into and draw it out with the syringe, as the bottle style of the Piezo Flush itself is not conducive to working with the included syringe. Minor design flaws aside, I cannot stress enough how fantastic this product worked! I have been trying for weeks to get my R3000 back to printing order, and in under an hour it's like new again. I highly recommend this product to anyone with similar inkjet issues.
B**.
Very messy and it does not work.
Not enough product to do the job. It did not unclog the dried pigment ink from the jets. It is very expensive $20 for a few ounces. Also the tiny little syringe that was included kept popping off of the small injection tube and spraying red fluid everywhere. It look like a blood bath! What a mess! I ended up using Windex it is only $10 for a whole a gallon and it actually works and not messy. I learned my lesson on this one.
R**R
A clogged head lifesaver
I had such a bad clog in my Epson SureColor P400, I thought it may be headed for the recycle bin. This kit, the instructions on their website, and some hints I picked up elsewhere saved the day. The illustration here doesn't show its secret to success, a plastic insert that plugs in like an ink cartridge that has an airtight port for the syringes tube. My printer wasn't on the list of supported devices, but the insert fit perfectly. The important tip I found was to wait 12-24 hours after a cleaning to run a head cleaning and test. From what I understand, this is how long it takes for any air bubbles to work out of the heads and for things to generally settle down. A test page run right after the cleaning looked awful. My other trick is to at least run a head test page once a week if I didn't do any printing during that time. (Even if you did, the test page will make sure all cartridges get a workout.
A**X
WF-7620 .... tried my best but ....
I have a WF-7620. The Nozzle check was good on all of the colors – but missed some dots on the black. Multiple cleanings and liaison with Epson Technical support had led me nowhere. I had watched several related head cleaning videos on YouTube, so I thought that I would give this kit a try to clean the head. There is an official cleaning video for this kit referenced in the instructions – and I watched that one multiple times, just to be sure that I was very clear on all of the instructions. I even made a trip to the supermarket to buy a roll of the recommended Bounty paper towel (referenced in the video) to use for the cleaning. The kit itself is simple and its use very straightforward. I followed the steps as shown in the instructional video EXACTLY. Indeed I did so four times over several hours. Alas there was no improvement in my print quality – in fact I ended up with even dirtier smudged prints than when I started. So, I tried the technique of leaving the syringe with cleaning fluid installed on the black head overnight to allow things to soak, in the hope that that would help. DON’T DO THIS!!! This morning, I tried a nozzle check and had neither colors nor black printing – ABSOLUTELY NOTHING PRINTING! Some hours later, after multiple further cleanings, and only after having replaced ALL ink cartridges, I now have the printer back to “working” – albeit with a far worse nozzle check print than it was when I started all of those many hours ago. So, I’ve gone from a working printer with less than optimal printing quality to a working printer with very sub optimal printing. Guess I’ll just have to buy a new one. At least it’s Black Friday tomorrow and I may be able to pick up a bargain ….. In short, I don’t see why this kit shouldn’t work, but after many dedicated hours trying to use it I have failed miserably and the effort has cost me dearly.
Trustpilot
3 weeks ago
2 weeks ago