


🚗 Elevate Your Off-Road Game!
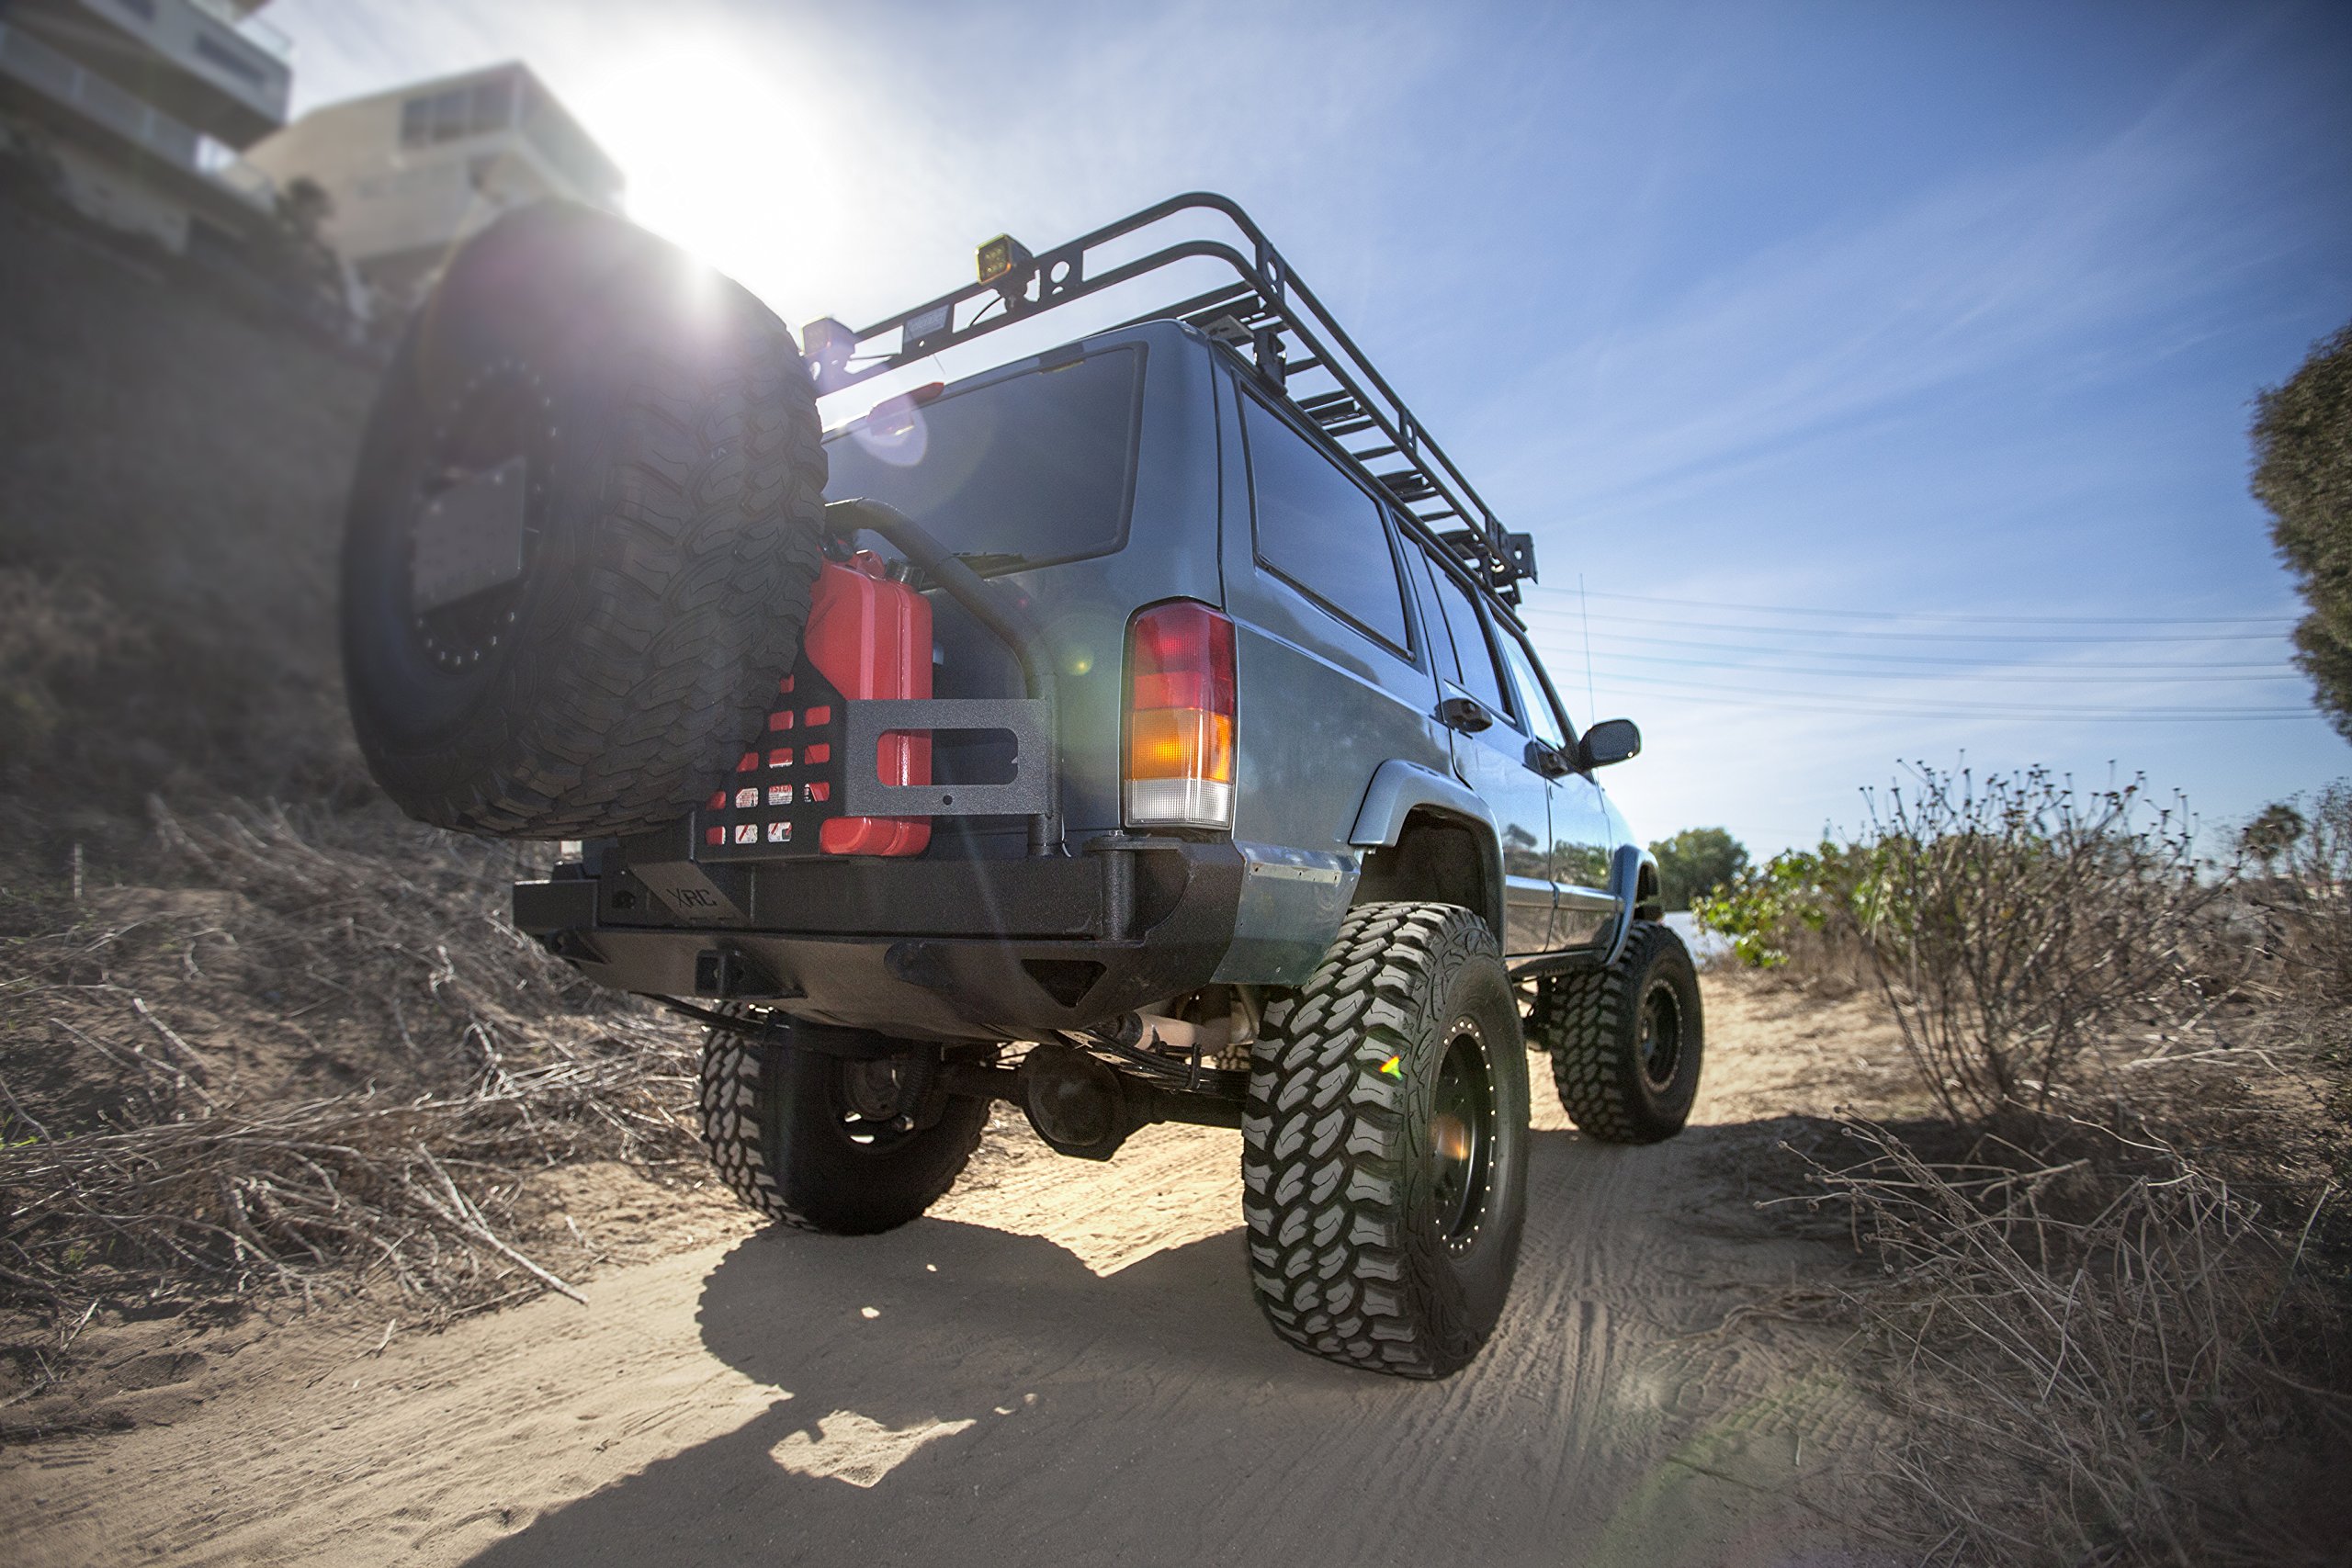
The Smittybilt 76851 XRC Rear Bumper and Tire Carrier is a robust, heavy-duty solution designed specifically for 1984-2001 Jeep Cherokee XJ models. Constructed from 3/16" cold rolled steel, it features a swing-away tire carrier that fits tires up to 37 inches, a Class III 2" receiver hitch rated for 5,000 lbs, and a rear gas can holder for added utility. This bumper is engineered for off-road enthusiasts seeking durability and functionality.
| Brand | Smittybilt |
| Auto Part Position | Rear |
| Material | Alloy Steel |
| Color | Black |
| Item Weight | 231 Pounds |
| Vehicle Service Type | Jeep |
| Exterior Finish | Chrome |
| Product Dimensions | 11"D x 66"W x 14"H |
| OEM Part Number | 76851 |
| Global Trade Identification Number | 00631410102321 |
| Manufacturer | Smittybilt |
| UPC | 631410102321 |
| Model | 76851 |
| Item Weight | 231 pounds |
| Item model number | 76851 |
| Is Discontinued By Manufacturer | No |
| Manufacturer Part Number | 76851 |
S**H
a very good deal. PROs
Overall, this is a high quality bumper and, for the $$, a very good deal. PROs: Heavy duty! Very well thought out. The powder coating is nice quality and has a matte black textured finish. The bumper compliments the body lines perfectly. It fit on my XJ with not many problems. The swing-out tire carrier is easy to adjust and the latch mechanism has a nice, positive locking feel to it. The spare tire height adjustment is easy. It comes with the bolt-on hardware to mount a hi-lift jack. The packaging is super heavy-duty and my bumper arrived undamaged with every piece needed to put it together properly. CONs; Heavy, heavy, heavy. You’ll need to have a buddy help you put it on. The bolts that come with it are junk. They’re butter soft. If you put a decently powerful impact on them, you’ll have problems stripping them. The washers that came with the hardware package have the consistency of a paper plate! All of the mounting holes on the brackets and bumper are slotted. As soon as you tighten the bolts down, the washers bend and sink intto the slotted hole. Junk. I visited the local bolt purveyor and replaced everything with real 10.9 metric bolts, nuts and washers. While the packaging is awesome and really protects the bumper during shipment, it is a pain in the buttocks to get rid of. There is so, so much styrofoam to deal with. The cardboard boxing is awesome until you have to cut it up. Have a couple of spare trash cans handy and have a couple of razor knives available as well. You’ll need both!! Including the trip to buy new hardware, it took us 5 hours to complete the install. The ONLY metal fuel can that fits on this bumper is made by Midwest. The NATO style gas can WILL NOT fit. You’ll need to relocate the license plate and light. I ended up fabricating a new relocation bracket. ADVICE: This isn’t a complicated install, but as stated earlier, have a mechanically inclined buddy give you a hand. You’ll need a floor jack and some blocking to help position the bumper. Take the time to run a bolt through each fixed nut on the bumper and nut strip prior to trying to assemble it - trust me on this one - the powder coating boogers up the threads here and there and makes it impossible to finger start to bolts once the bumper is in position. You’ll need a 1/2” extension with a universal and a mallet will be very handy to align the whole assembly. Go slow. There’s a few things you need to remove and put back in place - follow the directions on this because you wont be able to put the bumper on without doing so. Bad news is, I wasn’t able to put the fuel tank skid plate back on in its original factory mounted position (in fact every YouTube video I watched on the install showed no skid plate in place after the install was complete). The bumper brackets just would not fit with the skid plate in place. I had to modify the skid plate and remount it after the bumper was on. Leave everything relatively loose until you’re ready to line it all up - leave the brackets on the frame loose enough to move. Once you have the bumper where you want it, tighten down the brackets to the frame under neath, remove the bumper from the brackets and tighten the bolts on the bracket where it meets the body (4 bolts together) then remount the bumper, align it again and tighten it up. Don’t over-torque anything. This being an off-road vehicle, I recommend using copper based anti-seize on all bumper-to-body bolts. The end result is every bit worth the time and effort.
S**S
Awesome.
Very nice. Fairly easy install. Did it by myself. Instructions are a little faded and hard to comprehend, but a little common sense goes a long ways. I can recommend larger "bump stops" on the bumper itself for the swing to hit once latched. I have about 1/4" of play in the swing once latched. I'm sure I can find some at a hardware store. Other than that. It's perfect. Glad I have a hitch receiver too. Comes with light tabs and rear quarter armor too. Which is awesome.
H**K
Heavy duty and worth the money
The only thing i did not like about this bumper was some missing hardware other than that for the money its one hell of a bumper and would highly recommend. People talk about stuff not lining up, well their wrong you just have to take the time and carefully look things over. The jerry can slot was a little tight so i pried it open a little more and got it to fit. Comes in a clean textured finish and overall a beefy bumper
B**N
This is a good bumper; but there are some hitches (no pun intended)
Great product; but it did not arrive on time per the purchase arrangement on Amazon. That was my number 1 disappointment with that process.The bumper: Overall, it has a great finish and seems well made. It's on the spendy side; but there aren't many options left for the old XJs if you want a tire carrier.The install: Besides some ambiguity in the instructions there are a few issues: The nuts on the bumper to attached the cross bolts for mounting of the actual bumper to the bracket system system - it does allow for up and down adjustment; but not fore and aft, which creates a problem if the gap is unequal between driver and passenger side. You either have to elongate the holes, or cut the welds on the nuts for the side you want to adjust, or both. Another problem: I had a hitch with a set of OE nut plates. The OE style won't work unless they are modified. The ones included didn't have a bend for the rearmost exhaust hanger. The thru-holes for the bolts are there; but some of the older XJs have a small nut plate in there for the exhaust hanger bolts. The OE plates clear. Exhaust issue - I have a 4 1/2" lift and my exhaust needs to be cut and re-welded/modified to pass by the shackle and this bumper. A stock exhaust tip doesn't really fit well. It would have been perfect if there was a clearance notch in the bumper for the exhaust. Final issue: The side armor plates are cool but... they won't fit a pre-97 XJ without some work. I didn't put them on. If you cut your fenders, you'll need to trim them. They're probably great for 97+
L**G
Where are my Smittybilt stickers?
When I buy a name brand item for so much money, I EXPECT there to be stickers. It is VERY HEAVY, so your rear will sag, I had to cut my wheel wells ahead of schedule due to that, and which in turn i had to trim the armor plates. Otherwise, the bumper looks great, install was a little sketchy. Oh yeah, Hey Smittybilt! I know a good editor that could fix your screwed up instructions. And what's with all the reference photos being backward? Doesn't anyone check the editing department's work? Also, you may want to explain things a little.
B**T
Doesn't fit a standard Wavian brand gas can. Had to cut and re-weld.
Build quality and packaging are great. Installation on 1998 Jeep XJ was easy. It looks and drives great. If they had addressed a few simple problems it would be perfect in my eyes.1. Serious design oversight: I was very disappointed to discover that my Wavian brand gas cans (ie the original "Jerry-cans" and the gold standard in metal gas cans that Wavian has been making since WW1) will not fit in this carrier. For something that fits you apparently need to buy a cheap knockoff gas can sold by Harbour Freight. I have several Wavian gas cans and I'm very annoyed than they don't fit. I probably would not have purchased the bumper had I known. I eventually cut and re-weld a section of tubing on the tire carrier to make enough clearance for my gas cans. Turns out I did not even need to add any material... literally just flipped a section of tubing (see images). Makes me think this piece of tubing was just assembled wrong at the factory.2. Minor design omission: If parked on even a slight side slope, the tire carrier will not stay open. It swings closed under gravity and constantly gets in the way. Workaround: don't park on a slope or only park facing uphill. But for the price I would think they could have added a detent mechanism to hold the tire carrier in the open position (just like every car door in existence).3. Minor design afterthought: The side armor plates don't line up nicely with the bumper. It seems like these were added to the package as an afterthought. The bumper does line up nicely with the body but would need to be about 1/2" longer in order to line up nicely with the armor plates installed. I chose not to install the armor plates for this reason. Instead I removed the old bumper mounting hardware, filled the rivet holes, and painted with rubberized rocker guard up to the same height as the bumper. The texture and color of the rubberized rocker guard are a great match for the bumper.
J**N
no regrets
The overall quality is great and strong as can be, it weighs 300lbs so I dont recommend it for weak load rated suspension systems such as skyjacker or factory so I would say get AEV or OLD MAN EMU. The tire carrier gives you a great range to raise or lower your spare and many places to mount a CB antenna. The only thing have to mention for future buyers is that you should be patient and have a grinder handy as it will most likely need little trim on the brackets to fit the way you want, set 6hrs aside minimum for this upgrade.
Trustpilot
2 weeks ago
2 days ago