🔥 Upgrade Your Comfort Game!
The ICM Controls ICM271 Fan Blower Control is an OEM replacement for Carrier HH84AA020, designed to enhance the efficiency of your heating and cooling systems. With features like pin selectable blower delays, high power relay output, and a dual function fan delay timer, this control unit ensures optimal performance and reliability for your HVAC needs.


D**R
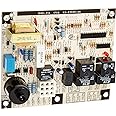
Drop-in replacement for Carrier 302075-304 HVAC Furnace Control Circuit Board (among others)
My old Carrier forced-air gas furnace was acting up, with the blower getting stuck on, but no warm air coming out. The problem was that the relay on the furnace's circuit board controlling the blower was getting stuck in the on position, never allowing the furnace to complete its cycle. I could tell because when I removed the furnace's service panel and gave the area around the circuit board a light tap with the handle of a screwdriver I could observe the relay get unstuck and the blower immediately turn off. After that, the furnace could again go most of the way through a heating cycle (pilot on, main burner on, blower on, main burner off), but with the blower again getting stuck on at the end.Replacement of the board was relatively straightforward. The components on the new board look somewhat different than the old one (mostly because it uses smaller solid state relays rather than big mechanical relays), but the dimensions of the board itself are identical, and the connectors are basically in the same positions. The only significant differences I noticed were:1. The positions of the COM and HI blade connectors were swapped on the new board relative to the old one. But, this isn't a problem since they are clearly labeled on both circuit boards and the blades were close enough to each other not to present any problem with wire length.2. The binding posts for the thermostat wires on the old circuit board were designed to wrap the wire around the screws, while the new binding posts were designed to slip the wires under the screws. The binding posts on the new one are a definite improvement, but you might want to straighten your thermostat wires with a pair of needle nose pliers so they fit better on the new circuit board.Before removing any wires from the original circuit board, be sure to take several pictures from different angles showing where the wires connect to on the circuit board and where they come from on the furnace. Label them if possible with the corresponding labels on the circuit board. You cannot rely just on wire color, because wire colors are repeated (at least on my furnace). You might want to use needle nose pliers and/or a small flathead screwdriver to help slip the blade connectors off.--------------------Notes on troubleshooting furnace problems:If you're reading this review, your furnace is probably acting up and you're wondering whether replacing your furnace's circuit board with this one will fix your problem. I am just an average do-it-yourselfer, not a furnace expert, but I will attempt to impart what little I've learned over the years working on old gas furnaces of my own.First of all, it helps to understand the basic steps in a furnace heating cycle, since things can go wrong any step of the way. On an old gas furnace, a normal heating cycle looks like this:1. When the air temperature drops below the thermostat's set point, the thermostat signals the circuit board to begin a heating cycle by connecting the RH wire (24 Volt AC) to the W wire.2. The furnace lights the pilot light by turning on the piezo-electric sparker (you can hear the repeated clicking sounds) and opening the pilot light gas supply valve.3. To avoid turning on the gas to the main burner before the pilot light is on, there is a sensor probe inside the pilot flame that must be heated up first. When it is, the main burner is turned on by opening the main gas valve.4. About a minute or so after the main burner turns on, the circuit board switches on the blower and warm air is blown through the ducts to heat the house.5. After the air temperature rises above the set point by a sufficient amount, the thermostat signals the circuit board to end the heating cycle by disconnecting the RH wire from the W wire, causing the gas to the burner and pilot light to be turned off.6. The blower will continue to run for about a minute after this, until the circuit board shuts it off.On step 3, if the pilot light lights but the main burner never turns on, it may be because the sensor probe is faulty. One way to test this is to apply the flame of a portable propane torch directly to the probe to heat it up. If the main burner ignites soon after this then the probe might need replacing. This is relatively inexpensive.On step 4, if the blower never turns on, then there are a couple of things that might be wrong. If the blower makes a humming sound like a stalled motor, then the start capacitor might be faulty. This is a device in a metal can, about the size of a deck of cards, often attached to the blower. A capacitor stores and releases electrical charge, helping the motor start up smoothly. As it ages, a capacitor may lose capacitance or it may develop increased parasitic resistance, both of which can prevents it from doing its job. Replacing the capacitor is easy and very inexpensive ($5 to $10). There are a few ways to test for a bad capacitor:1. If the capacitor is obviously bulging out, then it's probably bad and should be replaced.2. Use a meter to measure the capacitance and equivalent series resistance (ESR) of the capacitor. First look at the label on the capacitor to determine the nominal capacitance, and look up the part number online to determine the nominal ESR. Many multimeters have a function for measuring capacitance. If the capacitance is below the nominal value by a significant amount, replace the capacitor. ESR measurement capability is usually not included on multimeters, and measuring it requires specialized equipment. If you have that equipment, and the capacitor's ESR is higher than spec, replace the capacitor.3. If reaching in and gently spinning the blower motor causes it to start and run normally, then the start capacitor is probably bad. Obviously, this has to be done very carefully because of issues of high voltage and fingers near spinning blower blades.IMPORTANT: Start capacitors can store charge at high voltage and must be discharged before handling or testing. Failure to do this can cause injury to people or damage to test equipment. One way to safely discharge the capacitor is to touch the terminals of a 120V incandescent light bulb across the terminals of the capacitor and holding for a second or two. Using a screwdriver across the terminals to discharge is not necessarily a good idea since all the energy is released at once, which in rare cases could cause the capacitor to explode.On step 6, if the blower never shuts off, it could be because of a stuck relay on the circuit board. You can check this by opening up the furnace and gently tapping on or around the circuit board with the handle of a screwdriver. If the stuck relay releases and the blower turns off, then the circuit board should be replaced. Relays stuck in the on or off position could cause problems in other parts of the cycle. The troubleshooting technique is the same in those instances. (Note: A relay is an electromechanical switch that can be turned on or off by applying a voltage.)Another issue that might cause the blower not to turn off is a tripped circuit breaker on the furnace itself. The furnace has one or more circuit breakers (thermal and/or current) that can trip in certain circumstances. When this happens, one of the possible failure modes is the blower being stuck on. Inspect the outside housing of the furnace for circuit breaker reset buttons and try pressing them. They aren't always obvious. These are a good idea to check regardless of the symptoms, since they are easy to check and free to fix.
R**Y
Great replacement for 302075-304 control board
Bought this to replace the control board part # 302075-304 for my heat only Payne furnace. Purchased from Patriot Supply and it was shipped 2 day Priority mail the day I purchased it. Thank you Patriot Supply!Just to clear up some confusion, the board does not replace the mechanical relays with solid state relays. Both old and new have mechanical relays, not that there is anything wrong with that. My old board was original and installed in 1984.Symptoms: Furnace would go through heat cycle correctly except after reaching the set temperature, the fan would intermittently continue to run. Turning off the furnace at the thermostat would have no effect. Unplugging the furnace would stop it, but plugging it back in, the fan would start up again. Tapping on the rightmost relay, while holding the cover switch would stop the fan. Letting the cover button go and reinstalling the cover, the fan would start again, even with the furnace off at the thermostat.There are numerous steps here, but I would not label this a difficult repair project.Tools:Screwdriver, Flat blade1/4" nut driverNeedle nose pliers (optional)Wire cutters (may not be needed).Replacement procedure I followed YMMV:Read and follow the instructions that come with the board (disclaimer).1: Remove power from furnace. Turn off gas valve.2: Remove covers from furnace to access control board. I needed a 1/4" nutdriver.3: Photograph board as installed to confirm correct hookup of new board.4: Label all wires one by one as you remove them. Needle nose pliers help to get some wires off. I used my label maker to make labels .5: Once all wires are off and labeled, remove board. Mine had 2 1/4" hex head screws. There are tabs at the top, so slide the board down slightly then pull it out. Yours maybe slightly different, so look at it carefully.6: Examine old board for any jumpers that are intentionally cut. Refer to the instructions that come with the board.7: Reinstall new board, sliding it under any tabs if yours has those.8: Reconnect the labeled wires and any bridges or jumpers if your originally had them.9: Connect thermostat wires. The new board used a different system so you may need to trim or straighten the wires to go under the washer on the new board. This will be apparent if you compare the attached picture of my old board to the new one.10: Return power and gas to furnace. I'm assuming here your has auto ignition for the gas.11: Turn on furnace from thermostat and test.
R**Z
So far so good
Had an old board HH84AA011 and a relay went out so ordered this one and work great
T**T
Should have changed this years ago.
I have an old 1985 Carrier/Payne HVAC system and was a little intimidated by trying to fix it myself.I had cancelled my Home Warranty Insurance policy ($500/year +$100 Service call) after many needless hassles and hurdles to repair items that are supposed to be covered. So I decided to use YouTube to fix things around the house and what a money saver and fun new hobby that has become. I soon realized that the HVAC system isn't that complicated and after my blower fan wouldn't turn off - I knew that the control board needed to be replaced. At first, at the end of a heating cycle, the fan would cycle on and off 3-4 times. I dealt with that little annoyance for a few seasons but then the blow fan would not stop at all. This control board is exactly what was needed to replace out the old one. Very cool Amazon has these parts and at such great prices (a few HVAC repair sires wanted to charge $300+ for the same item).
K**C
2nd time around
This is my second blower board. The first one completely went out. I bought it new! I hope this replacement last much longer. This original board lasted 10 years or maybe longer.
Trustpilot
3 weeks ago
2 days ago