Desert Online General Trading LLC
Dubai, United Arab Emirates
Desert Online General Trading LLC
Dubai, United Arab Emirates


💧 Stay dry, stay ahead — the future of stormwater management is underground!
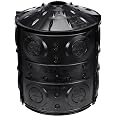
The NDS FWAS24 Flo Stormwater Dry Well System Kit is a 50-gallon, black plastic underground solution designed to collect, temporarily store, and slowly release excess rainwater. Its innovative gravel-free design offers 250% more detention volume than traditional dry wells, supports pedestrian and lawn tractor traffic, and can be stacked up to 8 feet deep for scalable stormwater management in residential and commercial landscapes.


| Material Type | Plastic |
| Shape | Round |
| Color | Black |
| Item Weight | 0.27 Kilograms |
| Item Dimensions L x W x H | 24"L x 24"W x 28.75"H |
| Capacity | 4E+1 Gallons |
Trustpilot
2 months ago
3 weeks ago