🗄️ Showcase your legacy — organize like a pro, collect like a legend!
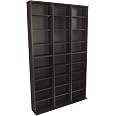
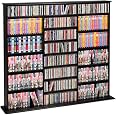
The Atlantic Oskar 1080 Media Storage Cabinet in Espresso is a large, freestanding unit designed to protect and organize extensive collections of CDs, DVDs, Blu-rays, games, and memorabilia. Featuring adjustable shelves, a slim 40.125" x 9.125" footprint, and a height of 71.375", it maximizes storage while fitting effortlessly into modern home or office spaces. Durable laminated surfaces, included wall anchors, and an extended base provide stability and easy maintenance, making it a best-selling, versatile solution for collectors seeking both style and function.


| Room Type | Hallway, Home Office, Living Room, Playroom |
| Number of Shelves | 1 |
| Special Feature | Adjustable & fixed shelves to maximize storage space, Easy-to-clean laminated surface, Extended base & included wall mount anchors for added stability, Flexible shelving options to hold optical media and other collectible items, US-based customer support team offers voice/email support |
| Product Dimensions | 9"D x 40.25"W x 72.5"H |
| Style | Freestanding storage cabinet |
| Finish Type | Laminated |
| Brand | Atlantic |
| Product Care Instructions | Wipe with Dry Cloth |
| Size | Large |
| Assembly Required | Yes |
| Number of Items | 1 |
| Manufacturer | Atlantic, Inc |
| Included Components | Cabinet side panels, Cabinet shelves, Cabinet backboard, Assembly hardware, Wall anchor brackets, User Guide |
| Model Name | Oskar |
| Item Weight | 61.5 Pounds |
| Furniture Finish | Espresso |
| Installation Type | Wall-Mounted |
| Specific Uses For Product | Inside |
| Unit Count | 1.0 Count |
| Product Name | Media Storage Cabinet |
| Shelf Thickness | 1 Inches |
| UPC | 031742357145 |
| Part Number | 38435714 |
| Item Weight | 61.5 pounds |
| Item model number | 38435714 |
| Is Discontinued By Manufacturer | No |
| Color | Espresso |
| Finish | Laminated |
| Pattern | Wall-Unit |
| Item Package Quantity | 1 |
| Number Of Pieces | 1 |
| Measurement System | Imperial |
| Special Features | Adjustable & fixed shelves to maximize storage space, Easy-to-clean laminated surface, Extended base & included wall mount anchors for added stability, Flexible shelving options to hold optical media and other collectible items, US-based customer support team offers voice/email support |
| Batteries Included? | No |
| Batteries Required? | No |
| Warranty Description | 1-year limited. |
J**S
One of the best gaming storage centers I have found
I have a decent sized gaming collection of over 1500 physical games from a large variety of gaming consoles I have collected over the years. I purchased two of these cabinets to help me with storage. I also have two other storage cabinets that are much shorter.I have a lot of good things to say about these cabinets, and just a couple of issues with them. Let's discuss the good first.GOOD POINTS1) The cabinets shelves are just right for storing games, blu-rays, etc. They are at a good depth so that the games are not hanging over the edge, but not so deep that space us wasted.2) The shelves are adjustable for height, at least for the most part. (One of the issues will be discussed under the not-so-good points.) So not all video games cases are the same height. These shelves all adjust height, which is perfect for some of the more unique video game requirements. All of the standard sized cases fit within 7 inches of shelf height. In the PS4, Xbox One, Switch generation the cases are not as tall. You can either shorten the shelves to make space, or stack the games flat with their spines out if you have too many. The issue comes with games like Sega Genesis and Nintendo 64. They are not nearly as tall and they have rounded tops that makes stacking them difficult. To solve this I was able to split the shelves into 3.5" height and then store those games on their flat bottoms. It works very well and keeps dust out of the contacts. I know there are cases you can buy, but I currently have 88 N64 and 50 Genesis games and it's just too expensive to buy cases for all those games.3) Once the units are assembled they are very stable. They even have a way to attach them to the wall if stability is a concern. Without the shelves in place the cabinets can seem a little flimsy. But the shelves are part of the structure, and once they are in place everything firms up quite nicely.4) I really like the look of the units. They are clean and sleek looking and fit really well in the room. Also since they don't stick out far into the room they are efficient and compliment my collection rather than dominate the wall as some cabinets I have tried in the past.NOT-SO-GOOD POINTS1) The top, bottom and middle of the units is not as flexible for placing shelves. The holes on the sides for placing shelves stop quite a ways before the top and bottom of each section. This means you have to plan your needs to have taller items in those areas, whether you like it or not. So that means you are forced to have taller shelves in four areas of each cabinet. It's not terrible, but it is something to be aware of, especially if you are trying to keep games from of smaller size or of same manufacturer grouped together.2) This is a small but annoying problem you should be aware of when putting everything together. I recommend studying the diagram very carefully so that you don't put anything together upside down. Pay attention to the holes for the sides and how they should orient together. Also know that the bottom goes on before the back, which creates an issue with getting the back nailed on since the unit wants to come apart in the middle since the front of the unit is not flush with the bottom (it's the back of the unit that's flush). My first cabinet did not go together so well because I did not fully understand what the diagram was showing me and because one of the metal twist rings that hold the top on crumbled The moment I turned the screw. The second one was much easier. Fortunately when the back is on and the shelves are in place it firms up nicely. Just be careful moving the unit when the shelves are not in it.Please understand that the good points far outweigh any not-so-good points. If I ever get rid of my other game cabinets I would not hesitate to get another couple of these shelving cabinets. I highly recommend them for storing games and movies.
D**.
To assemble easily and without breaking anything!
Important! How to assemble-- I bought these for the size and capacity and read the comments about how to put together so it doesn't snap. I thought I figured it out for the first one, it snapped, then I figured it out for the second one and it went together in 30 minutes quicky, smoothly, and with NO issues. No breaks, nothing. And looks great.Below, I have tried to make clear the steps I followed for a very successful build--bear in mind, the other comments were helpful, but did not make the steps clear.Here is how to do it, from someone who is not skilled, but was able to build in 30 minutes with no problems:1. Build the top first. And that means connect the top piece of wood as well. Build with the finished side facing you.2. Turn over.3. Nail the correct backing to the top.4. Now, work on the bottom. Build with unfinished side up.5. You are "changing" from the instruction page here.6.The wooden sides are opposite the instruction picture because you need to building this bottom section with the unfinished side up. This is key. If you don't, it will snap when you turn over. It is unconnected, unsupported, and if you follow the instructions, it HAS to snap.7. You need to build this opposite way so you can nail the back on it easily for support. This is the Holy Grail bit of advice for building this--if you follow, it will be perfect.8.Just keep the same wooden sides next to each other like the picture, but in reverse since it is upside down from the instruction photo. Translation: the letters on each piece of wood need to be next to each other like the picture, just turned so that the shelving pin holes make sense.If I can figure that out, anyone can.9. Because the base sticks out, it won't be flat when unfinished side is facing up. That's another snapping issue.10. I used 7 of the little shelves to place under the sides to "level."11. Screw in the sides, and level them as well for support.12.. You should be ready to join the 213. BUT here is where it can snap.14. Put levelers (I used the styrofoam and cardboard from box to make the Bottom half as high as the the unconnected top half (which should still be on the levelers.)15. Slide the bottom over to the finished top--which is heavy and supported.16. Note: I put some wood glue on the wood pins, but it does not matter.17.Both halves should be same height, and you should be able to position the bottom (unfinished side up) into the pins without any problem or stress whatsoever.18. Push together and tighten those cam bolts.19. IMPORTANT20. Nail the second backing panel into the back. Use all the nails and make secure.21. Congratulations, the hard part is over.22. It should be stable, but I turned it on its side, and slid it to where it would be resting.23. I did this by myself, and it was perfect.The problem with all the other reviews saying build it side first and nail on the backing--they did not say when you had to change from the instructions, and that created confusion.I hope this helps! It certainly made it easy for me, and I just ordered 2 more.When built like this, it really was as advertised!
Trustpilot
2 months ago
5 days ago